Liberty nights

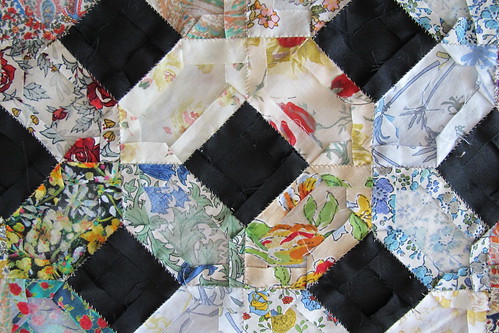
I’m publicising my nightwear again. Completely decently I promise. Fine lawn is cool to wear and folds up small and light for travel. Add a busy print and it’s more decent in the opacity sense. Liberty Tana is of course perfect. I made a kimono style robe for summer traveling some years ago from a beautiful orange tulip Tana. I’ve been wanting a gown to go with it. I decided to use some of the left overs from the lattice patchwork, including the tulip print.

While working on the lattice, I found this second hand purple dress. It didn’t fit, but I rather thought the fabric might be Liberty Tana. It was home made, so no label to identify it. I now think it probably isn’t, but it’s very close in quality.

.

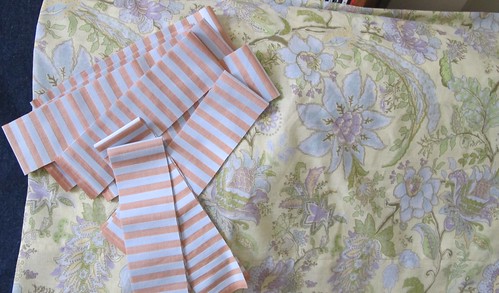
I used a little of it in the lattice. I deliberately kept the skirt whole, figuring it would be good for something needing acreage. Then I realised I could build a patchwork bodice, and use the skirt for this gown. I got a few squares out of the purple, enough to tie the bodice in visually. Measure the pattern. Work out a good size for the squares and how many are needed. Start laying them out:

IMG_3409

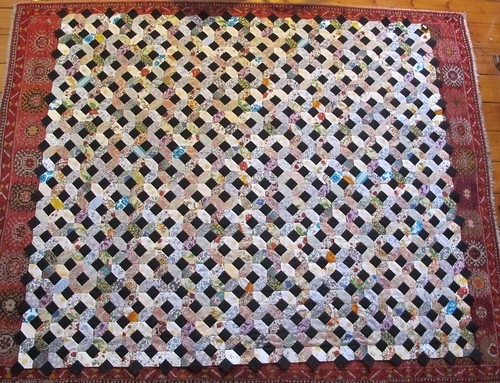
Assemble the rough shape. This is for the front.

IMG_3411

Then cut the pattern out of it, cursing when you realise you need to put darts in it.

..

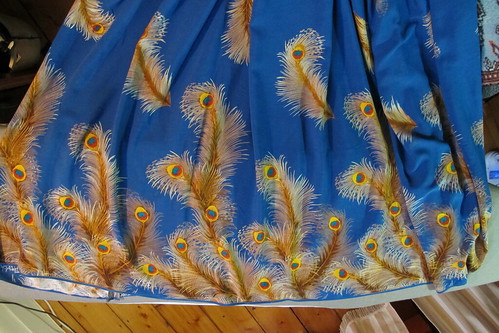
Assemble the bodice, all with flat felled seams to keep it single layer and minimum weight, maximum cool. Adjust the skirt so it can be attached flat to the bodice. To maximise fullness neatly, I put an inverted pleat at centre back. The hem is the original with a bit of tweaking where I redid the seams.

. .

A quick pic of it on. It’s baggy deliberately but the colours, though strange, work for me. No smile, I had a grump on.

.

The neck and armholes are finished with teeny straight grain facings, a trick I’ve adopted from my medieval costume work. It uses little fabric, is fairly quick to do and strengthens the edge.

IMG_3431

Here it is with the robe over. I’m pretty happy with it.

.

and a gratuitous label shot. In this case the label is recycled from a now too small shirt.

.

Lattice is Layered

I had meant to do just one post to cover the latest stages of the insane lattice quilt. I’ve broken the prep of backing and binding down into two separate posts or this would have been a huge monster post. This post is really just a pic-fest celebrating having gotten this far.

Using proper layering technique as taught to me by a good friend makes more sense when working on a queen size quilt rather than the small cot quilts I’ve done more recently. There is just so much fabric and batting to deal with. This is the (wool) batting half laid out. The backing is already positioned underneath it.

IMG_3243

The patchwork beginning to be added, still folded in quarters.

IMG_3244

Last chance for pictures of the back of the patchwork sans papers

IMG_3248

IMG_3249

All layered and safety pinned

IMG_3262

A final arty shot

.

Now I need to refine my plans for the quilting pattern. I started to chalk it in but I’m glad I had to leave the house for an appointment because I’m not happy with plan A. More thoughts needed.

Quilt Pre-Binding Experiment

I spent all day Sunday getting the lattice quilt ready to layer. This was the second stage after piecing the backing. This lovely cotton shirting woven satin stripe fabric is what I landed on for the binding.

.

It looks good with the backing (and you will see it with the patchwork a little later)

.

I had spent a bunch of time thinking on how I was going to bind this quilt. The way I had stitched the blocks meant that I couldn’t open the edge seams without cutting the fabric or unpicking the hand stitching, neither of which I was up for. I usually apply the binding after the quilting is done. However if I did it then, I really didn’t think I could apply it this close to the edge with the squishy batting as part of the mix. So I thought I’d try sewing the binding strips on before both layering and quilting. It worked fairly well, but I had forgotten that all the edge pieces are on the bias. So sewing on the binding had the risk of stretching or condensing the edge. I seem to have stretched it just a bit, but I’m pleased with the accuracy in terms of closeness to the edge. I very much hope that slight stretching is tolerable in the finished piece.

First the binding strips are joined to be long enough for each side, then pressed in half lengthways. No pics of this, sorry.

Then I cut the protruding edge squares back to provide a cut edge guide. Leaving a neat 1/4″ from the block edges was the right measure to use the machine foot edge as the seam guide and just barely catch the block edges in the seam.

IMG_3220

The little black offcuts look a bit like moths or bats 🙂

IMG_3225

Machining the binding on:

.

Pretty happy with this

IMG_3255

Then the binding is pressed away from the edge. I do like the colours and the stripe effect next to the patchwork. It will be a little less than half this width in the end.

IMG_3239

Pattern Matching Success

This rather pretty large scale print is going to be the backing for the lattice quilt. I had enough acreage but needed to piece it to make the right shape. I haven’t done a lot of pattern matching, big prints not being something I work with much. When I had tried, it hadn’t gone well. With prints, you can’t rely on the pattern being positioned squarely or evenly on the weave and they can be hard to match by eye when seaming them face to face. So I came up with a technique that worked a lot better than my previous attempts. I shall share it here, though I rather suspect I’m not the only one to use it.

Cut (or in this case tear) your sections with some extra seam allowance for shifting of the fabric to match the print. In this case, I had 2cm on one side, about 4cm on the other. Press under the smaller allowance and pin close to the fold over the other piece, matching the print as best you can.

Flip over the top piece without shifting the seam allowances. Pin as close to that soft fold as you can.

IMG_3195

Flip back and take out the first lot of pins.

IMG_3199

Flip over again and sew along the pressed fold

.

I was pretty pleased with how this came out. It’s now all ready for the quilt layering.

IMG_3208

Lattice patchwork finished-again

.

There. The two new strips of blocks have been added to make a slight rectangle. They have blended well, as I hoped. You wouldn’t know they were a late addition except that I’ve told you.

Now I need to decide on edge treatment before I remove the papers in the edge pieces. I had thought I would put this aside for a few months, but I really want to continue with it and I think this will fit as the next major hand work project in my (extremely rough) project schedule.

Peacock Dress

I think I’m supposed to be making some new lightweight jeans type trousers, but this fabric snuck out of the cupboard and demanded to be made up. 2.5m of peacock feather border print rayon. Not a lot of thinking. It just wanted to be a simple sleeveless bodice frock with a gathered long skirt. Having just proven that the bodice pattern I made last year still fits, this was quick to cut.

.

I don’t enjoy marking or sewing darts. Sometimes one just needs the shaping though. A lined bodice like this requires a dozen darts. Sigh. The skirt had to be cut on the cross grain to put the border on the hem. I cut the bodice on the straight grain from the less feathered side of the cloth. This was to better take the weight of the skirt and leave more length for the skirt. It also put seams front and back and caused some awkward feather placement at centre front. Hence the addition of the brown lace, which I happened to have (in the large and overflowing lace box, ahem). The lining is fine slippery and cool bemberg rayon left over from lining some wool trousers years ago.

.

The advantage of invisible zippers is that they are mostly invisible. Der. One can use a coordinating but non matching zipper from stash without problems.

IMG_3120

A better shot of the glorious hem print. I was lazy and just left the selvage as the hem.

.

and a couple of shots of it on in the fading light:

.  .

Reworked Hair Sticks

About six months ago, I nearly jabbed a friend in the eye with my hair stick when turning my head for a hug. I decided that my over long and too pointy hair sticks had to go or be altered. I’ve put aside some of the metal and plastic dpns* I was using and have had fun converting a couple of wooden ones and paint brush handles into appealing and somewhat safer hair sticks.

.

The only one that went as planned was the white pearl stick. That was a worn out paintbrush with the ferrule pulled off. Sanded back, coated with white gouache paint, said paint rubbed off as much as possible with a damp cloth, let to dry, then varnished. I’m really pleased with the effect.

The wooden dpns were much more troublesome. That wood turned out to be very brittle, so I couldn’t achieve plan A. The shorter one splintered several times during both sawing and drilling before I gave up on plan B and came up with plan C. I’m amused by the piercing effect. Hoping that one is in fact long enough to function properly (edit: Woot, it does)

This is a better shot of the first two I made:

.

A demonstration of one in use:

.

The smaller paint brush one was previously my favourite hair stick in it’s paint brush form. I didn’t want to clean it up too much so I didn’t at all. I just pulled the ferrule off, glued a wooden bead on the end and gave it rough coats of black, then gold acrylic paint. I love the finished piece despite the grungy handle.

.

*dpn=double pointed (knitting) needle.

Chocolate Sack Shirt

I wanted a shirt like garment to sew on the new Bernina 1120. I had a rifle through stash and came up with this.

.

A pure cotton single quilt cover set with a really appealing pretend sack print, that I had found for $20. I didn’t want to sleep under it, I wanted to wear it.  I unpicked a few bits to maximise the text print lengths, washed it, cut off the backing (sadly just plain white, will be put aside for other use) and spent a bit of time doing some large scale fussy cutting.

IMG_2881

I used pretty much all the printed fabric, including the pillowcase and produced this:

. .

Buttons are shell as usual, only with the shiny side down. The backs of these are such a good match for the fabric.

.

Here it is on. Ah breasts, spoiling the drape of simple garments for eons. I’m not yet sure if this will be worn as a dress, a tunic or nightwear. Possibly all three at different times.

.

.

Good news. The 1120 performed like a champion. Mostly. I tended to forget I was sewing on a different machine, it is so like the one I’ve used for 24 years. There was a little hesitation during buttonholing and once the needle position didn’t reset on turning her on. We will see.