Back on the dressmaking horse

I had not machine sewn anything for ages and the last garments had been cut at least a month or two before. I had not planned and cut out a garment since well before easter. This one however has been in my head since I picked up the fabric at a destash sale a few years ago. Vintage turquoise wool crepe. I guess the vintage part from 88cm fabric width!

The project started well, I couldn’t find the pattern! I knew I’d worked out a princess seam bodice pattern, but could I find it? Not at all. Then I remembered I’d cut one out for one of last year’s dresses, then changed my mind and cut another. I dug through the scrap boxes and found it!! Hurrah for thrifty habits.

IMG_0511

Just to be sure and because I had barely enough fabric, I cut a toile bodice and did some fitting tweaks. Then cut everything out. Bodice, skirt, linings. I love the resulting neat pile of pieces. Just as well, it sat there for at least a week while I continued to be obsessed with spinning.

IMG_0527-1

Eventually, I spent a day forcing myself to tackle it. I so wasn’t in the right head space, but I got the bodice together. This pic is later of course, but it’s of the bodice :-). The buttons are reminiscent of Dutch Knopen jewellery and I’ve been waiting for the right garment to use them on.

IMG_0664-1

I stopped when I couldn’t brain the skirt placket. I knew it would come together in the morning, and thankfully it did.

Of course she has pockets. I’d pick stitched the princess seam by hand to control the seam allowances. So I used a similar treatment to attached the pockets and finish the hem binding.

IMG_0673-1

img_0676.jpg

Here she is done! but shaped bodices always look silly just on a hanger

IMG_0679-1

Much better on. I’m pleased with the fit. It’s a loose in the waist for comfort. The skirt length was awkward to decide on. It would look cuter above the knee, but it’s a woolen winter dress so it needs to be below knee for warmth. Even longer would be warmer, but I didn’t have enough fabric to be properly long so it’s on the drafty side. Never mind. I have a plot for a pretty petticoat to wear under, but that’s another project.

IMG_0804-1

Shopping Bag Pattern

.

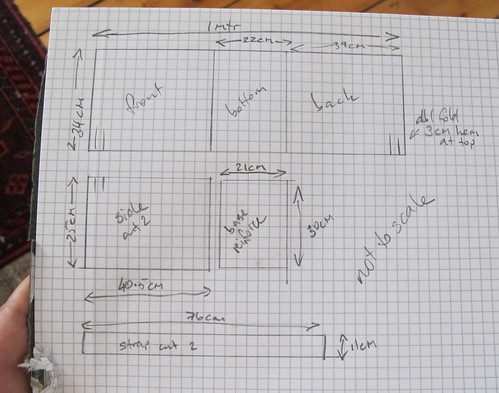
A friend asked for the pattern for my shopping bags. The directions might be a bit cryptic without pictures. Next time I make some, I’ll try to remember to take pics during construction and update this. Note that I haven’t drawn this to scale, use the written measurements.

As pictured, the measurements work for the soft cornered plain seam version.

Directions:
-Overlock around the base reinforcing piece and sew onto the wrong side of the bottom. Or cut it out big enough to press under a seam allowance before sewing on (this is bulkier of course).
-Sew the sides to the base with a 1.5cm seam, then overlock.
-Hem the top (double fold 3cm hem).
-Press the straps, long sides almost to the middle. Fold back on themselves and sew the ends shut. Clip corners, grade and turn open. Press neatly the whole length in half lengthwise ready to sew. Edge stitch both sides in the same direction.
-Place the straps on the front and back. I do them 12cm apart and 11cm from the top edge. Edge stitch the overlapped section with a few additional runs to secure the top edge.

For the stiff cornered reverse french seam version, add 1.5cm to the bottom depth (24.5cm instead of 22cm) to match to the side measurements. There is not a lot of point making this version unless your fabric has some stiffness to it.

Directions:
-Overlock around the base reinforcing piece and sew onto the wrong side of the bottom. Or cut it out big enough to press under a seam allowance before sewing on (this is bulkier of course and can conflict with the outer seam in this version).
-Sew the sides to the base inside out with a 0.5cm seam.
-Hem the top (double fold 3cm hem). If your fabric is heavy, it’s important to reduce bulk at the vertical seams as much as possible.
-Right sides out, Sew again around the side and base seams with a 0.7cm allowance. Sew each section separately, don’t try to sew around the corners.
-Press the straps, long sides almost to the middle. Fold back on themselves and sew the ends shut. Clip corners, grade and turn open. Press neatly the whole length in half lengthwise ready to sew. Edge stitch both sides in the same direction.
-Place the straps on the front and back. I do them 12cm apart and 11cm from the top edge. Edge stitch the overlapped section with a few additional runs to secure the top edge.

Almost Jeans Untwisted

I was really pleased with the last pair of almost jeans, except for the twist in the leg seams. I made pattern alterations pretty much immediately, then lost time to sewing machine dramas and a trip away. I got a pair cut out a few weeks back, but didn’t have a machine to sew them up on, hmm, I haven’t told that story here yet. Now I’ve got a very welcome borrowed machine, I’ve finally got these assembled.

Obligatory pockets shot

.

I have managed to banish the leg twist, yay! The pattern pieces look strange, but they work on my curvy, short legged self. Minor argh moment that I didn’t take a pic of the pattern, maybe later. Here are a few small pics of the new troosers on. Of course I hate the pics, but I do like the troosers.

. . .

Note for fit assessment that this is woven denim with no elastane. I’m not totally happy with the fly, either sewing or fit. I am pleased though that I managed to shorten a metal toothed zipper. One can just rip off the unwanted teeth with pliers it seems.

Next step is to have a go at altering the pattern to a proper jeans cut. I have a few other things to make first though.

Blue almost-jeans

I made a trouser pattern in a hurry in early 2016. I was pleased with the method, maybe more on that later. However, the fit of these was really quite baggy. I’ve worn the original of these (and the only dark blue pair) so much that they are now gardening trousers rather than worthy of being seen in. I was just going to make more to the same pattern, but decided to improve the fit. Gah, trousers are hard to fit! so many interrelated curves in all sorts of directions. I can’t buy trousers of any sort to fit me though, including jeans. So the effort is worthwhile!

This is not a true jeans pattern. It has darts at the back and patch pockets at the front. If I end up with a version I’m happy with, I might try converting it to more classic jeans construction. Then I’ll most likely change shape again eh?

The light is dim today so the pic on me is not wonderful.I’m cautiously excited by the fit I’ve managed though. This is heavy wool/cotton blend twill (denim? drill?) with no elastane. The fabric is really nice. I’ll be heading back to the shop tomorrow to see if I can get a little more for a repeat pair later.

.

I have fun with the decorative sewing on pockets. The designs are free hand drawn in chalk and then stitched freehand with a twin needle. This is my current favourite design. Gentle arcs are easy to sew. After taking the picture, I realised that these still needed the stitching run across the top, which I then went and did. I use a straight grain tape under the top folded edge to minimise stretching.

.

My fitting changes in the tummy/hip/bottom seem to have made the vertical leg seams twist, so I’ll have to fix that for the next pair. Not cutting any more until I’ve worn these though.

.

I feel I must add that testing fit in an underheated house in winter is tedious! How many times have I had these on and off in the last couple of days. 6 maybe?

Collar Issues

Sometimes it is brought home to me that I’m not as good at this game as I’d like to be.

This poor shirt has been lying part made, crunkled into a ball, since early January. The fabric is vintage Liberty Tana, bought from a shirt making firm closing down their Melbourne city workshop. I had wanted to make a fully classic shirt, including two part collar. I didn’t have such a collar to match my current shirt pattern, so I used one from my previous shirt pattern. I thought I’d checked the seam lengths, but it still ended up a couple of centimetres short. Boo. Once I’d convinced myself I couldn’t make it work, I threw a minor hissy fit, unpinned the failed collar and put the shirt bits aside. For months as it turned out.

.

Today, I decided that I would at least drape the constructed body/yoke on me to try to see what was going on. Aha. The neckhole is way too big. Why did I not see that before? It doesn’t look too bad in this pic, but that is the cut edge, not where the seam will end up lying.

IMG_0417

Given the neck edge was already clipped, I decided to revert to a narrow straight cut collar. Sad. Not what I wanted, but I’ve learned something.

.

See, too big. Pretty colours though:

.

I did at least make my first set of proper cuffs for ages, narrowed to better go with the narrow band collar. Also, my theory about making one of the wrist pleats a continuation of the sleeve crease seems to work. Hurrah. I thought that would make neat ironing easier.

.

Here is the whole thing:

.

and a sexier, more insouciant pose

.

FFF 2017 #2

Folk (music) Festival Fashion, second garment for this year.

I’m a fan of Indian block printed cotton, but it’s pretty hard to come by. Especially as yardage. Even in finished garments I don’t see it often locally these days. I’m also fond of circle skirts, as you might have noticed. So when I found some Indian printed cotton bedspreads with circular patterns on sale cheaply, I jumped in and bought one.

23684461madbl_1_1

It’s lighter weight fabric than I was hoping for, but the colours are lovely. I decided to make a loose dress that would also function as a pinafore/over dress. I started by cutting as large a circle as possible from the cloth. Then cut a bodice from the corners. Because of the limited fabric, it had to have seams front and back. Then I proceeded to make a series of changes and errors, all involving those centre seams! Silly me. I ended up with a bodice that fit, but which had only a tiny seam allowance centre front, which needed something applied to support it. I was struggling for a solution, until I remembered that I had yet to cut out the centre from the skirt circle. Aha! I could use that circle to both decorate and strengthen the bodice front. I had wanted a lower neckline, but given I’d had to cut the bodice short due to limited fabric, and couldn’t make the functionally decorative circle any smaller, the neckline depth was set.

.

The bodice is the pattern from the tricksy striped teal dress, only with the vertical darts left out so no fastenings are needed. That way I didn’t have to cut into the circle of the skirt. It’s lined with dark blue linen.

Here it is with the skirt on, all finished.

.

It’s not the world’s most flattering dress, but it’s comfy and fun and I like it. See the fullness of the skirt.

.

I’ve put a drawstring in at the base of the bodice, but I may not use it much. I think it looks better loose. Makes me want to twirl and dance.

.

Save

Save

Horizontal and Vertical

I’ve been wanting a new sleeveless, fitted bodice pattern for ages. Loose garments are easy to make and wear but tend to make us well endowed ladies look even bigger than we are. Patterning fitted things on oneself is annoying, but possible. This is entirely draped from rectangles of cloth. I didn’t want this really closely fitted and certainly not figure altering like some historical styles. So I tried a new technique of patterning only one side, the other held only at the shoulder and under the arm. This allowed me to slip the pattern on and off quickly to make alterations to the pinning. Mark the centres when done and voila. It definitely helps that I’m pretty much symmetrical.

IMG_9651-2

Then I needed to test the pattern. So I cut a white lining to test the fit of the pattern with both sides present. It needed a bit of tweaking, but thankfully only in ways that enabled the lining to be used. Then transfer the changes to the pattern and proceed to choose a fabric for the test garment.

This fabric has been out of the stash cupboard for weeks, begging to be made up, so despite it being one of the pricier pieces in my stash, I decided to be brave and use it. It’s pure cotton in a lovely teal with a white woven lace like stripe and texture in the background. From “The Fabric Store”, who have such lovely things that I’m sometimes tempted into paying more than usual for my fabric, even at sale time. I shell out for the occasional carefully selected piece.

IMG_9664

In my enthusiasm to get a test garment made, I forgot all about clever ways to construct a bodice to avoid hand sewing. I had already sewn shoulder and side seams before I remembered that isn’t the most efficient order of operation. So I ended up doing the neckline by machine, turning that out and facing the armholes with self bias tape. Oh well, it got done. The zipper is a recycled vintage one I had in stash. Cotton tape and metal teeth with a lovely clean action.

. IMG_9680

I decided to cut the skirt as a half circle, which inspired me to change the direction of the stripe on the bodice so the front is horizontal and the back vertical to match the skirt stripes. Amuses me at least. I’m very happy with the fit, a good shape on my current shape without being tight. There will be a few more versions of this made up soon methinks. I haven’t yet tried to see if it still works with different underwear. Fingers crossed.

IMG_9675-1 IMG_9672-1

Save

Mama shirt: stage two, trial shirt

The trial shirt reached Mama in the mail yesterday, so now I can post about it here. I had lots of ideas about what fabric to use for this, but finally settled on this dark blue linen*.

It’s a very plain shirt pattern. I was aiming for flat construction, no darts or pleats, but a gently close and flattering fit. It works quite well on me, how would it work on Mama?  Note that the lack of cuffs is by her request. The collar is a plain rectangle, I like the simplicity and it makes sewing easier, but won’t sit well under a jacket. I’m not sure why the yolk is sitting badly on one side, but it could be partly that Mum has slopier shoulders than me, more sloped than the hanger. It seems to set better on her.

.

A button detail. I like buttons and I’m pleased I’m getting better at buttonholes. Shell buttons as I prefer, except when metal ones work better. Mum is a clean lines lady so I sewed the four hole buttons on to suit, crossed stitching would amuse her less than I.

.

And look! it fits really well, or at least well enough. She is to tell me whether she wants any changes to the pattern before I make up the printed lawn. She has also asked for a copy of the pattern! I’m thinking that I was right that the armhole curves need softening a bit (not obvious in this pic) but that the neckline fits better than I feared, still might need adjusting though. Maybe a few mm more in the side seams over the hips. A jolly good outcome for a first attempt from the other side of the country though, and she likes it.

mama shirt-1

*fabric was a stash reject from a friend. The bonus of being a rare bird of a dressmaker is that people keep giving me their stash.

New Troosers

Two more pairs of troosers. Hurrah! I made a new pattern in three stages early this year and the resulting two pairs of almost jeans have seen heavy wear ever since. I really needed a few more pairs and now I have two. Yay. I want more but this is a good start, and two at once is enough of a production line for me.

No pics of them on me because I’m feeling blobby. The downside of making one’s own clothes is that one must actually look at oneself, properly, not that glancing, glossing over the bits one doesn’t like thing. My torso is composed of conjoined spheres, so not the approved look. However, these trousers fit better than anything I can buy in shops. So there.

The stripey ones get boring pockets because the fabric is too light to support the extra stitching. Yes I could have backed it, but I didn’t. So there.


.

The bright blue denim was bought at an opshop for $10. I hoped there might be enough for two pairs, but no, only one. I can probably get a short skirt out of the leftovers though. The zipper in the blue pair is a recently aquired stash reject and the buttons are from my stash. The stripey fabric is I suppose a cotton suiting. It is quite fine, tightly woven and has a brushed finish. Lovely stuff though it does crush.

Mama shirt: stage one, the pattern

Eight years ago, I went to Edinburgh to visit my brother. I found this pretty cotton lawn and brought a piece home for my dear Mother, who loves William Morris designs. On my last visit to family, Mama hadn’t yet done anything with the cloth, so I offered to make her a shirt.

.

What pattern to use? well, I’d just done up a new shirt pattern for myself, but Mum is littler than me. We tried my shirt on her, and I made a list of changes that seemed to be needed.

.

Today I got around to having a go at applying those changes and building a new pattern. However, without my model present for fittings and because I can’t replace the WM lawn, I’m going to cut and make up a trial shirt first to test the pattern.

.

I’m getting close to needing to replace my brown paper roll. Gotta keep the amazing vintage paper cutter in use.

.