Indigo stitch resist experiment

A dear friend of mine had a bunch of indigo dyeing ingredients fall in her lap. She was kind enough to invite me to join in with the dyeing day. I had done one session of the dyeing part before, including folded shibori style resist. What neither of us had done was prepare the dye bath. Thankfully we managed this just fine and it worked wonderfully well. It was also enormous fun. Indigo needs a warm, caustic, reduced solution to dissolve, so it’s a bit more complicated than some other dyes. On the other hand no mordant is needed. The process is extra fun because the dyed material comes out of the bath yellow and turns blue on exposure to oxygen. So it changes from yellow to blue via green and teal. Magic! I’m not going to try to explain how it all works. There is plenty on the web already to cover that. I’ve just put a few pics in to demonstrate how fun the colour change is.

Here is some of the first wool yarn to come out of the dye bath

20180818_123853

and here is the same yarn mostly oxidised to blue

20180818_124832

This is one of my pieces of silk half oxidised. Crazy stuff.

20180818_125442

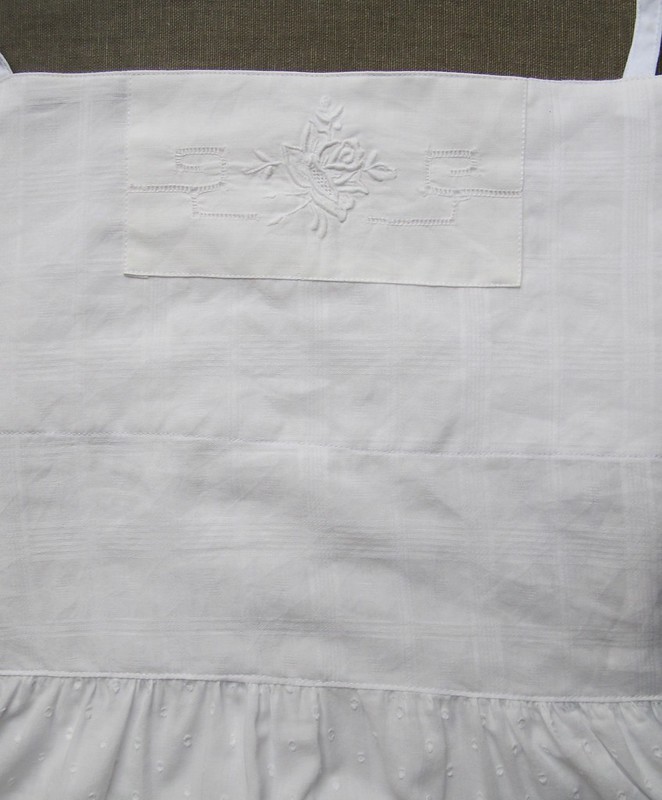
Jumping ahead. These are all my fabrics from the day, rinsed, washed, dried, pressed and waiting. I mean to show more detail of each as I make each of them up.

.

To the stitch resist samples: This is a technique I’d seen the results of but never tried. So it seemed like a good thing to include this dyeing day.

I had a go at what I concluded was an approximation of the traditional Japanese technique. I did it in a huge hurry without proper research. It worked at least a little, but left quite a bit to be desired. Well enough though that I’m inspired to find out more about how it should be done.

Draw your design. In my case a stylised generic vine design on silk crepe. Sew a tiny pinch pleat in running stitch along each element of the design. I read that one should not cross lines. So the leaves were done separately to the curved stem.

IMG_6532

Pull up and tie off as tight as you can.

IMG_6537

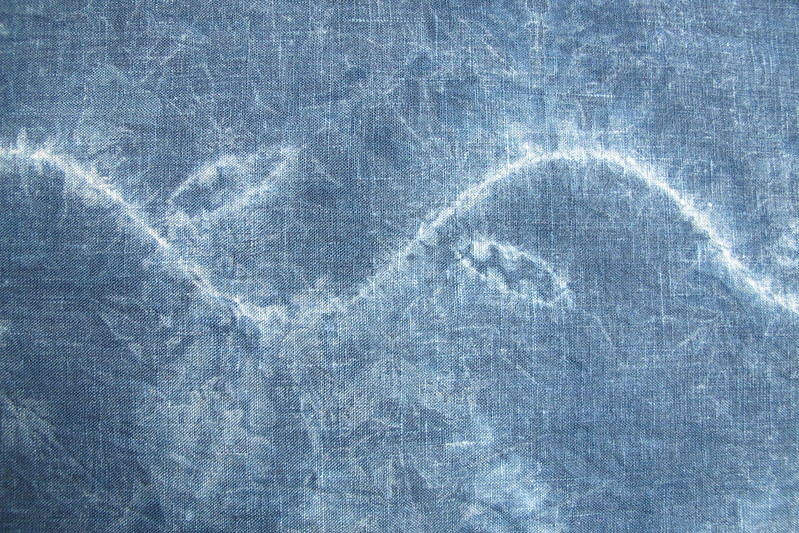
This is the section with the clearest result. I did a whole dress worth of edgings, most of which came out less well, but still well enough that I’m happy to make up the dress.

.

Another friend wondered whether a machine twin needle pinch pleat would work. So I gave it a go. I did the gathering by pulling up the bobbin thread.

IMG_6581

It works! in the sense that it produces an outline of the design. In my case, at least as well as what I think is the more traditional technique. Again, this is the best section. The effect is different but it’s much quicker to do.

IMG_6625

We didn’t manage to use up all the dye in the bath, so we get to have another go later. Woo hoo!

Tartan sack dress

Or modern sideless surcoat if you will. I’m in full pinafore dress enthusiasm. This is another version.

.

This dress has been in background planning for over a year. That it is now an actual thing feels vaguely miraculous . Having got my trial sideless in denim to the point that I enjoy wearing it (hmm, not written up here) and while the weather is still cool, it felt like time to finally make it. The fabric is a mid weight wool, a mere 1.5m bolt end. I had barely enough fabric. The stealth pockets had to be pieced.

IMG_6501

The bias facings and hem binding are tropical wool suiting that I overdyed especially for this dress. I just wanted a little touch of red. The binding red doesn’t quite match the main fabric stripe, deliberately. I’m aiming to trick the eye with a red that suits me better.

.

It has an “inverse flounce” at the hem. Is there a better word for this? I’ve seen this design element many times but don’t know what it’s called. I thought I’d have a play with it. It’s a bit of fun and serves to bring the hem width back in after the flare I need for fit.

.

Baggy, but minimally so. Certainly comfy.  If I make another, I might try raising the level that the “inverse flounce” starts.

.

Sneaking up on a pattern

Sometimes I make toiles. Sometimes I just make a garment with the pattern tweaks I think necessary and see how it turns out.

A few months back I sorted through my linen cupboard, which includes nightwear. Two favourite white nightgowns were starting to shred, but only the tops. So the tops were cut off and sent to the rag bag. The skirt of one has just been cut up to make a top for the other, with the addition of another slightly ragged embroidered cloth for decoration.

IMG_6452

The bodice is a slightly modified version of the one from my last post. Deeper bust darts, straight cut neckline, narrower and lower at the strap insertion points. Roses for prettiness.

IMG_6471

and one rose for the back:

.

IMG_6473

I’m happier with the fit of this and look forward to wearing it when the weather is appropriate. No, it’s not meant to go over a skivvi.

.

Eyes of Blue

A few years ago I bought a skirt from an opshop because I loved the colours and the print. It was way too small for me and covered in damaged sequins. A few months ago I sat one evening and unpicked all the sequins.

IMG_6127

So many sequins.

IMG_6128

A week ago, I picked up my two newly serviced Bernina 1030s. To test them, I needed something to sew. I won’t use this garment until the warm months, but I knew what I wanted to do and it helps me test the new bodice pattern.

All fabrics are reclaimed in some fashion. From bottom up. Op shop skirt. Floral offcut from a dress I made a few years ago. Satin stripe shirting from a friend’s cast off business shirt. Brown skirt lining. The blue trim at the neck is another offcut.

.

I am quite pleased with the mitred neckline. The “eye” motif is of course cut from the skirt.

.

I thought I may as well include the shirt pocket in the appropriate place.

.

And on, for brief moments. It’s cold! I love the colours. The waistline is a bit bigger than it needs to be and the strap insertion points wider. I’ll amend those for the next pattern iteration.

.

Strawberry Apple Rhubarb Jam

.

It’s strawberry season here, even though it’s hailing right now where I am. Grown in Queensland and shipped south. Today I bought 6 punnets for $10. Not quite market prices but pretty good for a supermarket. 4 punnets are now jam. I decided to use apples for the pectin, then looked out the window and saw some pickable rhubarb in my garden. A friend calls rhubarb “berry extender”. So that went in as well.

1kg strawberries, washed, hulled and roughly chopped
100g rhubarb washed and finely sliced. Could use more but this was what I had.
400g red gala apples (they were on special), washed, peeled and grated (discarded peel and cores)
4 ice disks lemon juice (~1/4 cup)
1/2 cup water
1kg sugar

Combine prepared fruit, lemon juice and water in a big pot. Bring to a simmer for long enough to soften the fruit. Stir in sugar. Heat gently until dissolved. Increase heat to a boil until set (about 25min today). I think it might be a soft set, which is fine. A bit hard to tell yet while it’s still hot. Love the colour though, which is a little deeper in reality than the picture shows.

.

Sock pair #33

My first pair of socks from handspun yarn, and I even did the spinning.

Beginning the knitting:

IMG_5257

After three months, though the knitting didn’t take anywhere near all of that time. Socks are an in between project for me.

.

So comfy. They fit well and feel lovely. Some of the yarn is really too fine and some is underspun. A much more skilled spinning friend pointed out that as one gets faster at drafting, one needs to allow what feels like more time to get enough spin in the fibre. The drop spindle doesn’t go faster to match your increased drafting skill. So I don’t know how long they will last to either wear, shrinkage or felting. I sure mean to wash them carefully.

.

and they match my handspun hat
Well at least partly. They are from the same fibres but the stripes are constructed differently.

.

Including a gratuitous arty shot. I’m enjoying the not too matchy colours and stripes.

.