Indigo Tiers

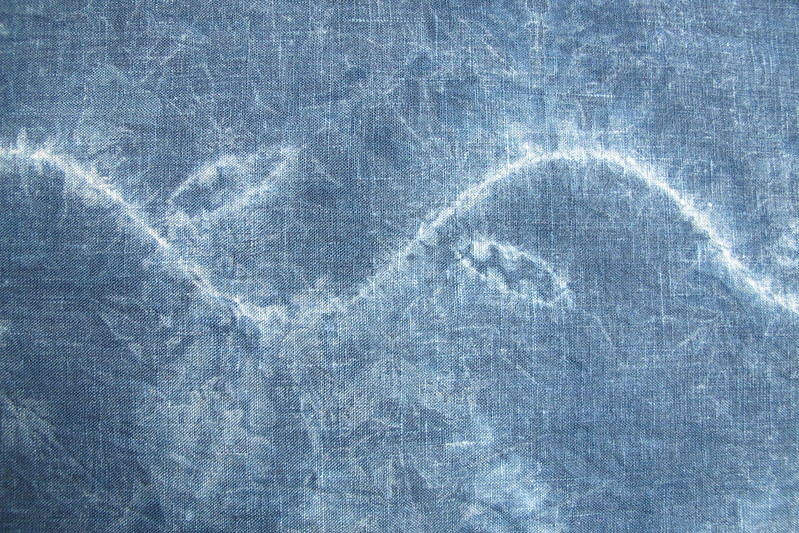
When prepping materials to dye in our indigo adventures three years ago now, I pleated up some fine, crisp linen(?)* with the intent of making a tiered ruffled skirt. I was working at speed to get everything ready in time and didn’t think hard enough about how much fabric I needed. This turned out to be only enough for a bit more than the lowest ruffle.

*Possibly not flax? Definitely cellulose fibre. My best guess is a cotton ramie blend. It was bought very cheaply in folded bales from a closed shop clearance sale.

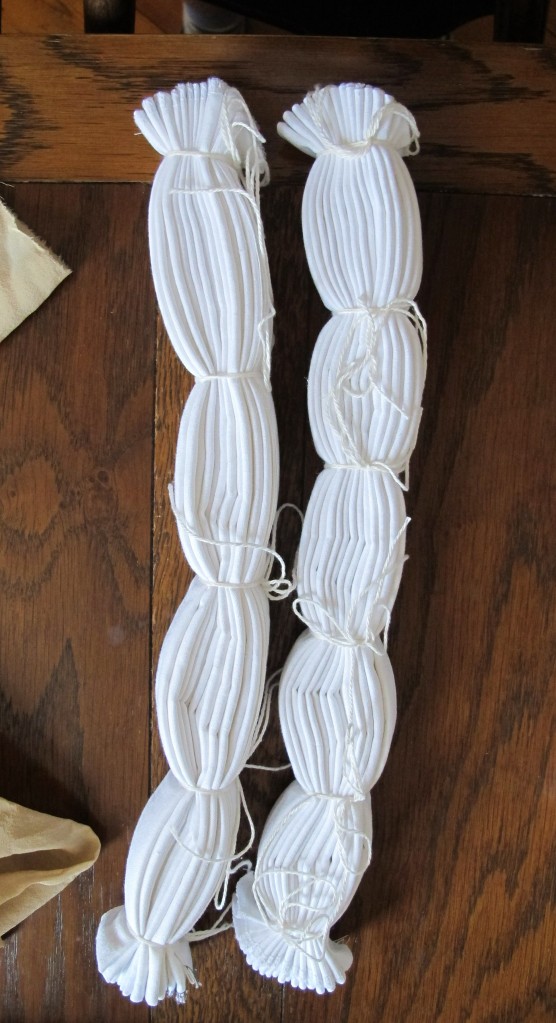
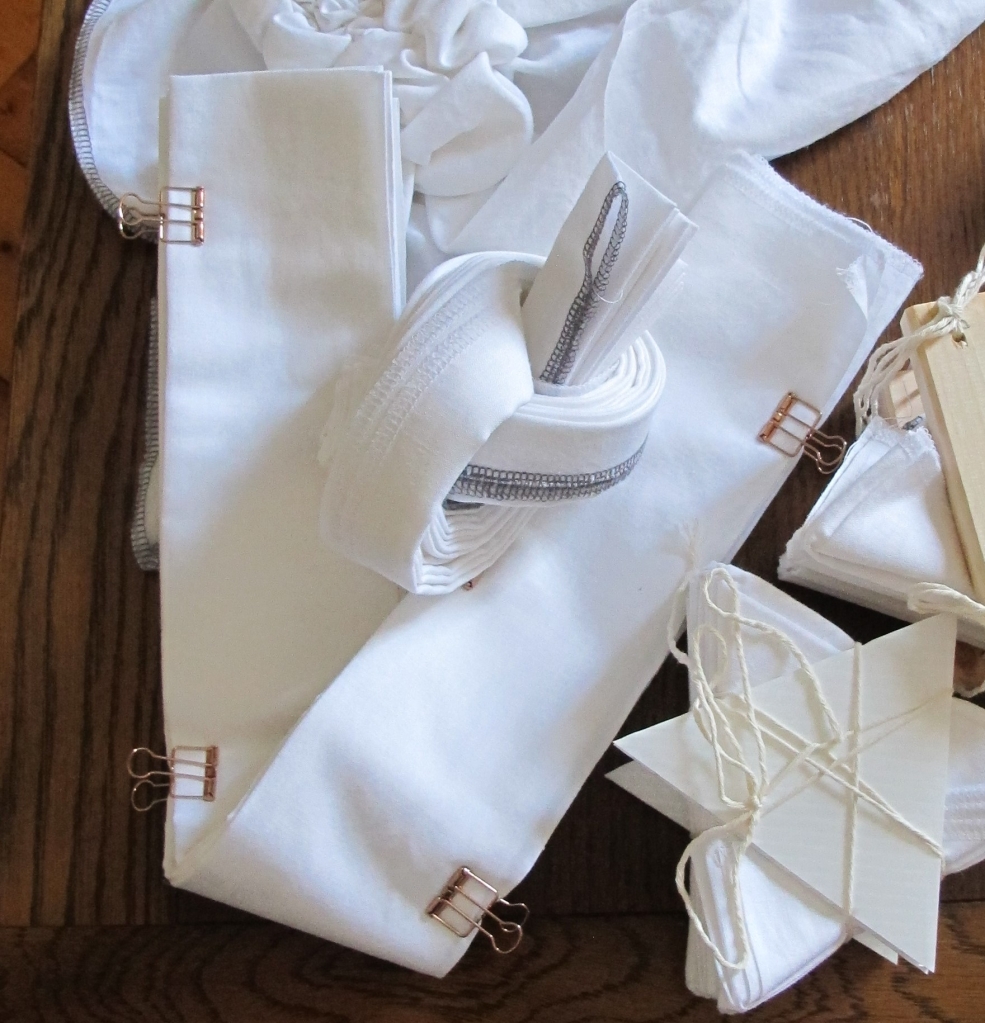
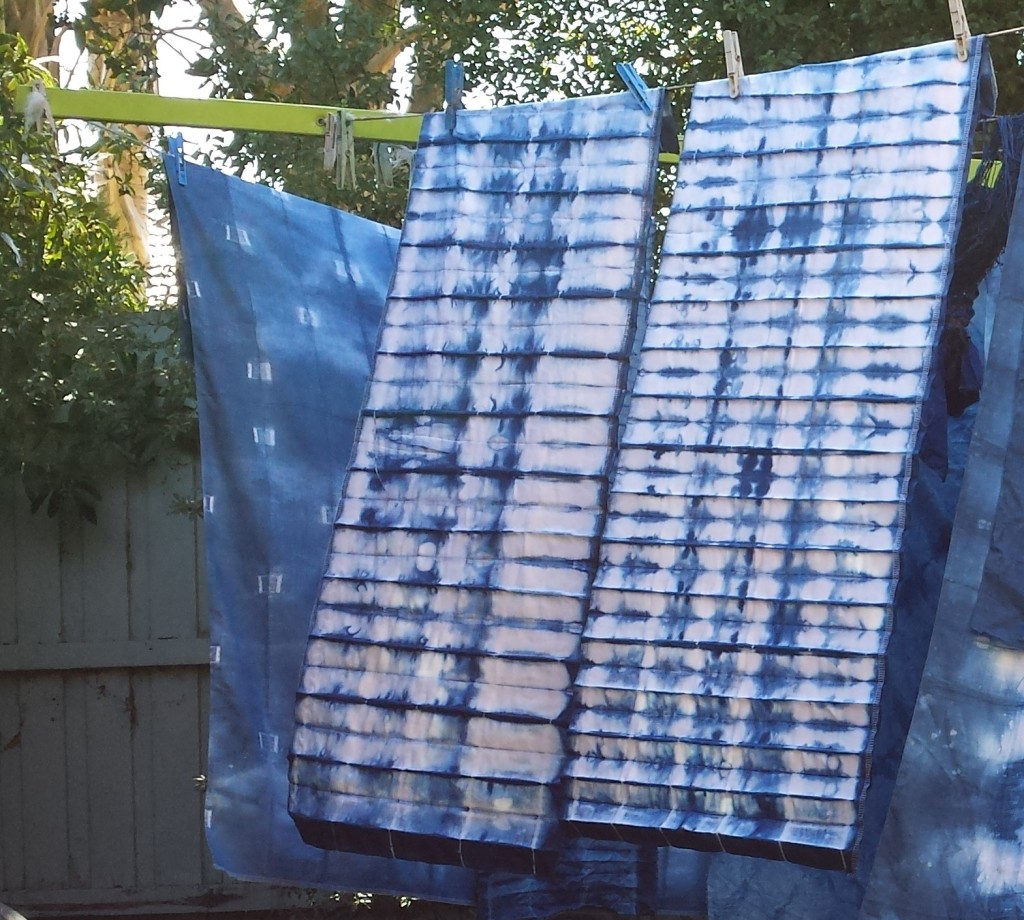
Happily, I also pleated up another piece of the same fabric but slightly differently and with no specific plans attached. This is the piece with the copper coloured clips below

by chance, I have a picture of these three pieces next to each other straight out of the dye vat

Argh. These images are bigger than I would choose to use. I’ve moved to a different computer and don’t currently have a copy of my usual photo editing program. Maybe I have to bite the bullet and shell out for it.

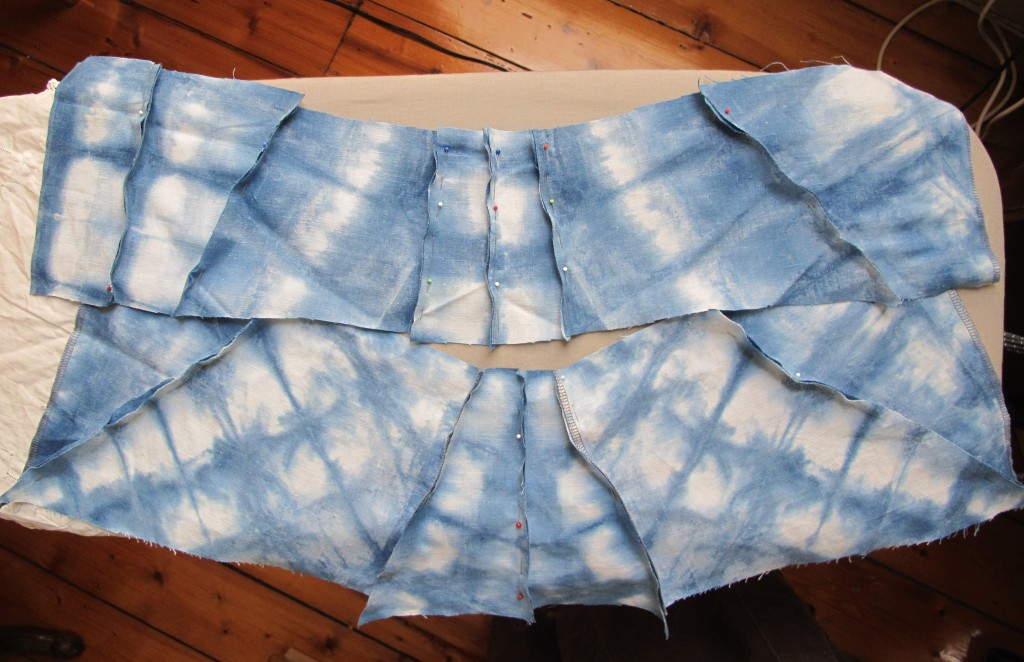
Anyway, All these pieces started the same size and were folded in three before pleating. So they all broke down most neatly to three 38cm wide strips. I used the darkest three for the middle tier and ended up needing 5 of the remaining six for the bottom tier. I still needed a top section to get the overall length I wanted. I originally meant to make another rectangular cut gathered arrangement for the top part, but flat to the body is more flattering even though it will mostly be covered in wear. So I fiddled appropriate shaped curved pieces out of the bits leftover from the indigo rays frock which is also and usefully, a slightly heavier fabric. This is just pinned, prior to final adjustments. Silly me fitted it over another skirt though so it ended up needing more overlap than intended.

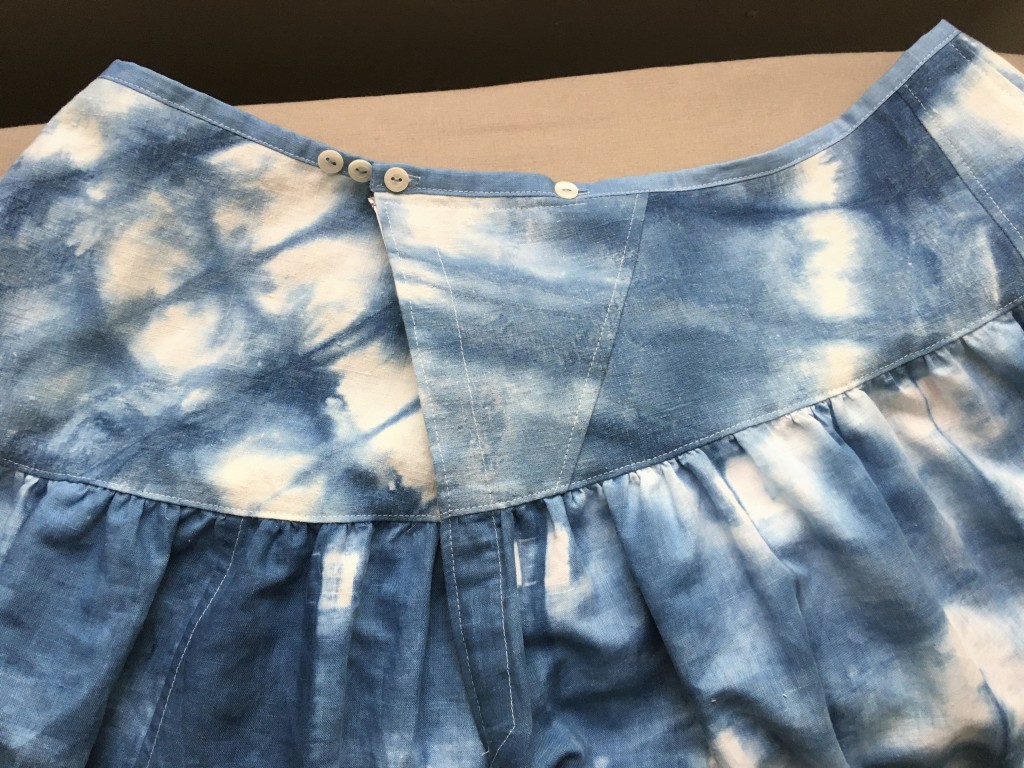
The fastening is similar to the overlap method used in this colourful remodel but buttoned instead of the ties used there. A friend suggested the buttons and I think I like them. They are more comfortable than the ties I think, but require sewing on many buttons to provide the same breadth of adjustment. Optimistically I have placed buttons for my current size and a couple of smaller options. Fingers crossed I don’t need to add more.

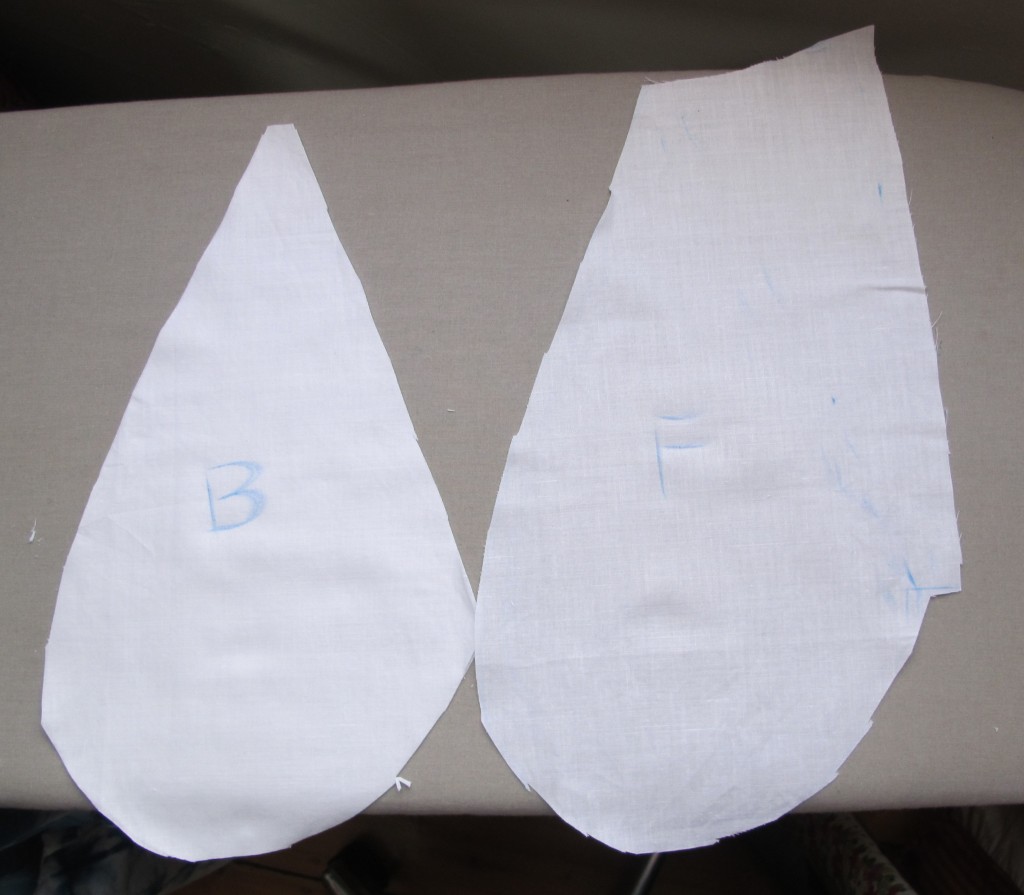
I couldn’t face braining the pockets until I’d finished everything else. So they are not sewn in as elegantly as if I’d planned them from the beginning. I’m happy that they work though, and I ought to be able to make nicer versions if I make another skirt of this kind. Here are the shapes. The front and back need to be different because of the overlap.

and after insertion: the two sides are sewn together below the opening shown. The front section is sewn in under the waistband to support the pocket and contents, so the pocket bag can’t be fully closed or one can’t get in and out of the skirt!

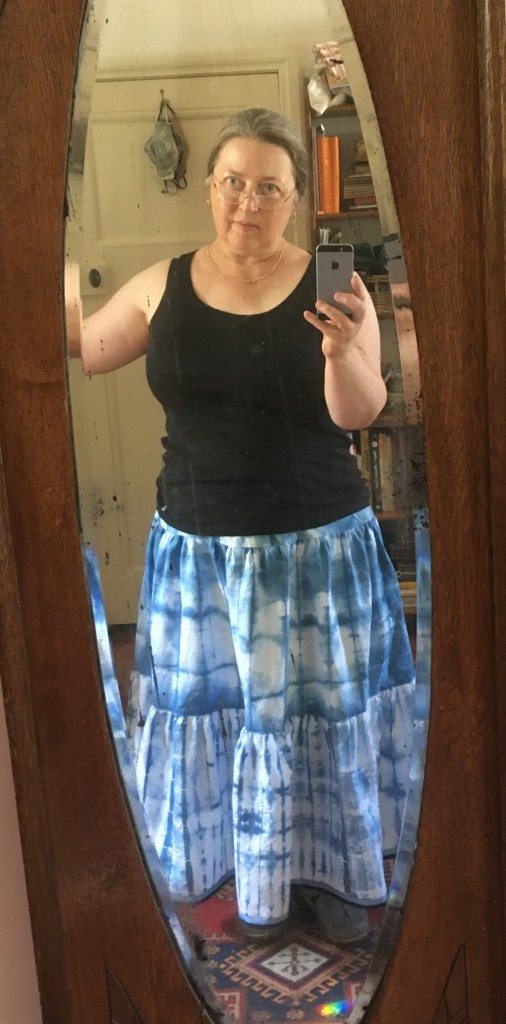
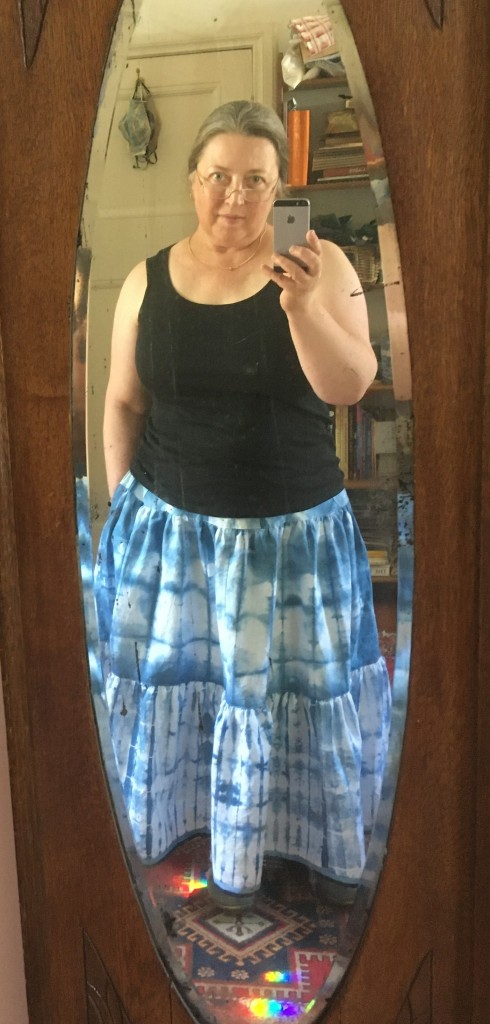
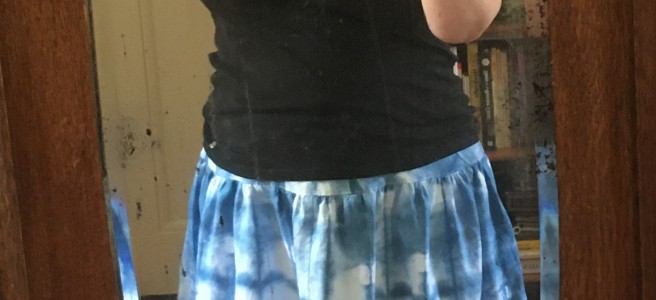
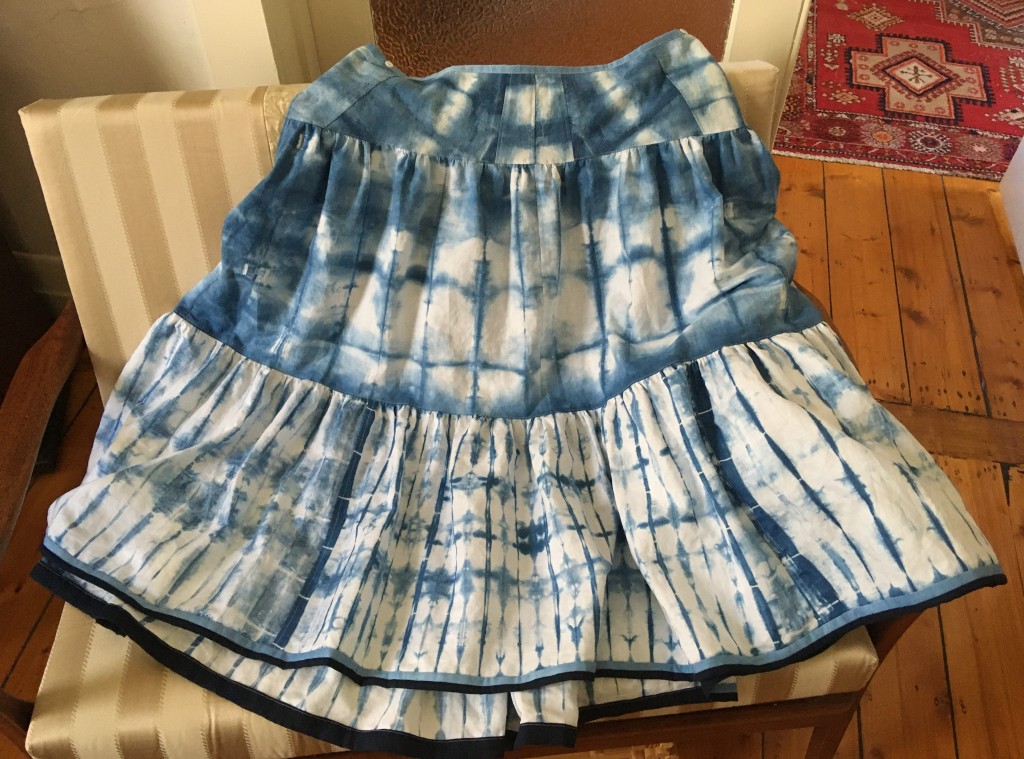
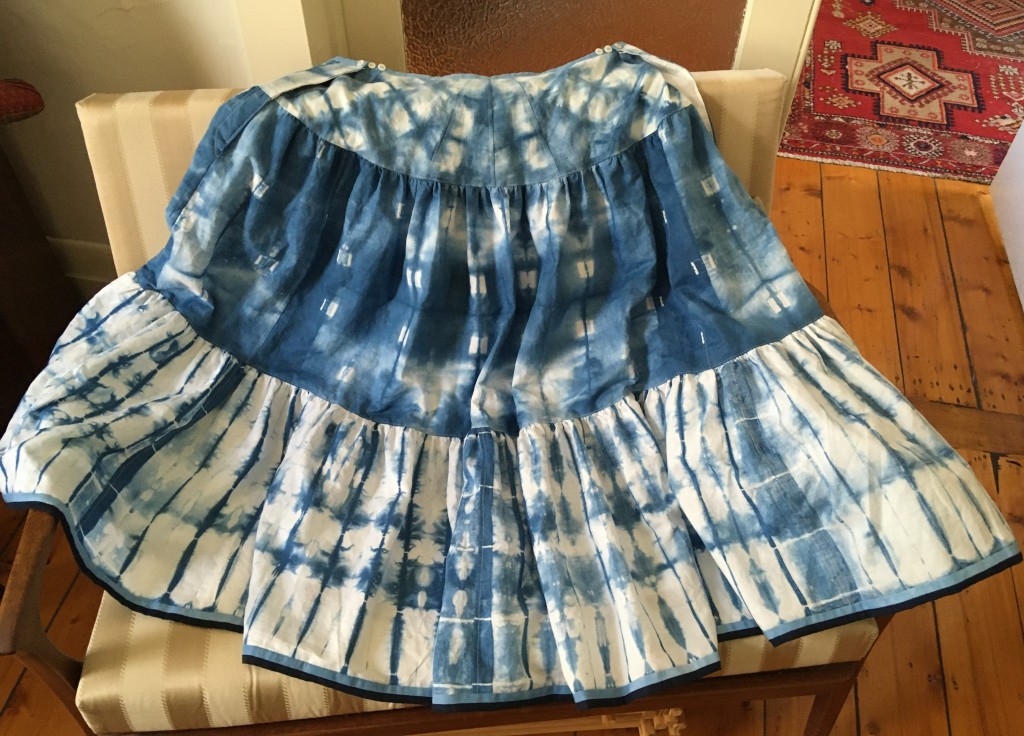
Here is the full thing, front and back

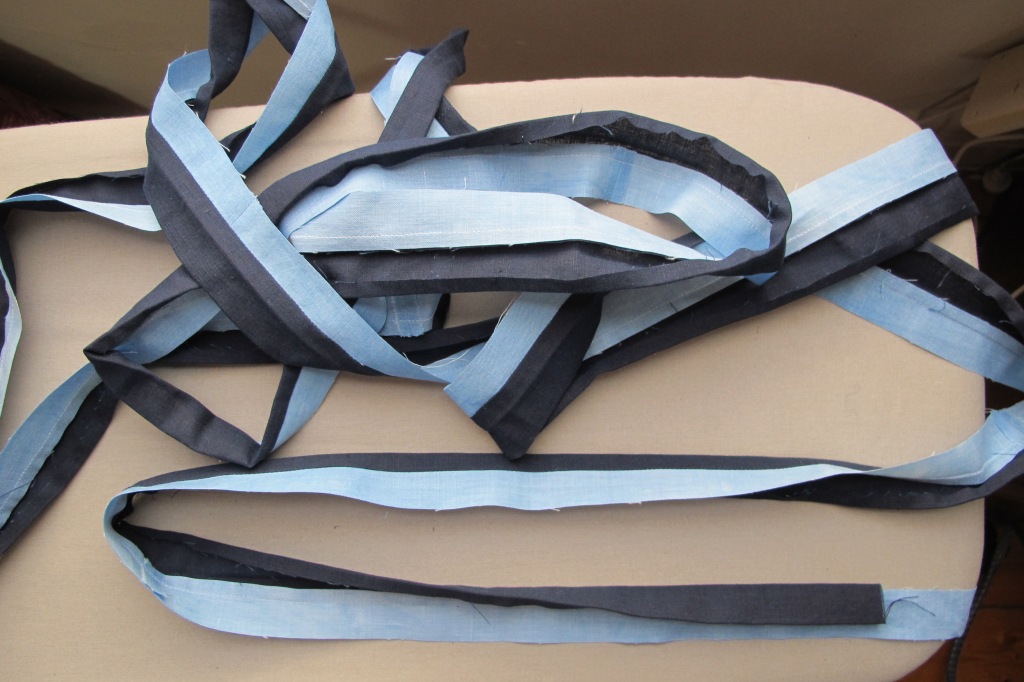
I’m delighted with the hem. I didn’t want to sacrifice any length, so I needed to bind it. Neither the pale blue or dark navy cloth sparked joy on their own for this purpose, but both together felt like a sweet solution, a subtly fussy detail. It took quite a few hours to achieve though. I used patchwork style rotary cutting for accuracy of the strips and fully assembled the border, sewn and pressed before attaching it to the skirt. Worth the effort I think.

A couple of shots of it on me, one demonstrating the pockets of course. My mirror is the wrong shape for taking pictures of full skirts, but full swishy skirts make me happy. I was worried this one might feel too silly, but happily I like it.

Cabbage Coat

“Cabbage” is an old term for left over fabric. I gather it was often considered tailor’s perks. The client would provide the fabric and the tailor got to keep the scraps left over. Anyway, I keep the majority of the cabbage I generate, plus bits and pieces from elsewhere. I sort it by fibre type and some by weave. I’ve been thinking I’d have fun making a colourful patchwork coat from the soft wool coating cabbage. I thought I might have enough, and as it turns out I did.

Pull it all out, decide on a plan, start cutting squares

IMG_4604-1

The main body pieces and sleeves cut. Gores, facings, pockets, lining still needed.

IMG_4609-1

Lay out the body to try for a pleasing arrangement of colours. I started with a checkerboard of dark neutrals and colours. Then I offset the outer pieces to reduce both seam intersection bulk and strong horizonal lines.

IMG_4613-1

Once all that was put together, I cut gores and pockets from the remaining fabric. Wasn’t easy, there wasn’t a lot left! They are all pieced based on available shapes rather than a pre determined plan.

Here it is at the point I felt I was happy with the shape. I also decided here to top stitch all those messy seams.

IMG_4686

So much top stitching. I was very glad of my edge stitch foot.

IMG_4804-1

Crazy gores and pockets. Even many of the main squares needed to be pieced.

IMG_4798-1

Corded buttonholes for neatness and longevity. I like that the button border sort of echoes the top stitching. Buttons are cast off stash from a friend.

IMG_4794-1

Lining is three kinds of silk/cotton. Teal satin from an opshop find, plain weave teal from a different friend’s stash castoffs, red satin that I have been using slowly for cushion patchwork and borders etc.

IMG_4791-1

Here is the whole thing finished. I love it.

IMG_4810-1

IMG_4812-1

and a couple of pics on me

IMG_4826-1

IMG_4847-1

Of course there is a long list of source garments for all the different fabrics. So it is a memory coat of sorts.

Repeatery for linkage pickup

IMG_4810-1

Schparkly handpainted silk remodel

9 years ago I bought a length of sequinned, handpainted silk from Eastern Silks in Adelaide. 5 years ago I made it up into a sheath dress. This fitted beautifully at the time. Maybe not the most flattering cut for me but the sort of thing the fabric wanted to be. The painted areas are a little stiff so it doesn’t drape nicely. It needs to hang in a smooth fall to display well. Dress version #1 went to a party, had a drink spilled on it, got washed and…. shrank. I had been an idiot and not pre-washed the painted silk. To add insult, the pale pink silk satin prewashed lining didn’t shrink.

Original, before party and washing:

IMG_4367-1

The poor distorted thing was far too splendid to ditch, but it took much time and thinking to come up with a way of resurrecting it. After hearing me musing about it, a clever friend suggested tabardising it. Eventually I concluded that was indeed the best idea. It was a lot of work though. Unpick the sides and shoulders, cut a deeper “armhole”, cut away most of the lining- which ended up remaining only as a facing for the front neckline. Then hand finish said front facing, and add facings of silk organza reclaimed from an old bridesmaid dress to all sides and newly cut back neckline. That might sound simple but by golly it was fiddly.

The shoulders needed more length to put the residual bust darts in the right place, and the sides needed ties for closures, so I pulled several coordinating skeins of perle cotton out of stash and plaited up some cords

IMG_2564-1

This is what I ended up with. Pretty and floaty but obviously can’t be worn in public as is.

IMG_2651-1

An underdress/slip of some kind was needed. After considering many lengths from stash, I settled on a heavy rayon twill of exactly the right red to match the red painted sections and brighten the outfit. It is a slightly tweaked version of the recent indigo linen remodel only cut through with no waist seam and a step out at the sides that I formed into inverted pleats.

IMG_2669-1

Side seam with inverted pleat:

IMG_2674-1

And together. The outfit is not quite a 1920’s reproduction, but is heavily influenced by garments from that time.

IMG_2701-1

I did love the original front neckline, so that got to stay.

IMG_2697-1

Shoulder detail:

IMG_2708-1

Side ties:

IMG_2658-1

and on:

IMG_2689-1

It has been to a party (where it had another drink spilled on it, but it is now washed and fine). Is incredibly comfortable and swooshy to wear. Shoes are red plaited leather, opshop sourced though apparently unworn. I spent a couple of weeks wearing them intermittently to stretch them the needed amount across the forefoot. Thankfully that worked well enough to wear them for most of the party. Success I say.

Back on the dressmaking horse

I had not machine sewn anything for ages and the last garments had been cut at least a month or two before. I had not planned and cut out a garment since well before easter. This one however has been in my head since I picked up the fabric at a destash sale a few years ago. Vintage turquoise wool crepe. I guess the vintage part from 88cm fabric width!

The project started well, I couldn’t find the pattern! I knew I’d worked out a princess seam bodice pattern, but could I find it? Not at all. Then I remembered I’d cut one out for one of last year’s dresses, then changed my mind and cut another. I dug through the scrap boxes and found it!! Hurrah for thrifty habits.

IMG_0511

Just to be sure and because I had barely enough fabric, I cut a toile bodice and did some fitting tweaks. Then cut everything out. Bodice, skirt, linings. I love the resulting neat pile of pieces. Just as well, it sat there for at least a week while I continued to be obsessed with spinning.

IMG_0527-1

Eventually, I spent a day forcing myself to tackle it. I so wasn’t in the right head space, but I got the bodice together. This pic is later of course, but it’s of the bodice :-). The buttons are reminiscent of Dutch Knopen jewellery and I’ve been waiting for the right garment to use them on.

IMG_0664-1

I stopped when I couldn’t brain the skirt placket. I knew it would come together in the morning, and thankfully it did.

Of course she has pockets. I’d pick stitched the princess seam by hand to control the seam allowances. So I used a similar treatment to attached the pockets and finish the hem binding.

IMG_0673-1

img_0676.jpg

Here she is done! but shaped bodices always look silly just on a hanger

IMG_0679-1

Much better on. I’m pleased with the fit. It’s a loose in the waist for comfort. The skirt length was awkward to decide on. It would look cuter above the knee, but it’s a woolen winter dress so it needs to be below knee for warmth. Even longer would be warmer, but I didn’t have enough fabric to be properly long so it’s on the drafty side. Never mind. I have a plot for a pretty petticoat to wear under, but that’s another project.

IMG_0804-1

Grey merino rib

IMG_9196

Sometimes fabric is cheap for extra reasons. I got this piece of lovely soft grey wool knit out of the cupboard to find two significant holes and a run about a third of the way across, going almost the whole length of the 3metre piece. Grr. I can’t remember whether I knew about this when I bought it from my favourite bolt end shop. It wouldn’t have cost me much though.

I did manage to cut a cardigan without flaws, which was my major aim. I  managed to also cut a skivvi, without holes, but with runs and one side of the back needing piecing at the shoulder.

What I forgot to allow for in cutting, was the extra widthways stretch from the rib knit. Sadness.

This is what happened to the cardigan armscye:

IMG_9210

I wanted comfortably loose but this is droopy and over large. So I cut off the seam, recut the armhole and sewed the sleeve back in. I also took the side seam in a bit. The reset image is the skivvy because I forgot to take that pic of the cardigan, but that had the same issue. See the armscye now runs over the point of the shoulder and and the worst of the excess fabric has been removed.

here is the cardigan all assembled. It’s basically the same shape as the Paua cardigan that is sadly lost to me and I’ve been missing. I stupidly left it behind on an aeroplane and it was never to be seen again, by me at least. Hopefully someone is getting use from it.

IMG_9229

This one has now been folded and tortured by pegs in the hope of being dunked into an indigo dyebath on the weekend. I’ll make fastenings after I know whether the dyeing happened and how it turned out.

IMG_9255-1


Meh

I’m a bit sad. I had this lovely soft, shiny, prettily printed rayon velvet.

IMG_8274

“Ah, that will make a nice summer* cover for the hexagonal cushion”…. or so I thought. It turned out ok but blah.

IMG_8270

Part of the problem I think is that a hexagon is not the most elegant shape for a cushion. The reason I have this custom shaped, feather filled cushion insert is for this hand pieced silk tumbling block patchwork cover:

.

The other problem is that the size and shape lost the interest of the rest of the print, which was chinese lanterns. Oh well, I will use this for a while and maybe make a more interesting one later. I do like the fancy effect on the stitching used to create the border. It’s a double zigzag with two strings run through a cording foot. I might use this again elsewhere.

.

The closure is my standard shell button arrangement

IMG_8286


*I only use the fancy handsewn silk patchwork covers in winter. I prefer to have more easily washable ones out in summer when they meet more bare, possibly sweaty skin.


Repeatery for linkage:

IMG_8270

Indigo Heffalumps

IMG_7704

Another product of the indigo dyeing day a few months back. Not sashiko this time, just a plain overdye of what was cream coloured fine cotton voile, heavily embroidered with elephants, or as I have called them for years, “heffalumps”. Happily, the embroidery turned out to also be cotton.

.

The lumps of the heffalumps caused a few problems in the stitching. Lumpy fine voile, aieee. I persevered and got it done though.

The resulting shirt dress is intended as a lightweight anti sun garment. It could be worn as a tunic though. It’s a bit short for me to be comfy wearing it as a dress!

Here it is flung over what I happened to have on. I’m spending most of today brewing. I absolutely love the colour.

.

Blooper reel:
I’m quite pleased with the collar, or I was before I realised that the frill ended up different depths on each side.

.

I managed to cut all the pieces with the elephants the right way up, except the sleeves, sigh.

.

The dye coverage isn’t quite even, and to make that worse, I managed to sew the back skirt panel wrongside out. At least it’s the back!

Fastenings:
I kept the buttonholes away from the bulk of the waist seam, and put a little press stud in so it will still close neatly. It also has the loop and button trick for bringing in the fit if I want.

.

Fully closed and on me to show the fit.

.

Not quite by accident, it’s a lovely length to wear over the Tardis dress.

.

Indigo stitch resist experiment

A dear friend of mine had a bunch of indigo dyeing ingredients fall in her lap. She was kind enough to invite me to join in with the dyeing day. I had done one session of the dyeing part before, including folded shibori style resist. What neither of us had done was prepare the dye bath. Thankfully we managed this just fine and it worked wonderfully well. It was also enormous fun. Indigo needs a warm, caustic, reduced solution to dissolve, so it’s a bit more complicated than some other dyes. On the other hand no mordant is needed. The process is extra fun because the dyed material comes out of the bath yellow and turns blue on exposure to oxygen. So it changes from yellow to blue via green and teal. Magic! I’m not going to try to explain how it all works. There is plenty on the web already to cover that. I’ve just put a few pics in to demonstrate how fun the colour change is.

Here is some of the first wool yarn to come out of the dye bath

20180818_123853

and here is the same yarn mostly oxidised to blue

20180818_124832

This is one of my pieces of silk half oxidised. Crazy stuff.

20180818_125442

Jumping ahead. These are all my fabrics from the day, rinsed, washed, dried, pressed and waiting. I mean to show more detail of each as I make each of them up.

.

To the stitch resist samples: This is a technique I’d seen the results of but never tried. So it seemed like a good thing to include this dyeing day.

I had a go at what I concluded was an approximation of the traditional Japanese technique. I did it in a huge hurry without proper research. It worked at least a little, but left quite a bit to be desired. Well enough though that I’m inspired to find out more about how it should be done.

Draw your design. In my case a stylised generic vine design on silk crepe. Sew a tiny pinch pleat in running stitch along each element of the design. I read that one should not cross lines. So the leaves were done separately to the curved stem.

IMG_6532

Pull up and tie off as tight as you can.

IMG_6537

This is the section with the clearest result. I did a whole dress worth of edgings, most of which came out less well, but still well enough that I’m happy to make up the dress.

.

Another friend wondered whether a machine twin needle pinch pleat would work. So I gave it a go. I did the gathering by pulling up the bobbin thread.

IMG_6581

It works! in the sense that it produces an outline of the design. In my case, at least as well as what I think is the more traditional technique. Again, this is the best section. The effect is different but it’s much quicker to do.

IMG_6625

We didn’t manage to use up all the dye in the bath, so we get to have another go later. Woo hoo!

Eyes of Blue

A few years ago I bought a skirt from an opshop because I loved the colours and the print. It was way too small for me and covered in damaged sequins. A few months ago I sat one evening and unpicked all the sequins.

IMG_6127

So many sequins.

IMG_6128

A week ago, I picked up my two newly serviced Bernina 1030s. To test them, I needed something to sew. I won’t use this garment until the warm months, but I knew what I wanted to do and it helps me test the new bodice pattern.

All fabrics are reclaimed in some fashion. From bottom up. Op shop skirt. Floral offcut from a dress I made a few years ago. Satin stripe shirting from a friend’s cast off business shirt. Brown skirt lining. The blue trim at the neck is another offcut.

.

I am quite pleased with the mitred neckline. The “eye” motif is of course cut from the skirt.

.

I thought I may as well include the shirt pocket in the appropriate place.

.

And on, for brief moments. It’s cold! I love the colours. The waistline is a bit bigger than it needs to be and the strap insertion points wider. I’ll amend those for the next pattern iteration.

.

Stashaholics Anonymous

Hi everyone. My name is Montjoye and I haven’t bought fabric since early May. That’s 11 weeks! I’m proud of myself for this. It’s been hard. I’ve lost count of how many times I’ve thought of going fabric shopping and resisted.

IMG_6240

I have however been busy making things in that time, as you know. Turning stash into finished and useful items. Today I am celebrating that all my fabric fits into the designated fabric storage places various. There is no random stack hanging about. First time in ages. There is even a very little spare room!

.

I mean to try to continue to resist for a while longer. I have so much fabric that I can sort of go shopping in my own stash. I have an enormous list of semi planned projects that I’m excited about, with no need for shopping. I’d like to make a bit more room. It’s less about avoiding spending. More about not feeling like I’m drowning in stuff that I haven’t time to deal with. I think I might even try to sell some more of it, if I ever get around to selling things.

.

I have also not bought yarn or fluff for quite some time. Since April I think. I have less of that, but get through it more slowly. I really have no need for more any time soon, especially having figured out how to customise it by dyeing.

This is a good review to have done just prior to visiting a sheep and wool show. I expect I am likely to buy something. I shall try to limit it. Some sort of souvenir of the trip is allowed.