Glad Rag

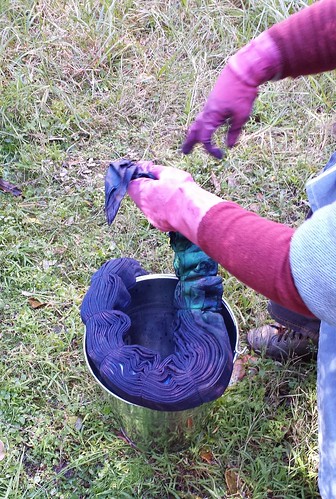
I tend to crave colour in winter and Covid lockdown intensified this. I really wanted something madly multicoloured to spin, but I didn’t have anything that answered and couldn’t find the colour combination I wanted in anything orderable. Then I made the Cabbage Coat  instead, which filled the need for colour for a while. Eventually I decided to order individual colours and make my own madly coloured yarn. All of this is from the recently renamed “Fibre Arts Shed”. Feltfine as it was when I ordered. Granite alpaca/merino and dyed merino in scarlet, denim, mustard, and mallard

IMG_5286-1

This thought evolved into trying for increasing intensity of bright colours after starting with a neutral. Much, much thought, planning and spinning delivered this delightful madness. I’m pleased it worked pretty much the way I hoped except that the grey bloomed on wet finishing and ended up bulkier than I hoped.

IMG_6049-1

IMG_6112

I had always intended to knit this up in the pattern “Turbinado” by Sharyn Anhalt. I made one of those earlier this year but gave it away to a friend as a birthday present. The knitting started with the grey and I wasn’t loving it until I got to the fully coloured yarn. Suddenly I was having much more fun.

IMG_6267

I was worried that the coloured yarn, being finer, would be too wibbly and not drape well. So I had my first go at adding beads to knitting. Happily the only beads I had of almost the right size were also a useful colour. I didn’t have a tiny enough crochet hook but I did have a tambour hook that was previously barely used.

IMG_6301

I put two rows of beads a couple of rows apart from each other and the cast off edge. I also beaded the tips of the picots in the cast off. So cute. They look like little creatures. Ducklings one friend said. The beads are not obvious in the finished garment but they do deliver the drape I wanted.

IMG_6305

Knitting finished and blocked, in time to use the last hour of sun on the back of my house.

IMG_6317

A detail showing the increasing intensity of colour

IMG_6328-1

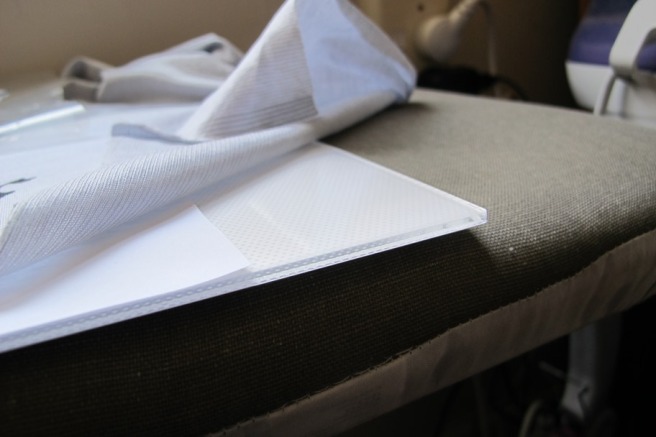
Dry, and draped on the ironing board so I could sew in the loose ends. So pretty

IMG_6339-1

The colours themselves were chosen to go with the Cabbage coat, though I think the styles clash rather. Never mind, I like them both, whether I end up wearing them together or not.

IMG_6374

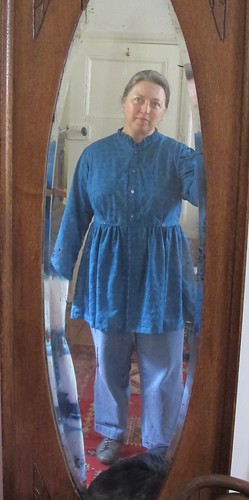
and on. It was so hard to manage the right light to show off the colours without overexposure at the same time as a picture of me I was willing to publish. This doesn’t do either really well but is the best I managed.

IMG_6362

repeatery for linkage

IMG_6339-1

Midnight Forest Hat

I’ve had this lovely natural coloured alpaca/merino/corriedale yarn for a couple of years. It was Aussie Bale Project tops spun by Sharon Bowman and bought from her at the Bendigo wool show. I’ve been patting it for a couple of years. Time to see if there is enough for a hat.

IMG_5522-1

I used the same stitch count and basic plan as the recent red hat but dropped the needle size to 3.75mm. I wanted some kind of interest in it so I went searching through my books and settled on a cabled tree pattern. This has the bonus of giving me a little cable practice, it’s something I’ve done very little of. I messed with it though and made trees of three different sizes and graduated the tops to make them look more natural.

IMG_5626-1

After I was finished and found I had enough yarn left, pulled back the brim and reknitted it on 3.25mm needles to reduce the frillyness and improve the structure.

Then I blocked it. I might not have bothered but I had to wash the hat anyway as there was enough sheepiness left in the yarn to set off my allergies. I’m often amused by the strange assemblages of things I use for blocking. In this case, a poly hat blank base, built up to be taller with cut down file folders, the top filled in with an old tshirt and the lot in a plastic yarn bag.

IMG_5630

Here it is basking in what little sun we had

IMG_5637

Then I steamed it to soften that corner, and embroidered a crescent moon for accent. The camera really struggled with the very dark hat and the not as pale as it looks embroidery.

IMG_5647-1

I like it and now I can both pat it and wear it.

IMG_0166-1

Lady Macbeth Gown

Gothic Pandemic Couture. Mwahaha.

There has never been a better time to work entirely from stash. Thankfully I have a lot of stash. I wanted a new winter dressing gown. After much thought, I finally came up with a design that met the evolving design criteria. All from stash, all natural fibre, warm colours, comfy, nice against the skin, especially at the neck, not too weighty. Then I realised my design had rather gothic overtones… which made me think of Lady Macbeth, who has a hand washing thing….That Was It. Had to be done.

I cut the gown from barely enough heavy Italian wool knit coating… need I say that I bought it cheaply? Yeh, nah. You know me a bit by now.  I had a piece of luxurious crimson silk rayon velvet to use for the collar, and I wanted to get that more of that red into the gown. I only had 1/4 bottle of red dye, so I dip dyed the cuffs and hem.


IMG_4304-1

It looks quite elegant in the finished garment but I could not help thinking “trailing in wells of blood” (which is a folk song quote really) but was what made me think of Lady Macbeth. “Out, damn’d spot! out, I say!…………..who would have thought the old man to
have had so much blood in him?” No murder done here except perhaps to the height of good taste.

IMG_4360-1

The gown is mostly unstructured, but I did tape the roll line (pictured), the shoulder seams and the back neck seam. There is a lot more handsewing than I initially planned. The knit fabric is bulky and doesn’t press well, so I coarsely hand felled all the shoulder and collar seams. I now wish I’d taped the edge of the collar as well, but too late for that now. The cuffs are hand hemmed but I machined the the bottom hem, I won’t be looking so closely at that and neither will anyone else.

IMG_4321-1

The collar turn backs are casually hand quilted so the velvet becomes one with the knit underlayer. Sort of works like pad stitching. There is no interfacing. I did though put a lot of effort into making sure that the roll worked properly. I must say, it feels glorious.

IMG_4376-1

There are of course pockets. Quite stealth though not a perfect pattern match. That, and the creative shaping are due to having no extra fabric. The label went here because previous attempts at putting them onto velvet caused much swearing.

IMG_4373-1

What to use for the belt? I had nothing but tiny scraps left of either fabric and no more dye. After a couple of other plans, I remembered I had previously dyed some grey wool yarn with the exact same dye for a project that didn’t proceed. Hurrah. Perfect.

IMG_4348-1

The belt loop is a detached buttonhole arrangement in stealthy grey tapestry wool.

IMG_4371-1

Here is the finished gown in a relaxed pose. So comfy.

IMG_4405-1

Here I’m trying to act all Lady Macbeth determined.

IMG_4386-1

and this was my best attempt at a handwashing shot with no one else present to take the picture.

IMG_4395-1

I don’t look forward to washing it and shan’t for a while. Every component is prewashed though, including the velvet and the seam tape. Part of the motivation for the dyeing was in case some of the velvet dye migrates to the wool in the wash.

All of the above

IMG_3412-1

Shirt? Dress? Coat? All of the above

This started with an experiment in diagonally folded shibori. The upper piece in the picture below.

img_9246-1.jpg

I don’t recommend it. Diagonal means bias and that as you probably know, is stretchy. Getting this into neat parallel folds was NOT EASY. However, I bloody mindedly pursuaded it. I cut a large square from wide linen, heavy end of shirt weight and lovely quality. If I remember correctly, I folded the corners to the middle, then pleated it up on the bias and pegged it to hold, aiming for minimal resist. Grr. Big struggle to get it neat. There was a narrow strip left which I simply concertina pleated on the weft grain. That is where the finer stripes came from.

The bias experiment did make an interesting piece of fabric though. It was dyed all pegged up and then re dipped after the first lot had oxidised. Hence blue on blue rather than blue on white.

IMG_9339-2

The dyeing happened back in about Feb 19. A few months ago I was frustrated with sewing fine silk and decided it was time for some nice friendly linen. I got this out and pressed it. Then got sick and hung it in the corridor. It made it to the cutting table a few weeks ago and then languished again. I changed my mind several times as to what I would cut from it. I was going to make a dress, but didn’t want anything too similar to the other things I’ve made from indigo shibori. I didn’t want a plain shirt. I ended up with a skirted shirt, a shirt dress, a lightweight coat.

I’m pretty impressed that I managed to get this out of a total of, I think, about 1.1×1.4m of fabric, plus a little plain dyed lesser quality linen for facings. Golly, can that be right? The back and sleeves did need to be pieced, but some good came of that. The bodice back became more interesting and gave me seams for shaping.

IMG_3415-1

The sleeve piecing gave me an easy option for the vents- just leave part of the vertical piecing seam unsewn, press open and hem/fell.

IMG_3407-1

There was rather too much inside out, upside down-ness during construction. Some got fixed, some didn’t.

Of course I put pockets on it. I forgot to put the label on the yoke facing as usual, so it went on one pocket instead. I was lazy. I haven’t given it a final press before taking these pictures, it’s only had construction pressing. I quite like the relaxed look of slightly rumpled linen.

IMG_3403-1

Here it is on. Back and front

IMG_3433-1

IMG_3427-1

I really like it. It has 18thC frock coat overtones. Vaguely piratical. I’m thinking this shape would be nice in some lightweight coating I have in stash. I’ve been nice to future me and taken a pattern of the bodice adjustments before assembly. Pretty happy now that I did that.


F*ck Cancer

I have a friend needing to engage in full on chemo treatment. So I’ve made her a hat. Not a hand knitted hat because I didn’t have any appropriate yarn in the house. Instead it’s a more summer friendly fine mercerised cotton knit and I’ve had fun with paint.

IMG_3330-1

This project gave me an excellent excuse to buy something I’ve wanted for years- a proper light box. Only these days it’s more a light board. The light is provided by LEDs and the whole thing is all of about 3mm thick. 3 light levels. Cool, literally, so I found I could paint directly over it rather than pencil tracing first, which is great for such a detailed design. I’m delighted with it.

IMG_3323

IMG_3320-1

The sewing part is only a single seam to tun this into a tube, which I failed to get a picture of. No hems or overlocking to keep potential irritation to a minimum. Put it on inside out, twist the loose end around 360 degrees until the design is at the front and invert over the top. It’s a bit hard to describe but it ends up looking like this…. I forgot to ask for a picture of it on her, so here it is on me.

20191230_180315-1

Or it can be worn with the loose end draped down your back, or as a cowl or a head band.

The words might upset some, but she doesn’t care. I’ve deliberately made it less than perfectly easy to read to gently reduce the danger, but without actually obscuring the words. It’s a a slightly enhanced version of the “Parchment” font.


Eric the Kimono Robe

Eric the half a bee is now a whole bee and even more recently has taken up his destiny on the back of a robe. All this will make more sense when I write the first half of this post about the shibori and dyeing. I’m writing it backwards ’cause I’m all excited about the finished product:

IMG_9499-1

From the front:

IMG_9502-1

When starting to design things for our last indigo dyeing day, I definitely wanted to have another try at stitched resist. I decided to do a bee after learning that one could do a folded shibori that delivered hexagons, reminiscent of course of honeycomb.  I also watched some youtube videos on stitched shibori and learned that it is often done folded in half. Hence half a bee was the thing. I was thoroughly amused.

My hexagons didn’t come out quite the way I wanted. I’m apparently too good at preparing fabric to resist dye. Part of this is that I think I’ve been too ambitious in the amount of fabric per parcel. So I thought I’d emphasise the hexagons on one of the pockets:

IMG_9484-1

I’m utterly delighted in how well Eric himself came out:

IMG_9495-1

There was a lot of slight redesign in the process of making up the robe. One of these was having made the neck cutout too small, so the first time I tried it on it didn’t sit at all well. After some minor panic late at night and some slow thinking, I figured out that I needed to unpick the neck band, increase the neck opening, extend the neckband and reassemble. Which worked just fine to fix the problem. Whew.

IMG_9514-1

The robe has pockets, belt loops, a hanging loop and a deep facing across the shoulders from shoulder blade to below bust. The latter for warmth, structure, longevity and support of the precious bee design.

Here it is being modeled:

Goth Budgie Tshirts

Earlier this year I drew up a budgified version of a medieval eagle for a woodwork project. A few days ago I felt like doing a bit of painting, but didn’t have enough brain for design. So I took my gothic eagle budgie and copied him onto a couple of remnant pieces of lovely fine mercerised cotton knit fabric.

The first one was just painted black like the original (nasty quality paint)
IMG_8141

The second one ended up a more colourful and somewhat realistic version.

IMG_8144

Then I was inspired to finally take a pattern from the utterly comfy baggy tshirt that I couldn’t get enough of last summer. Colourful budgie took up standard tshirt design position:

.

I’m not actually fond of wearing tshirts with bold designs front and centre. So I decided to put goth budgie on one side at hem level:

IMG_8191

I was delighted that I managed to sew down the neck band seams neatly. When I’ve tried this in the past, I always ended up with a mess. This is done with a twin needle. The original seam was done on the overlocker.

.

Here is one on me. See, baggy and cool, especially in such fine knit.

.

and here is a little collection of new summer shirts. I cut and ran up a couple of others while I was at it. The fabric was all bought as remnants, sized somewhere between a bit too little for a tshirt and a bit too much. Hence the occasional contrast sleeve and neck band.

IMG_8187

Indigo Heffalumps

IMG_7704

Another product of the indigo dyeing day a few months back. Not sashiko this time, just a plain overdye of what was cream coloured fine cotton voile, heavily embroidered with elephants, or as I have called them for years, “heffalumps”. Happily, the embroidery turned out to also be cotton.

.

The lumps of the heffalumps caused a few problems in the stitching. Lumpy fine voile, aieee. I persevered and got it done though.

The resulting shirt dress is intended as a lightweight anti sun garment. It could be worn as a tunic though. It’s a bit short for me to be comfy wearing it as a dress!

Here it is flung over what I happened to have on. I’m spending most of today brewing. I absolutely love the colour.

.

Blooper reel:
I’m quite pleased with the collar, or I was before I realised that the frill ended up different depths on each side.

.

I managed to cut all the pieces with the elephants the right way up, except the sleeves, sigh.

.

The dye coverage isn’t quite even, and to make that worse, I managed to sew the back skirt panel wrongside out. At least it’s the back!

Fastenings:
I kept the buttonholes away from the bulk of the waist seam, and put a little press stud in so it will still close neatly. It also has the loop and button trick for bringing in the fit if I want.

.

Fully closed and on me to show the fit.

.

Not quite by accident, it’s a lovely length to wear over the Tardis dress.

.

Indigo Spots / Accidental Tardis

.

The next piece made up from the last indigo dyeing day contained unexpected tardis qualities! I really didn’t intend the tardis look, and didn’t see it developing until the skirt was on the bodice.

It started as 2 metres of fine linen, folded in half widthways, then concertina folds one way, and the other. A resist disk was placed top and bottom. I don’t have a proper “before” photo because those ties were replaced by clamps before it went in the dyebath. Pity, a friend dubbed this the “madly flapping dove”, which name I love.

.

Anyway, this is how the dyed fabric came out:

IMG_6643

It seemed to want to be a sundress. Who was I to argue? I did put quite some care into the cutting, including paying attention to the placement of the pattern elements.

.

The bodice is a slightly altered version of this. My bit of pattern sneaking has paid off. The skirt is in two layers. The fabric is so fine that it needed lining anyway, so I decided to make the hem more interesting. Both layers have hem facings and the bodice is lined, all from the linen scrap box.

.

Again it’s made as a drop over the head number. I’ve used another variation of my side front fastening to close the fit.

.

.

I’m ruddy delighted with it. The fit is lovely, as is the length. It feels wonderful on, and it accidentally looks rather Tardis like! I’ll take that as a feature rather than a bug.

.

Indigo Rays

I’ve made up one of the planned garment pieces from the indigo dyeing day.

Two lengths of cotton/linen blend fabric, twice the length of the fabric width, seamed to make a huge square. Fold in half and manipulate into rough “sunray” pleats. This bit was harder than I expected but I managed it.

.

Tie off tightly at intervals with string you might like to have turn blue for later use. The wider bulgy bit was deliberate, to provide a darker circle for the hem.

IMG_6572

Wet it, pop into the dye batch for a while, then pull out, untie and hang to develop and dry. Then wash, rinse etc until it stops shedding colour.

20180818_125618

20180818_133409

Some months later, I’ve made a dress from it. Cut as big a circle as I could, cut the bodice etc from the corners. Cut a smaller circle from the centre of the big circle to match the bodice waist measurement.

.

My bodice has side bust darts, and I’ve used my trick of attaching ties from what would be the under bust dart position. This forms a casual and adjustable tuck when tied. In this case I’ve used buttons and hand sewn loops to attach them. I’m not fond of battling long ties in my laundry.

IMG_7447

A close up of the waist tie attachment:

IMG_7453

The bodice slit closure, featuring some rather manky machining that turned out to be caused by a bad needle. I changed that and the rest was much neater. See the edge stitching is much better.

.

The loops and buttons are sewn with the perle cotton used to tie the cloth for dyeing. Lovely matching blue string.

.

Pockets!

.

On me

.

.