Goth Hem Gingham

Or the “Monty Moonlights as a Mechanic” dress?

I’ve been thinking on this plan for months. Mid weight linen gingham, purchased maybe 5 years ago as a stash reject at a market. Cut a bodice, make an A-line skirt from the rest of the fabric. Pleat that up and hang it to control what fabric sits in the dye. Then sit it in a black dye bath.

This is a more controlled version of the dyed borders I did on the Lady Macbeth Gown. It came out neater than I expected. I thought there would be more of an ombre effect. The hem section has been rinsed, washed, rinsed etc then sun dried and ironed. It will probably shed more dye when I wash the whole dress. I didn’t want that to happen until the bodice was attached or it might look unnaturally clean. I am pleased with how black the blackest bits are. That may not be so after some more washing.

Then I built the bodice, which I remembered to cut it with a back seam so I could do the shoulder turn trick with the facing, which means the entire thing can be machine sewn.

Then the hem was faced and the skirt attached. Done.

Or maybe it’s done? I like this on the hanger, though I wanted it longer and with a deeper more complex border. I don’t mind it on but I had somehow forgotten that I’m not fond of pale dresses. Sigh.

I’m really not sure about it. It might go another round with a dye pot. I might wear it for a bit first. Hmm. I’m pleased with the pleating and hook arrangement as a non-resist dye control method. Any attempt at a deeper treatment of this sort would either require a deeper pot or be messier due to tilt and crumple resulting from lowering the fabric further into the pot. That latter wouldn’t necessarily be a bad thing. Hmm, musings.

Cool Stripey Linen

I’m having a minor freakout over an upcoming trip. So, sewing being self soothing for me, I’m building garments that have been in my mental queue. They might just turn into a new travel wardrobe.

This one is floaty, runkley, stripey linen. I bought it a few years ago ridiculously cheaply. I kept thinking of making a buttoned overshirt type of thing, but the runkliness would get in the way of making neat buttonhole bands. It does though make a nice simple dress. T shaped bodice with an angle down from the shoulder. The skirt is just two drops of the fabric, seamed and gathered onto the bodice.

The neckline uses a treatment I rather like for floaty fabrics. Use a thin but strong cotton picot lace. Sew it on at the seamline. Press the fabric away from it then fold under and hem. The lace prevents the edge stretching and there is no bulky facing. I’ve also done this starting with an overlocked edge and just top stitching after the pressing. I like the folded finish better but different fabrics ask for different treatment. Yes the label is crooked. Or really, the dress is cut a bit crooked. I should have put the effort into pulling threads to find true weft grain. I can usually do it pretty well by eye, but not on this fabric!

The flower motifs were a Daiso find maybe 5 years ago? It did not escape my notice that they have trefoil centres.

Here it is on. So comfy and cool. Of course it has pocketses.

Almost Gingham

I’m not reading fashion media and I’ve not been out of the house much in a couple of years so I’ve not really much idea what is considered fashionable in clothing. The fabric shops however think that gingham is quite the thing. This lovely stuff is very nearly gingham so I thought I’d get it turned into a garment before the moment passes. It was sold to me as pure linen. I scoff. It might possibly be a blend but I believe it’s cotton. I really like it though. On washing, it went slightly wrinkly with a pleasing handspun type feel. I’ve been wanting a few more cool and comfy summer dresses so here is one.

I made it up in two days* and within 10days of receiving the fabric. The latter is most unusual. Mostly my garments are from well aged stash or recycled from other garments. I failed to take any progress shots so you just get a few details instead.

*would have been one but my recurrent overuse injury wouldn’t let me.

It has facings from plain black cotton (stash reject from a friend) and a little subtle black cotton lace trim at the neckline. I figured it would be cooler without a lining. I’ve been feeling the need to minimise femininity in my outfits lately but the lace trim just demanded to be there. It looks so right I’m pleased I included it.

I carefully made sure that the waist seam had the black stripe on both sides. I figured it would look neat and possibly more slimming than otherwise.

The pockets are stealth except for a little black band at the top for interest and to support the quite stretchy main fabric.

and a pic of it on. Simple, nice, neat, comfy. I think i will really enjoy this.

Stealth Polkadots Remade

Back in late 2016, just after I started this blog, I made a dress out of a lovely piece of black on black dotty all cotton broderie anglaise. I don’t seem to have written it up here sadly, but there is a pic below. Sort of a petticoat dress. About “5 minutes” later the bodice didn’t fit. Yes I’m exaggerating the short time frame but I can’t even remember whether I even got a wearing out of this first incarnation.

The fabric was way too nice not to remake it, and I found that I had enough leftover cloth saved that I could cut a whole new bodice and pockets as well.

I didn’t take many progress shots but thought this one was worth sharing. On dark fabric you can mark the position of things like buttonholes using pins which then provide a nice defined hard backing to get quite an accurate chalk mark. On pale fabrics I use a soluble marker instead.

Obligatory button shot. Shell buttons, part black, part nicely irridescent. Prettier in reality, so hard to photograph.

The new bodice is a different shape, longer, less fitted, though it is gently darted.

I stuffed up and cut the neckline too low. I could wear it as a cool party dress but I’d have to be feeling bolder than usual. Wearing a camisole is an option but would make the outfit warmer.

It’s likely to be styled more like this pic below most frequently. As a pinafore over a tshirt with socks and stompy shoes. That weird expression is what happens when I realise I’m not smiling, am not in the mood but try to anyway. Ha!

Winter Shibori Dress

A few years ago I scored a 4 metre bolt end of white pinwhale corduroy. I immediately knew I wanted to give it some shibori love though it took me until now to get around to it. Here it is divided up, pleated and tied. A tedious process, but the effort was worth it I think.

Put it through a dyebath along with a bunch of other things. In this case I used “indigo” coloured Procion fibre reactive dye from Kraftkolour.

I got three 1m pieces patterned like this meant for a skirt, some plain bits for a bodice and a smaller pleated bit for pockets. I undid the end most ties on the skirt pieces after the first long dip on the grounds that i didn’t want too much pale over my tum.

From there I built a fairly standard Montjoye dress. Semi fitted bodice and flared skirt. Except that I made a bunch of errors in the cutting. I’m still quite out of practice with sewing garments! Happily all errors were fixable in one way or another. The first big mistake was failing to allow the needed overlap for the intended buttoned front. Bother. Couldn’t fix that really without creating too much bulk. Never mind, I’ll just do a side zipper. Ah, but that means the skirt sections need to match the bodice waist properly both front and back. The skirt pieces were folded in half lengthways and divided diagonally to give a six panel skirt with the back panels joined in the centre. Guess who forgot to allow for the centre panel seam allowance in the back pieces? Yeh, me. That meant I had to dart the back of the bodice to get everything to fit. Happily that was actually a good thing. Then I found I needed to lift the whole skirt to place the pattern more pleasingly which meant the front skirt waist matchiness didn’t work anymore and the seams were all topstitched already so I wasn’t reseaming them. Botheration. I’m mostly laughing at myself here. I sure hope the next garment runs more smoothly!

The bodice has a fair few extra seams than would have been necessary if I hadn’t changed my mind about what garment to make from this fabric before it was even dyed. I had already divided it up into sections and folded it before changing my mind. Oh well. Because I wanted to make the seam allowances behave themselves I decided to top stitch pretty much everything, which also tied in the extra seams and the white parts of the shibori visually.

I still ended up with a frock. Front then back below. It’s cut to be shaped but still quite loose which is comfy and as flattering as possible for the iso belly I’m still carrying.

The pockets manage to be fairly stealthy, achieved by pleating that piece to match the skirt pieces.

Of course it is really just a winter version of this summer favourite made 3ish years ago, written up here https://montjoyeblog.wordpress.com/2018/10/25/indigo-rays/ and worn a great deal since.

and proof the new winter version fits on me. Yes I know it’s well off the vertical. I took a bunch of photos and this was the best despite the kooky angle.

Frilly Gothish Remodel

I had all sorts of plans for making clothing for myself this summer, but none of it happened. I got distracted by a bunch of other projects. This little plan was firmly stuck in my head however and I had a packet of navy dye that needed using before the water soluble enclosure succumbed to humidity.

This tiered frilly skirt was a 90’s Jigsaw brand number that I loved and wore a lot. I don’t wear this sort of warm colour combination any more though and besides, it no longer fit. I nearly consigned it to the opshop bag but the fabric is really lovely, fine and close woven cotton, near Tana lawn quality and all those gathers were already constructed. Surely I could rework it?

I pulled out the leftovers from the shirt featured in https://montjoyeblog.wordpress.com/2020/03/29/yoke-wrinkle-solved. Irish linen, orange and grey shot. Really lovely stuff. Stiffer than the skirt fabric but a bodice is allowed to be different. It tones with the skirt so hopefully they would work together after dyeing.

I then put them both through the navy dye bath with a bunch of other things

Happy with the colours. I cut a bodice from the linen, black facings from the leftovers of a different shirt. I chopped off the original top tier of the skirt, which yielded a piece to make the visible part of a button band to tie the two fabrics together and add interest. Hmm, somewhat wonky sewing there. I made a bunch of mistakes in cutting, all of which were retrievable. I’m peeved that I screwed up by making the button band the “wrong” way around, buttonholes on the left. No one else will notice, but it will annoy me.

Here is the whole dress. Of course I put pockets on!

and on me. Maybe I’m too old to wear this many frills? I don’t care. I love the new dress.

New dress from old

Somewhere around 6-7 years ago, I bought some beautiful and pricey satin striped linen with intentions of making a skirt. 5 years ago something possessed me to make a dress out of it instead. It was quite lovely when I made it. A simple T shaped bodice with a fairly slim six panel A-line skirt which used very close to all the cloth.

However, it didn’t get worn much. The fabric is really a bit heavy for a sleeved dress, the neckline is a bit low for decency when worn alone and I felt a bit like a marshmallow in it. I don’t think it made it out of the wardrobe last summer, so it was ripe for a remodel.

I chopped out the sleeves

Then cut an extra pocket and some bias strips for binding from the excised cloth. The original had only a tiny pocket due to fabric shortage, which I had sewed on the left side by mistake. Frustrating! So now I have a larger pocket on my preferred side as well. Much better.

I sewed that lot on and put the whole thing in a black dye bath. It went purple, which wasn’t what I wanted so I tried again with more black dye and some yellow for colour correction. Now I have a long black singlet type pinafore frock, which I haven’t ironed, as is obvious.

Here is a detail of the neckline which I rather like, with a bit of the original fabric to show the colour change.

A pic of it on, and don’t I wish I could look like I did 5 years ago? but the years roll on whether we want or not.

I reckon I’ll enjoy it in this form.

All of the above

IMG_3412-1

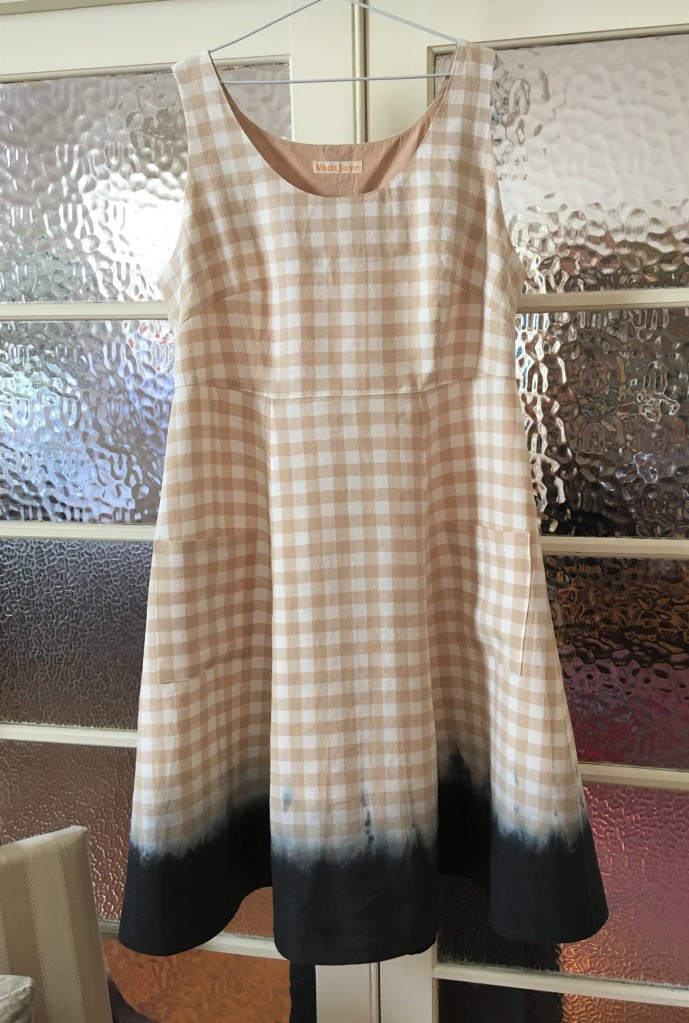
Shirt? Dress? Coat? All of the above

This started with an experiment in diagonally folded shibori. The upper piece in the picture below.

img_9246-1.jpg

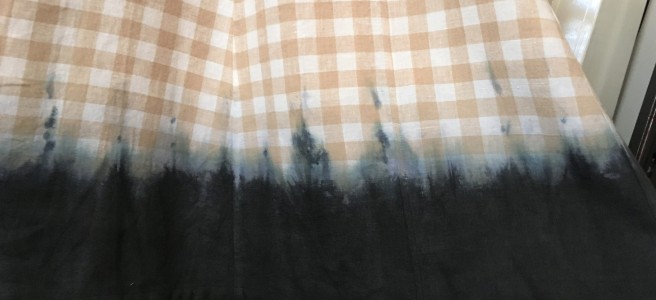
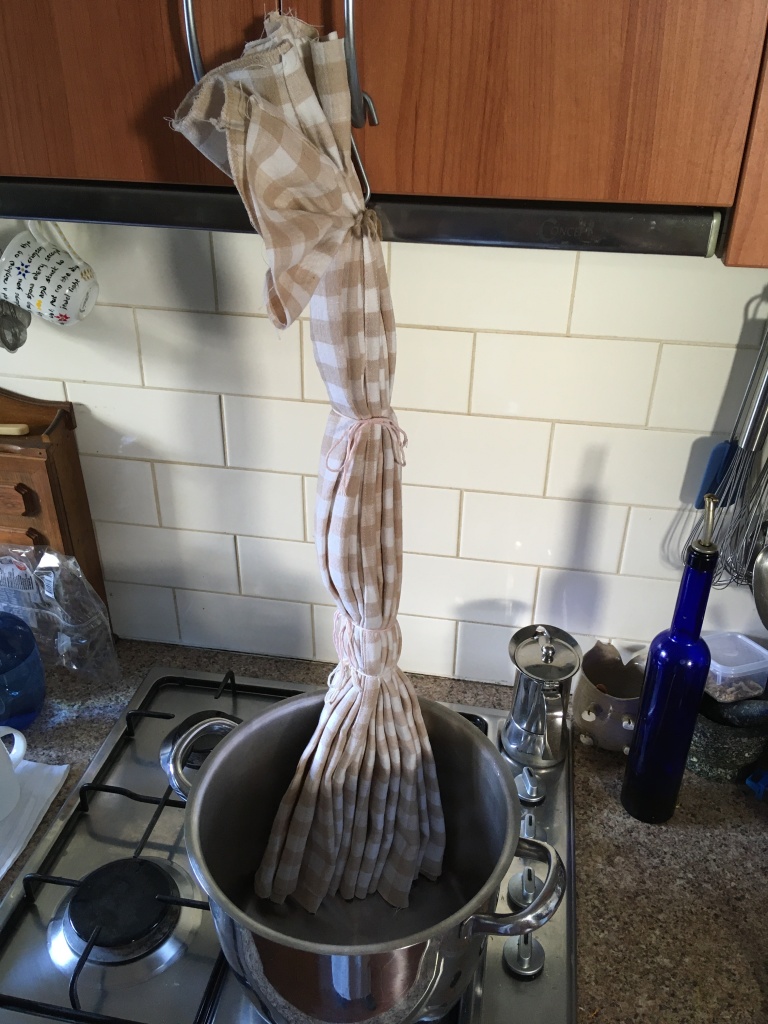
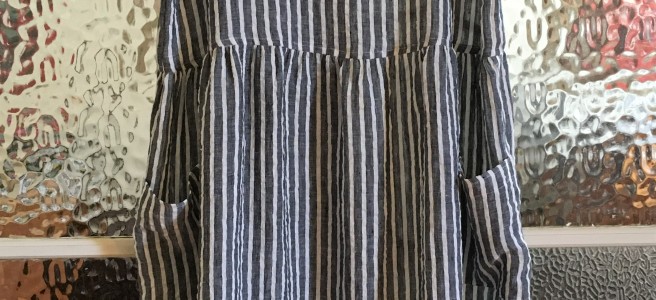
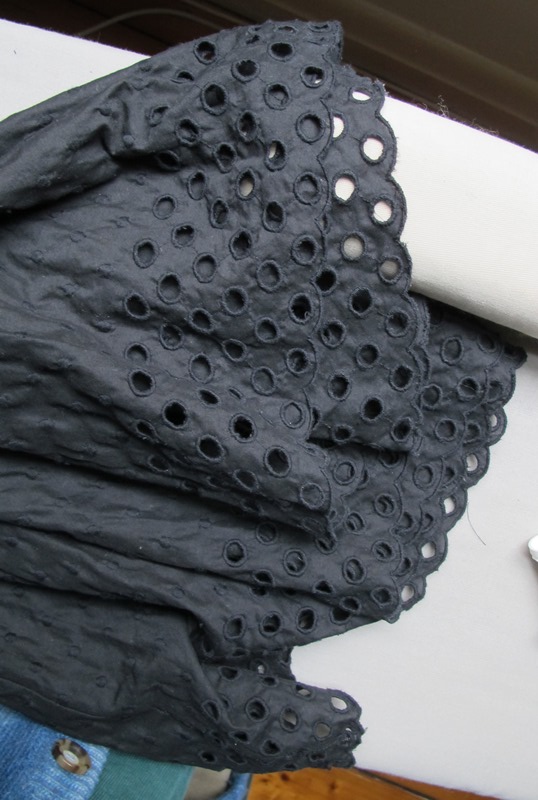
I don’t recommend it. Diagonal means bias and that as you probably know, is stretchy. Getting this into neat parallel folds was NOT EASY. However, I bloody mindedly pursuaded it. I cut a large square from wide linen, heavy end of shirt weight and lovely quality. If I remember correctly, I folded the corners to the middle, then pleated it up on the bias and pegged it to hold, aiming for minimal resist. Grr. Big struggle to get it neat. There was a narrow strip left which I simply concertina pleated on the weft grain. That is where the finer stripes came from.

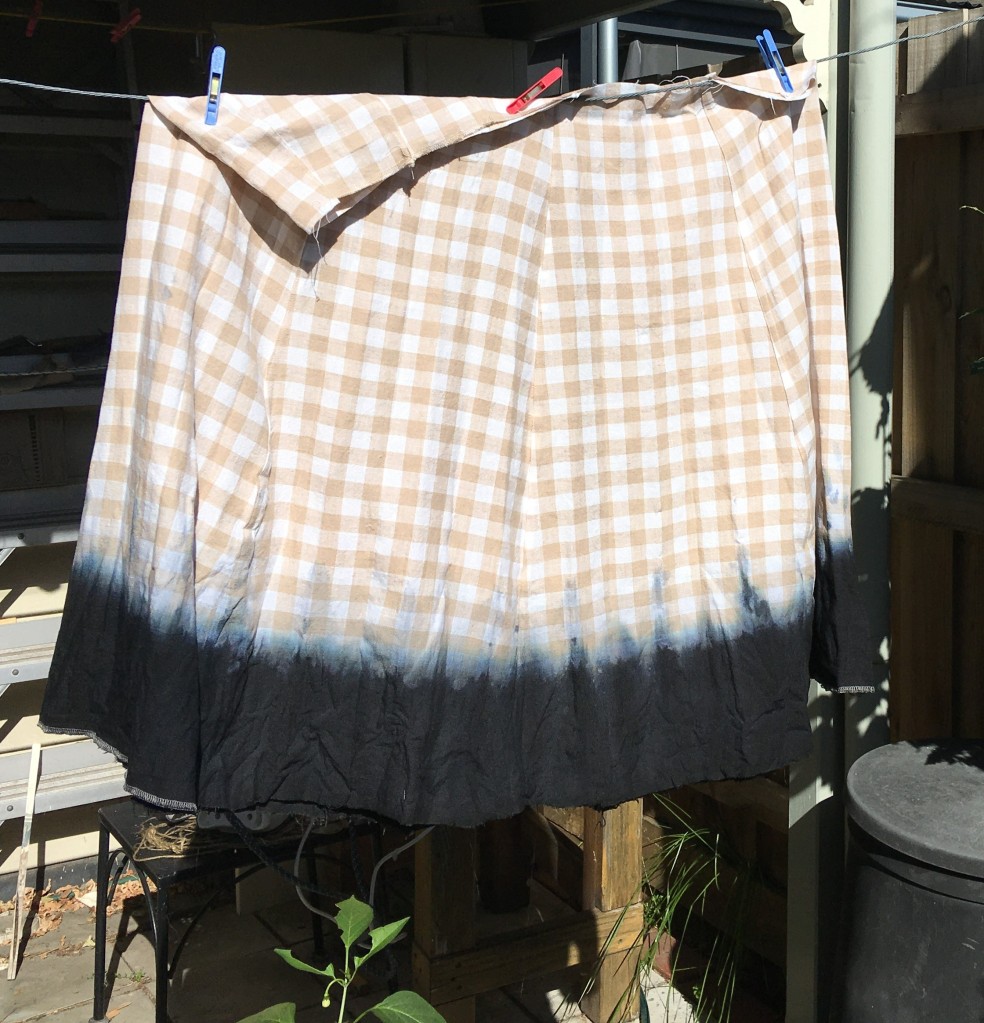
The bias experiment did make an interesting piece of fabric though. It was dyed all pegged up and then re dipped after the first lot had oxidised. Hence blue on blue rather than blue on white.

IMG_9339-2

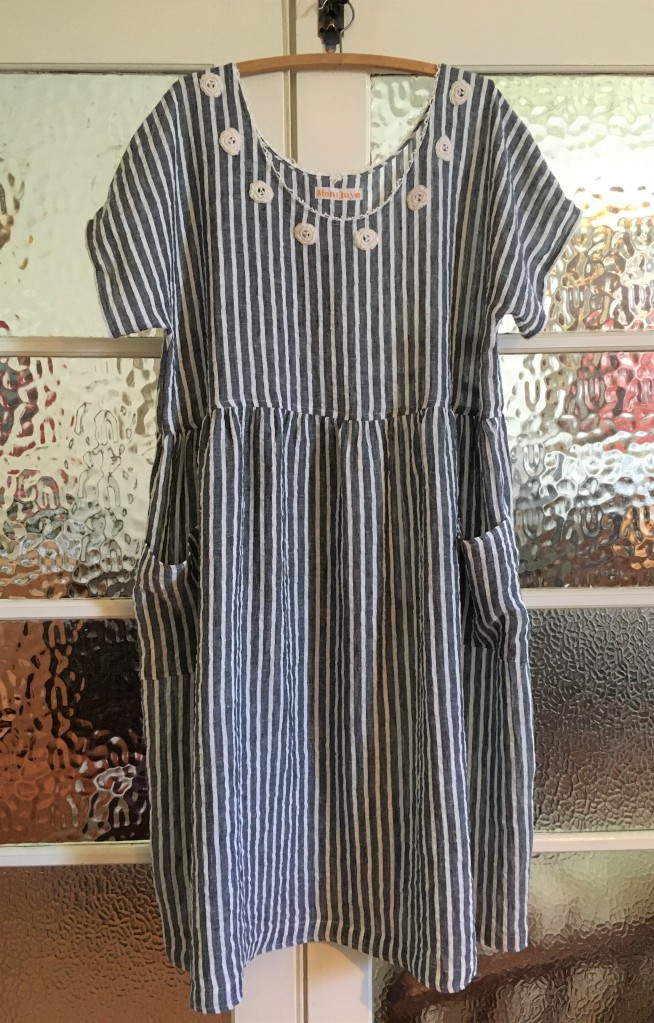
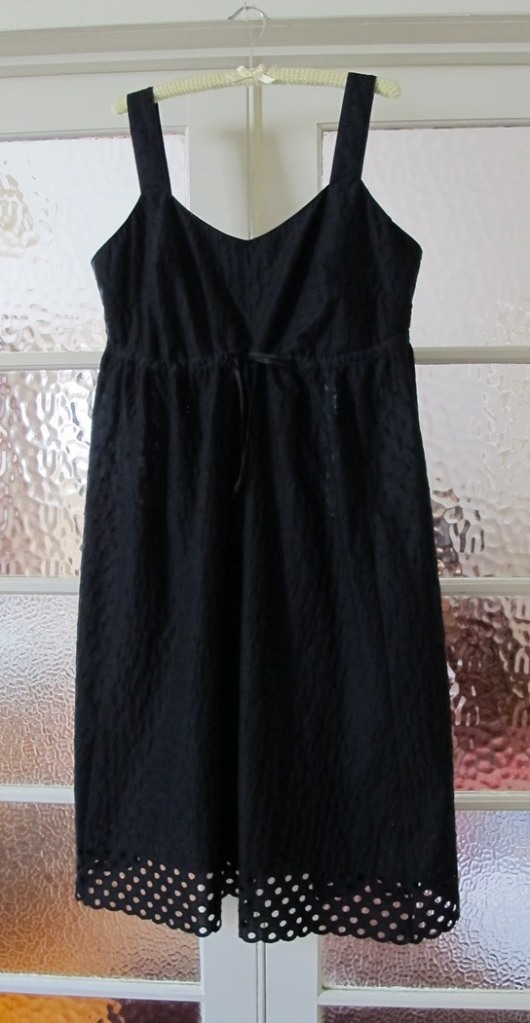
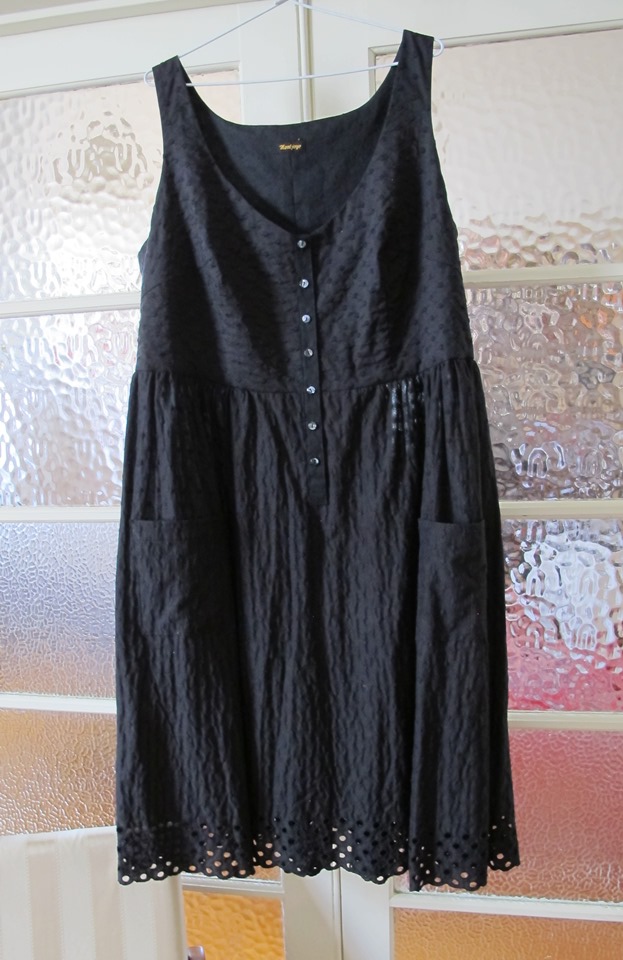
The dyeing happened back in about Feb 19. A few months ago I was frustrated with sewing fine silk and decided it was time for some nice friendly linen. I got this out and pressed it. Then got sick and hung it in the corridor. It made it to the cutting table a few weeks ago and then languished again. I changed my mind several times as to what I would cut from it. I was going to make a dress, but didn’t want anything too similar to the other things I’ve made from indigo shibori. I didn’t want a plain shirt. I ended up with a skirted shirt, a shirt dress, a lightweight coat.

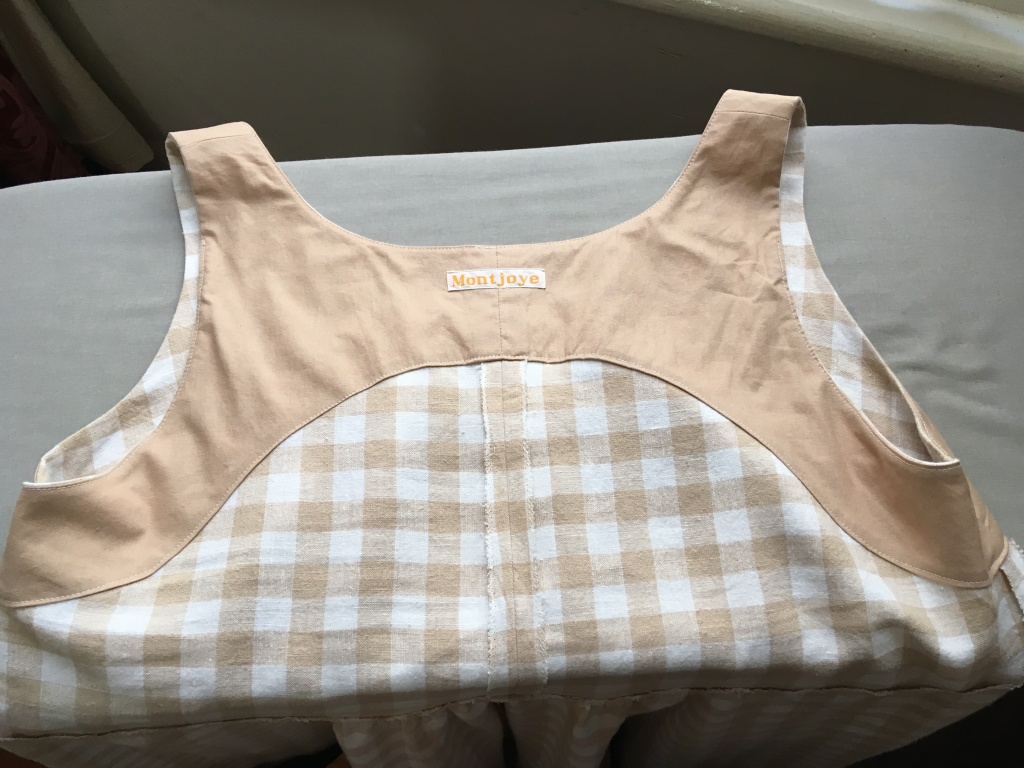
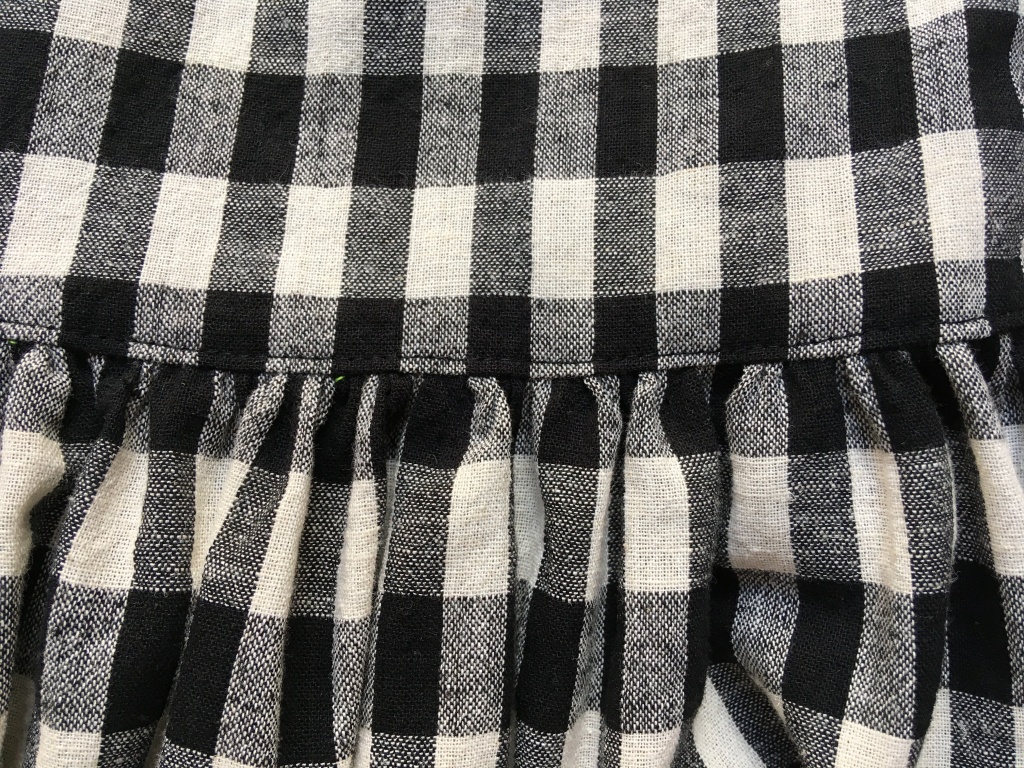
I’m pretty impressed that I managed to get this out of a total of, I think, about 1.1×1.4m of fabric, plus a little plain dyed lesser quality linen for facings. Golly, can that be right? The back and sleeves did need to be pieced, but some good came of that. The bodice back became more interesting and gave me seams for shaping.

IMG_3415-1

The sleeve piecing gave me an easy option for the vents- just leave part of the vertical piecing seam unsewn, press open and hem/fell.

IMG_3407-1

There was rather too much inside out, upside down-ness during construction. Some got fixed, some didn’t.

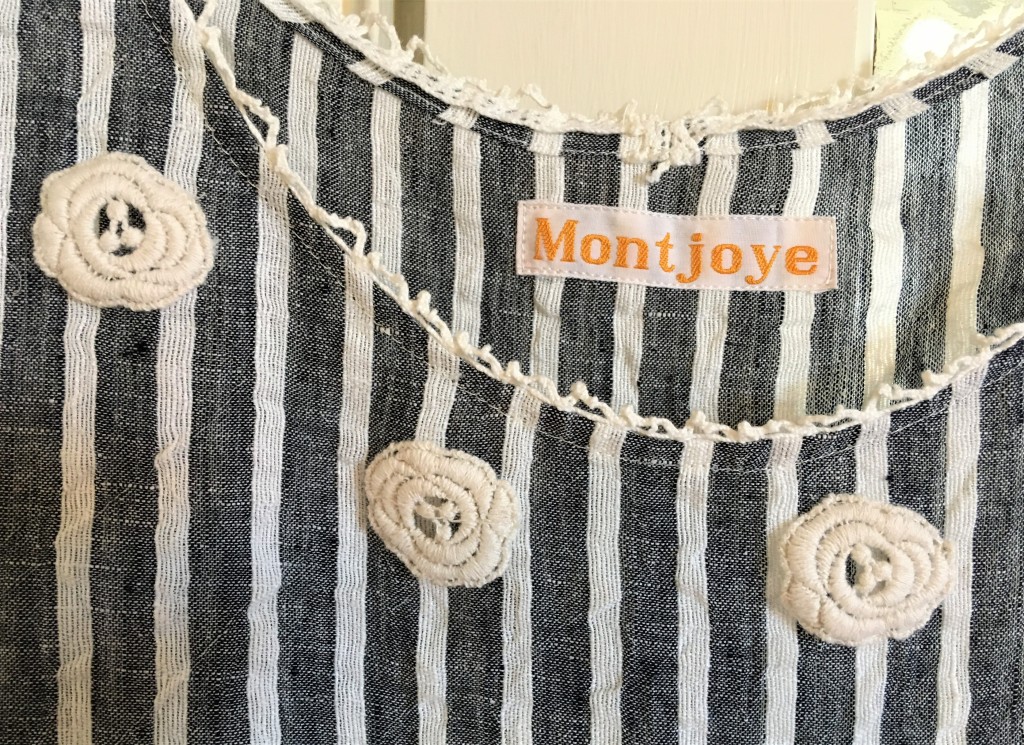
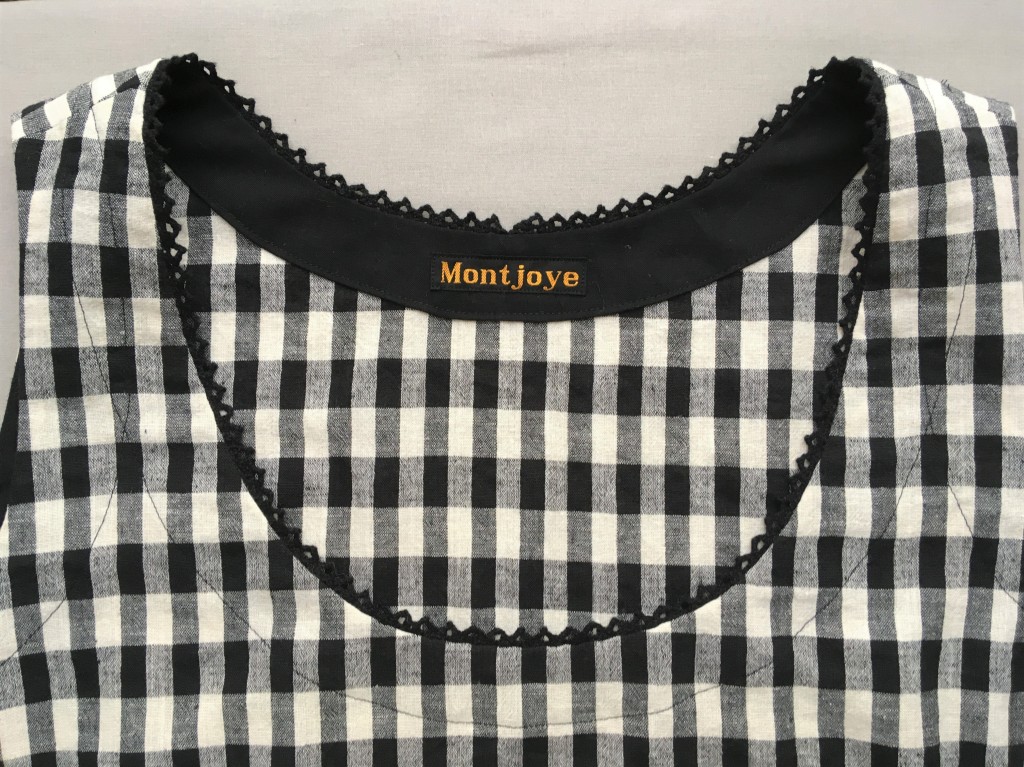
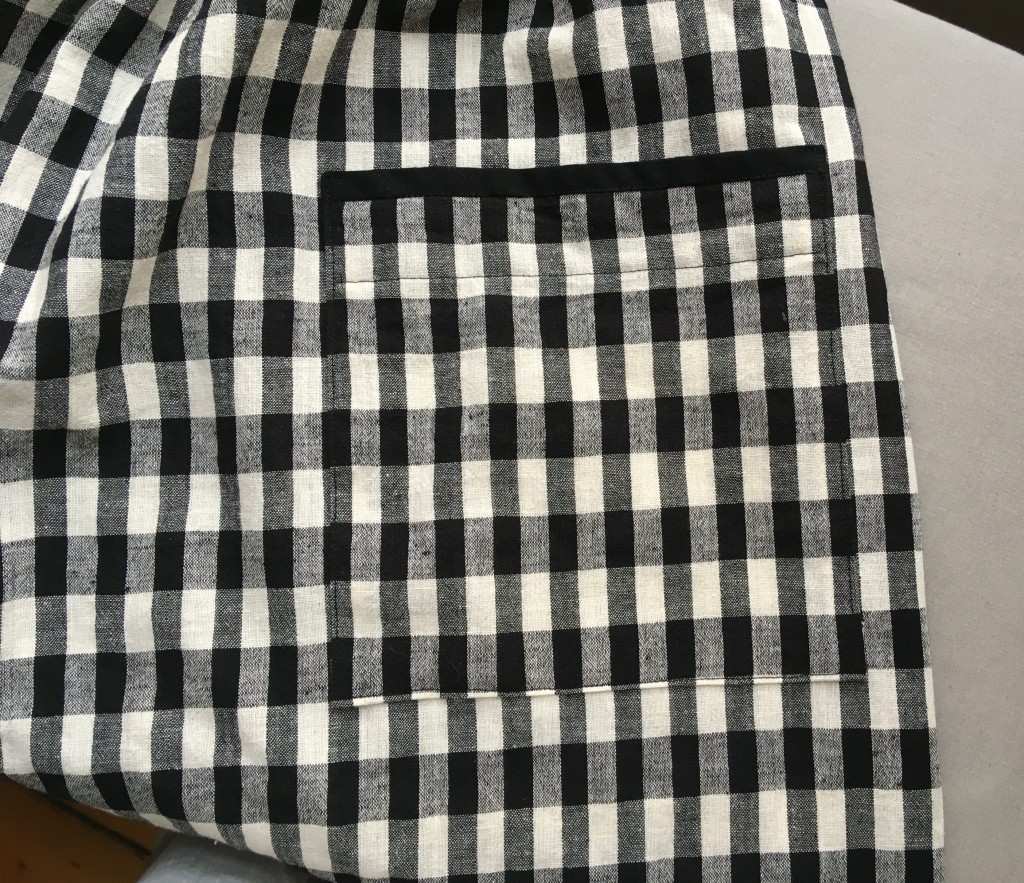
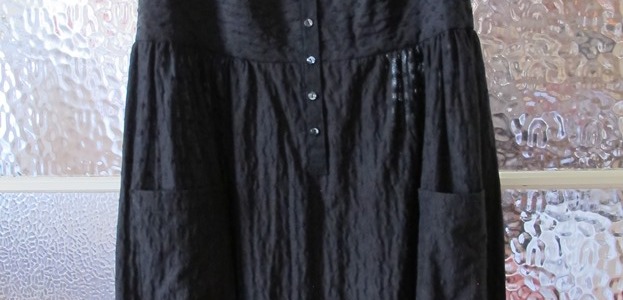
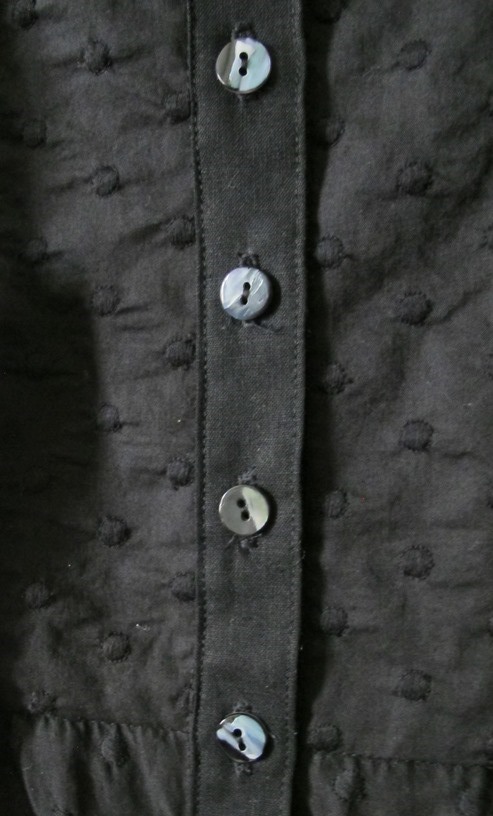
Of course I put pockets on it. I forgot to put the label on the yoke facing as usual, so it went on one pocket instead. I was lazy. I haven’t given it a final press before taking these pictures, it’s only had construction pressing. I quite like the relaxed look of slightly rumpled linen.

IMG_3403-1

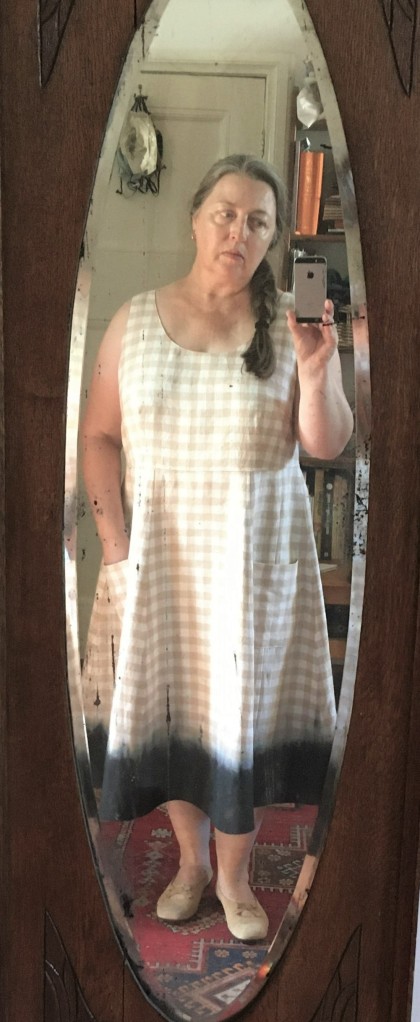
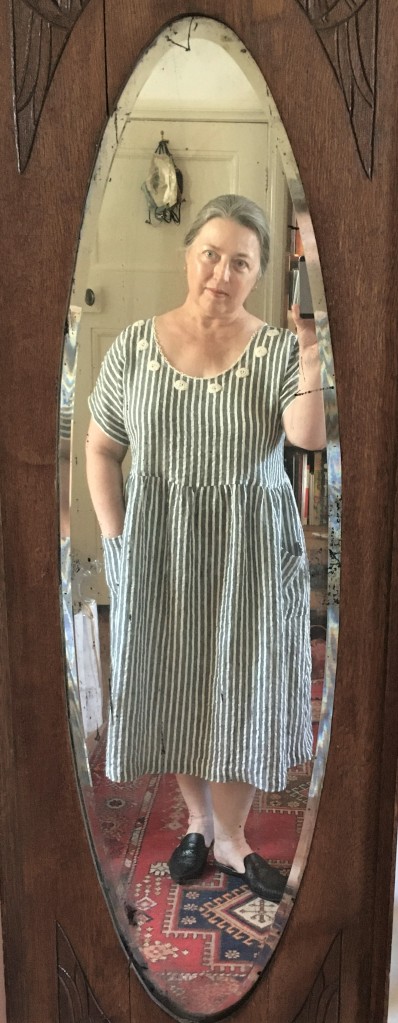
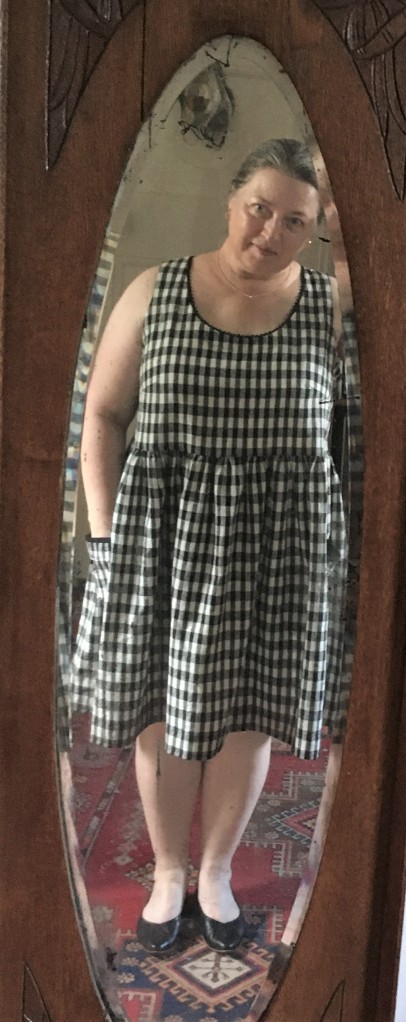
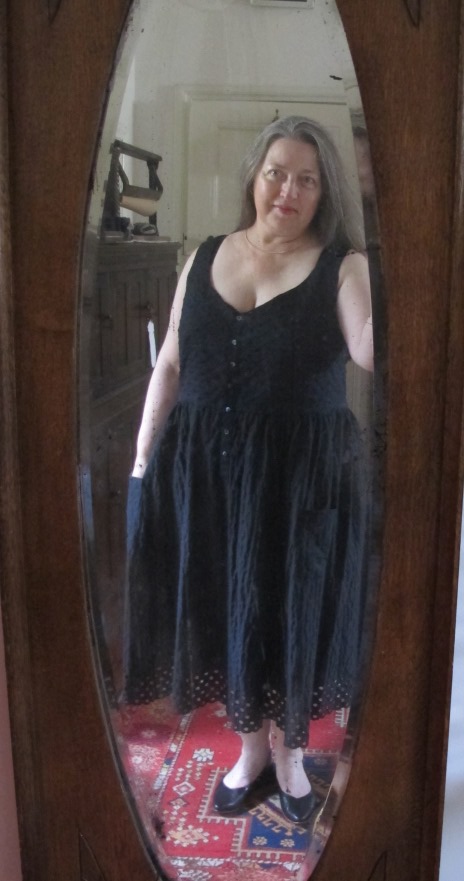
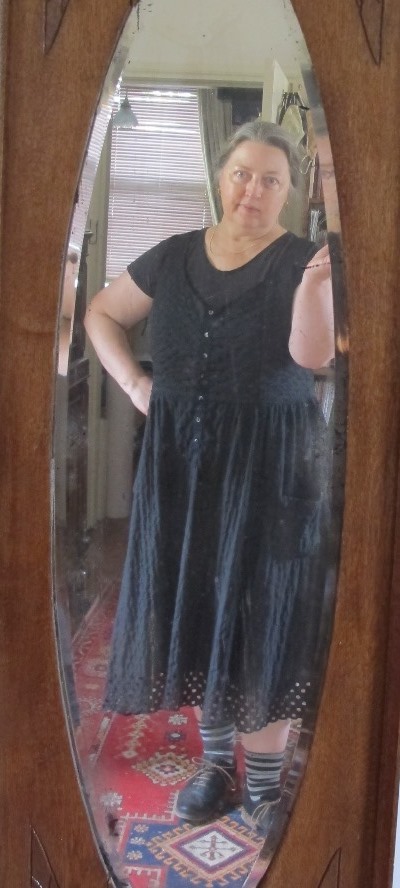
Here it is on. Back and front

IMG_3433-1

IMG_3427-1

I really like it. It has 18thC frock coat overtones. Vaguely piratical. I’m thinking this shape would be nice in some lightweight coating I have in stash. I’ve been nice to future me and taken a pattern of the bodice adjustments before assembly. Pretty happy now that I did that.


Indigo Vines Dress

Quite some years ago I saw a child’s dress in Glasgow’s Kelvingrove museum. Custom batik decoration, indigo dyed, and with an intriguing but simple cut. An Arts and Crafts movement piece.  I was very taken with it and it stuck in my head.

IMG_0169

Then about 14 months ago I prepared a length of silk with custom stitched resist pattern, intending to make a dress inspired by this. See Indigo stitch resist experiment.

A month ago I realised I had a delightful excuse for a new semi formal day dress in the form of Christmas lunch. So I decided to make this up. I laid the fabric out and was about to cut but felt fuzzy headed and left it until a little later. This turned out to be a very good thing because during the pause I remembered that I wanted to embroider the leaves, which had not worked as well as the stem of the design, and that is much easier to do with the fabric uncut.

IMG_3058-1

I worked the embroidery over the next week or so. The neckline and one sleeve edge is done in stem stitch with one thread of Madeira stranded silk. The other sleeve and the front hem are done more simply with just a running stitch. The fascinating background fractalish pattern is I think because I washed but didn’t fully scour the fabric before dyeing.

IMG_3226-1

That done, I finally did the very minimal cutting out and assembly.  There is a little machining for the main seams but I did most of the stitching by hand. Partly in keeping with the rather labour intensive custom decoration but also to make the non pattern stitching less visible and let the silk sit well.

Here is the finished thing. By no means a close copy but very much inspired by. Amongst other things, mine is less full (limited by fabric width) and has added pockets. Sleeve edge to sleeve edge is selvage to selvage.

IMG_3242-1

A detail shot of the finished neckline:

IMG_3228-1

and on:

IMG_3265-1

I’m pretty pleased with this I think. It’s loose and very comfy. A great dinner dress. A bit matronly perhaps? I was going to add ties to pull it in but it really didn’t want them, unlike my first go at a dress with this cut.  I think that might have something to do with the level of the waist cut. I must do a proper comparison of the two. I’m feeling I might make another of the same cut with a fuller skirt and with the front waistline cut angled downwards to allow for the bust lift.

Yes, I’m dressing like a Victorian child again. I noticed some time ago that clothes popular with middle aged women have a certain intersection with designs used for children. There are good practical reasons for this but it does amuse me.

Schparkly handpainted silk remodel

9 years ago I bought a length of sequinned, handpainted silk from Eastern Silks in Adelaide. 5 years ago I made it up into a sheath dress. This fitted beautifully at the time. Maybe not the most flattering cut for me but the sort of thing the fabric wanted to be. The painted areas are a little stiff so it doesn’t drape nicely. It needs to hang in a smooth fall to display well. Dress version #1 went to a party, had a drink spilled on it, got washed and…. shrank. I had been an idiot and not pre-washed the painted silk. To add insult, the pale pink silk satin prewashed lining didn’t shrink.

Original, before party and washing:

IMG_4367-1

The poor distorted thing was far too splendid to ditch, but it took much time and thinking to come up with a way of resurrecting it. After hearing me musing about it, a clever friend suggested tabardising it. Eventually I concluded that was indeed the best idea. It was a lot of work though. Unpick the sides and shoulders, cut a deeper “armhole”, cut away most of the lining- which ended up remaining only as a facing for the front neckline. Then hand finish said front facing, and add facings of silk organza reclaimed from an old bridesmaid dress to all sides and newly cut back neckline. That might sound simple but by golly it was fiddly.

The shoulders needed more length to put the residual bust darts in the right place, and the sides needed ties for closures, so I pulled several coordinating skeins of perle cotton out of stash and plaited up some cords

IMG_2564-1

This is what I ended up with. Pretty and floaty but obviously can’t be worn in public as is.

IMG_2651-1

An underdress/slip of some kind was needed. After considering many lengths from stash, I settled on a heavy rayon twill of exactly the right red to match the red painted sections and brighten the outfit. It is a slightly tweaked version of the recent indigo linen remodel only cut through with no waist seam and a step out at the sides that I formed into inverted pleats.

IMG_2669-1

Side seam with inverted pleat:

IMG_2674-1

And together. The outfit is not quite a 1920’s reproduction, but is heavily influenced by garments from that time.

IMG_2701-1

I did love the original front neckline, so that got to stay.

IMG_2697-1

Shoulder detail:

IMG_2708-1

Side ties:

IMG_2658-1

and on:

IMG_2689-1

It has been to a party (where it had another drink spilled on it, but it is now washed and fine). Is incredibly comfortable and swooshy to wear. Shoes are red plaited leather, opshop sourced though apparently unworn. I spent a couple of weeks wearing them intermittently to stretch them the needed amount across the forefoot. Thankfully that worked well enough to wear them for most of the party. Success I say.