Indigo Rays

I’ve made up one of the planned garment pieces from the indigo dyeing day.

Two lengths of cotton/linen blend fabric, twice the length of the fabric width, seamed to make a huge square. Fold in half and manipulate into rough “sunray” pleats. This bit was harder than I expected but I managed it.

.

Tie off tightly at intervals with string you might like to have turn blue for later use. The wider bulgy bit was deliberate, to provide a darker circle for the hem.

IMG_6572

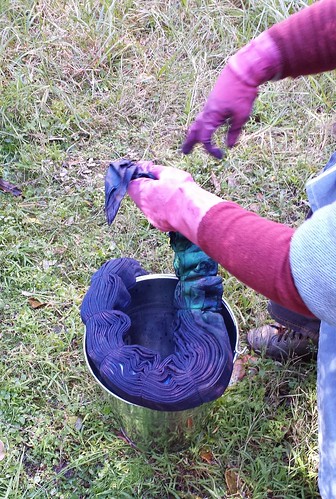
Wet it, pop into the dye batch for a while, then pull out, untie and hang to develop and dry. Then wash, rinse etc until it stops shedding colour.

20180818_125618

20180818_133409

Some months later, I’ve made a dress from it. Cut as big a circle as I could, cut the bodice etc from the corners. Cut a smaller circle from the centre of the big circle to match the bodice waist measurement.

.

My bodice has side bust darts, and I’ve used my trick of attaching ties from what would be the under bust dart position. This forms a casual and adjustable tuck when tied. In this case I’ve used buttons and hand sewn loops to attach them. I’m not fond of battling long ties in my laundry.

IMG_7447

A close up of the waist tie attachment:

IMG_7453

The bodice slit closure, featuring some rather manky machining that turned out to be caused by a bad needle. I changed that and the rest was much neater. See the edge stitching is much better.

.

The loops and buttons are sewn with the perle cotton used to tie the cloth for dyeing. Lovely matching blue string.

.

Pockets!

.

On me

.

.

Baggy Batik

A friend needed shirts and there were some pieces that appealed to his colourful tastes in my ridiculously large fabric stash. Hence….

.

Shirt #1
A crazy orange based batik piece that I think I bought in Malaysia? on a work trip if my memory serves.

.

I used some purple cotton (a stash gift from someone or other) to fill in the needed extra acreage.

.

Shirt #2
A really beautiful and interesting piece I bought in Sydney on a previous trip to the Fabric Cave.

.

This one has a self straight grain tape facing and extra sleeve fabric from a lovely bit of creamy cotton twill I had meant to make a work shirt from… um… about 15 years ago.

IMG_7234

Shirt/Poncho #3
These were all supposed to be from stash, but having said I’d make them, I fell over this piece in “The Sewing Basket” (the Fabric Cave by another name in their new location) on my recent Sydney trip. I knew my friend would absolutely love it, so there was no question. It got bought and duly made up.

.

This piece had no spare fabric at all, so I used a coordinating green piece from stash (actually yet another stash gift) for the facings.

IMG_7299

The side edges are just sewn up, with an opening left for the arms. I’ve added a reinforcing patch to prevent the seam ripping.

IMG_7305

Here is the last “shirt” on me, which isn’t the point, but I tried it on to make sure my (rather large) head fitted through the neckline. I found the shape unexpectedly fun.

.

Shoe strings

I’ve always liked shoe string straps, but as a woman with a not small bust, they are not feasible if one prefers to cover the required underwear. As a pinafore though! Woo hoo. I can have shoe string straps!

I loved this version of a slip pinafore as soon as i saw it. It’s a promo from The Fabric Store. So relaxed and fun. I grabbed the image but then couldn’t find it when I went to make a version, so I was working from memory. After I’d made this frock, I found the picture! I will probably have another go with the much deeper armhole and back that this has.

Merino-Turtleneck-Fabric-By-The-Fabric-Store-Buy-Fabric-Online-1

Here is my version, reclining on the couch.

IMG_7413

And a close up to show the print. It’s a rayon twill, from a friend’s (possibly the friend’s mother) rejected stash.

.

With my figure, to achieve even a relaxed look without it being a tent… one has to use significant pattern shaping. This is the bodice pattern. Two darts each side and enough length in the front to achieve a horizontal waist seam. I do not wish my bust away, but I sure wish it was easier to pattern for. I have an incompatible liking for simple garment shapes.

.

On me. It’s only fitted as much as is possible to be a pull on garment. I’m not actually quite as blocky in the figure as this image suggests. Sigh.

.

Thrifty customised stash hat

Making the thing I wanted from stuff already in the house.

I knew when I made the tartan pinafore that it wasn’t in my current usual colours. As a result, I didn’t have quite the warm hat I wanted to wear with it. This possum merino beret is really lovely to wear. So light, yet warm. I had lots of the yarn left, but of course it was the wrong colour. So I took the greener of the two teals and overdyed it as close to black as I could manage (food colour again). The creamy colour on the right is the original yarn.

IMG_6859

My aim was a cream and near-black striped beanie with a single red stripe. So I still needed the red. I thought I didn’t have enough of the cream possum/merino to steal some for the red, so I overdyed some apricot merino/cashmere yarn out of stash.

.

This is the combination I ended up with. None of the colours quite match, but they are pretty good when separated appropriately in the wearing.

.

Having fun with ways to arrange a very floppy beanie to have it’s picture taken. I really like the single red stripe.

.

.

.

Wish I’d thought to look up how to make jogless stripes at the beginning. You can see where I made the change! That was a technique worth learning.

.

A picture of it on. I think I like it. In a reversal from some recent posts, this outfit was donned only briefly for the picture. Too warm to wear for long today.

.

Finished!

Celebrate with me if you will. The Liberty lattice quilt is finally done. Finished. Complete.

.

From the concept and set up back in December 2016. Nearly a year of patchworking, then a summer laid aside while it waited for cooler weather. Then the quiltening, which I had to talk myself into. It’s the patchworking that brings me joy. The quilting just had to be done despite me not loving the process. The centre needed a tiny bit of quilting, so it got a little flower for interest, fun and the ceremony of the last stitches in such a long project.

IMG_7204

The pre binding experiment worked well enough. I found I needed to run a line of quilting right next to it to catch all the layers together before trimming off the excess batting and backing. I think I did stretch the edge of the top slightly in applying the binding in the first place, which is not ideal but the finished piece is tolerably flat.

IMG_7230

On the bed! The black squares and the black bed frame work so well together. Yet the overall effect is light, bright and neat. I’m so pleased.

IMG_7211