Cashmere Eggs

A bunch of years ago, I brought home a pure cashmere cardigan in palest pink that I had found in a charity shop. I loved it. So, so soft, and it has pockets! It had drifted into too small territory so I stopped wearing it. I pulled it out in a recent wardrobe cull and found it was peppered with moth holes. No! The cupboard got a good clean and some moth papers. The cardigan got a wash and about half a day’s work.

IMG_2408

I darned 11 small holes or weak spots and patched two larger holes. I might not have bothered, but… pure cashmere! and…. pockets!

Aside from the moth holes, it was a bit yellowed in places. Too subtle to catch well in photos, but enough to make it dingy.

So I applied beads and elastic bands:

IMG_2420-1

and popped it in a yellow dye bath. Here are close ups of the most obvious mended section before and after dyeing. The mending was much more invisible before. The different materials took up the dye at different rates. Boo.

IMG_2423

IMG_2463

Still, the overall effect is nice I think. I’d so wear it if it was a bit larger. So I need to find it a home. Egg yolk yellow, decorated with fried egg donuts. Or possibly inverse cheezels.

IMG_2466-1

Accident appealing enough to mimic

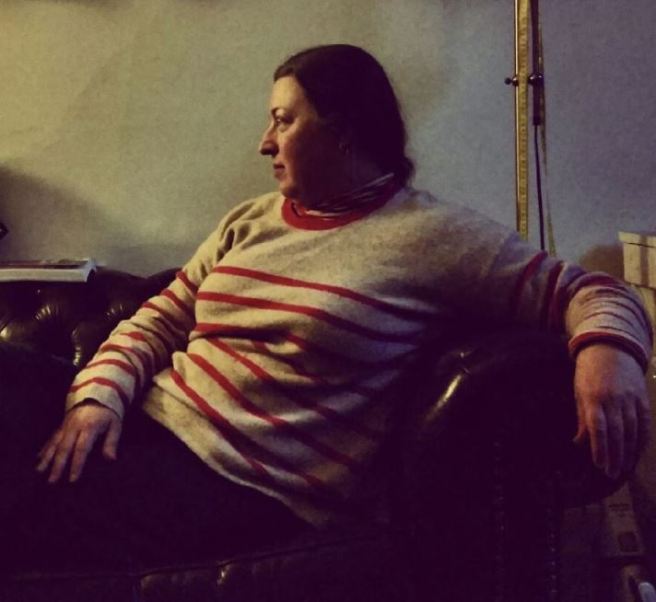
While waving dye about the last few days, i decided to dye a jumper red. A jumper that I liked the shape of, but had fallen out with it’s colours. I failed to get a proper before shot, so I submit one taken by a friend. She calls it the “Dutch Masters” look

IMG_20160721_193754-3

Oatmeal and salmon. Opshop sourced, darned and mended. I wanted it red. I’m in a red wearing mood. wearing red in winter makes me feel warmer. However, I was a bit concerned that trying for a flat red over a striped plus darned and mended jumper might not be that appealing. Besides, I’m currently very taken with the whole shibori thing. So I jumped in and bound it up with string after the garment had been washed and vinegar soaked. It turned out that the string I used had powers I had not anticipated. Powers lent to it by it’s previous sojourn in blue dye! When I untied it and found unexpected blue in parts of the garment, I was shocked and saddened, but only momentarily. I soon found that I actually really liked the effect. So much so that I took a blue fabric pen and worked to imitate the effect in as yet unaffected parts of the garment. Can you tell which sleeve is string dyed and which is imitated?

IMG_1009-1

String, dye exhausted and not. That blue string still holds possibilities.

IMG_1059-1

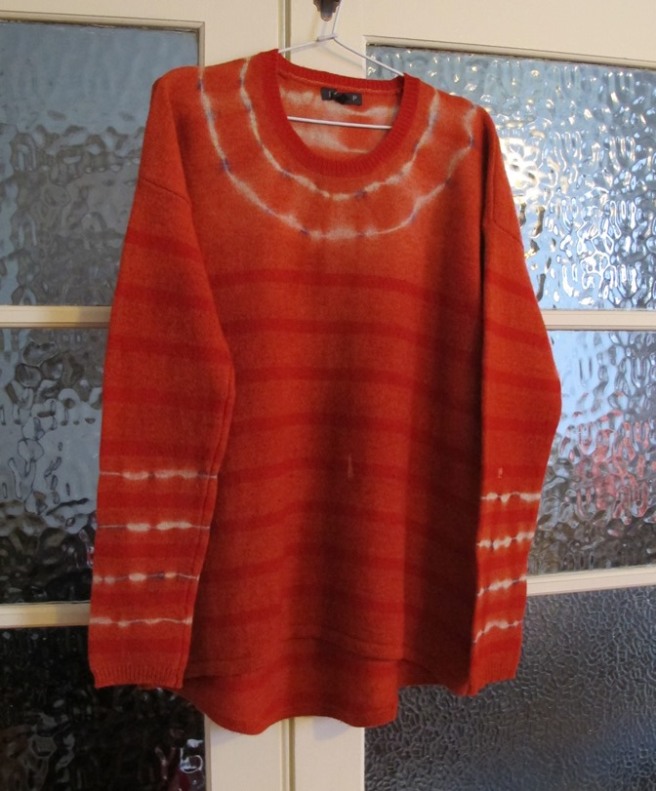
Whole finished jumper. I am really pleased with my last minute tie dyed stripes. They give character and soften the boxy, shoulder enhancing effect of the unstriped yoke area, changing the focus to the face and forearms. The red was achieved with Queen food dye. 50ml (a whole bottle) of pillar box red, 2ml of green and 20ml of yellow. I find that “pillar box red” alone gives a colour too candy pinkish for my liking.

IMG_1004-1

I love it anew. I’ve worn it the last two days. Might well be my newly favourite jumper.

IMG_1014-1

Embroidered (table)Cloth Robe

Still playing catch up on post content. This one dates back to January.

I had need of a new lightweight dressing gown/ house coat ahead of the arrival of a house guest. I had spent quite some time combing through the fabric stash without coming up with an appealing combination of fabrics. The gown needed the equivalent of about 4 metres of standard dress width fabric. Much of the interesting print or otherwise patterned fabric is in 2 or 3m lengths, hence the need of two fabrics at least, both suitable and coordinating, and not earmarked for other projects. Argh. Patterned fabric helps to maximise modesty while still minimising fabric weight and therefore warmth. Then my eye fell apon these two old table cloths. Instant inspiration!

IMG_8764-1

They are not identical but really very close. Each is from one set of grandparents. Obviously this sort of thing was fashionable. Same background colour, both cotton. Pretty much the same colours in the embroidery, one is more delicate, the other is more bold. These I could work with. Woo Hoo. She was off!

The cutting layout was very much driven by the positioning of pattern elements. I wanted to show the fancy work off as much as possible. Here are the gown pieces cut and roughly laid out, prior to assembly.

IMG_8770-1

The pockets and belt tabs are fussy cut pattern elements. The belt is a twist cord made up from crochet cotton in colours matching the embroidery.

IMG_8772-1IMG_8775-1

I added some wide cotton lace to border the whole thing and help form the collar

IMG_8798-1

The sleeves are cut from the corners of the heavier worked cloth

IMG_8801-1

From the back

IMG_8804-1

and a silly, vaguely boudoir shot. I wanted a whole reclining on the couch kind of vibe but this was the best I could manage as a selfie

IMG_9091-1

Once I’d decided to use these cloths, it went so fast. The whole thing was made in not much more than a day. It turned out so well. I’m delighted. It is lovely to wear and feels so rich. Not bad for a couple of old tablecloths.


Red Cashmere Remodel

I wanted a red jumper, but I didn’t want any more jumpers. So, take one chartreuse, 100% cashmere opshop sourced jumper that fits well but I’ve only worn once, and that a year or more ago.

IMG_0414-1

Dye it red with food colour. Ooo, I love the colour!

IMG_0449-1

Decide I’d really rather have it as a cardigan. So cut it open at centre front, make facings from bright orange merino knit offcuts and button loops from sexy shiny silk thread. The colour isn’t right in the picture with the buttons. It really is as red as the pic above.

IMG_0497-1IMG_0502-1

See, sexy shiny silk thread. I have a stash of this bought cheaply from a closing down sale. Well, cheaply per item. I spent a lot of money at that sale.

IMG_0518-1

Add a label, because you can

IMG_0484-1

and call it your new, ultra soft, rather stylish, red cardigan.

IMG_0506-1

Simple recycled bags

Not impressive sewing, but a nice bit of thrifty remodelling. Making use of quality fabric and keeping some memories. I had a bunch of too small and/or worn out garments made from liberty lawn and other fabrics that I loved to much to part with. I’ve made the largest pieces from six of them into four simple bags. These will I think mostly serve as shoe bags for travel. They are near weightless.

Here is one of the shirts when it was newly made. I love the fabric so much. I could have hung on to it in hope of weightloss, but it turns out the neckline wasn’t ideal anyway. So even if it fit again, I’d rather make new shirts.

IMG_3869

Bags of prettiness, thrift, practicality and memory. Hmm, I might see if the rest of the garments might yield big enough pieces to try making waxed fabric cloths for food storage.

.

Serendipity cushion

I just spent a week with hard flat wooden seats as the only sitting options. Oh my sore tailbones. A cushion would have made my week more comfy.

In the clean up after this event, I nearly threw out the few handfuls of cotton flock left over from a futon remodel. No! this could be cushion stuffing! Then I remembered a scrap of lovely wool embroidered upholstery cloth I’ve had in stash for many years. That had resisted all attempts at inclusion in other projects. It wanted to be it’s own thing. So I assembled the cotton into the shape of this cloth and made it into a baby futon with a bit of old sheet that was lying about.

.

.

By itself, this cotton made a sad, flat, baggy cushion. I wondered if I had much in the way of feathers left from previous custom cushion insert games. I did! It was the short end of a feather pillow, already roughly closed and…. the right shape! So that went in too, making the cushion slightly overstuffed.

I made a bunch of tassels from left over tapestry wool in stash, picking up the colours of the embroidery

.

The backing is heavy cotton offcuts from a butterfly my grandmother worked many years ago. It’s a good match for the weave and weight of the ground of the embroidered cloth. My stash doesn’t run much to heavy cloth, so piecing the bits of this was worth it.

IMG_5292

Cushion! The multiple tassels per corner were inspired by the extreme tassellation of some 16thC bags.

.

It’s only little, and quite narrow, but it’s enough to give my poor tailbones a softer experience and can be used even on little stools. Fits nicely on my “Waldo” stool (one of a series of these made by a good friend).

.

Custom yarn from scrap

I decided to let my next sock recipient nominate her preferred colours. “Reds and Blues” she said. The sock wool stash had no red, but there was a variagated pink/orange. I had dark navy and some pale blues, but no nice bright blues.

IMG_1241

Woo hoo, an excuse to do some dyeing! the pinks are now red, which my camera is refusing to capture properly. The blues are now deeper, brighter and much more fun. I plan to use the navy for the toes, and maybe cuffs? I’ll use the newly dyed yarn in broad stripes with spiral joins I think. I reckon I’ll enjoy knitting these.

IMG_1305

Peach Chilli Chutney

Long time no post! I’ve been away but now I’m back and there is a backlog of posts to get through. I had three lots of free fruit arrive in my life this week. I’ve been working hard and having fun preserving them.

A friend of mine is an enthusiastic picker of neglected fruit trees. Someone he knows had peach trees with spare fruit, he kindly sent a big bag of them to me. They took a few days to get to me so there was a lot of heavily bruised fruit. The ~4.5 kg of peaches yielded half a kilo of good eating fruit plus 2kg of usable peach flesh.  Processing fruit takes time. It took me an hour to get from bag-o-fruit to that 2kg of chopped flesh ready for cooking.

I used a tweaked and multiplied version of this recipe. I made a slightly different version of it last year and it turned out brilliantly, aromatic and lively. Really nice either with curry or cheese sandwiches. That first batch has all been eaten, so I was glad for the chance to make more.

.

2kg peeled and diced peaches (prepared weight)
10 tiny red chillis, deseeded and chopped
2.5 heaped dessert spoon chopped ginger
2.5T cumin seed
seeds from 40 green cardamom pods
500g brown sugar
650ml cider vinegar

Put all of that into a wide pan, bring to boil. Cook uncovered on medium heat until it thickens. Bottle.

When I say tiny chillis, I mean tiny. These are from a plant in my garden. I’m a bit astonished at how small they are. I’ve used them as if they each have the heat of a more regular sized Thai chilli.

.

Lacy Handbag Resurrection

A few months ago, a friend invited me over to go through her remaining fabric stash and take what I wanted. Very generous. Amongst the bag of bits I took home was this old hand crocheted bag that had seen better days. I wanted to have a go at making it both useful and pretty again and give it back to the lady.

.

You can see above that the outer section of the lacy edge was quite badly damaged. My first thought was to fix that by sewing it together, using beads to enliven it. I started doing that but the fibres were just falling apart as I worked. So instead, I decided to snip off the worst of the damage. Thankfully the crochet was worked in rounds so taking off the outer section was easy.

.

Here it is sans damaged section.

.

I was sad about having to lose that lovely depth of lace trim. So to both replace the fancy and give back some weight and drape, I decided to sew the beads all around the edge. Besides, doing that was fun. The beads are a mix of ones I had in my stash.

.

Beginning the bead trim:

IMG_9586

It needed a strap. I was a bit stumped for what to use until I thought of plaiting one from a mix of almost right colours. Thread from my stash. I think it looks quite good.

IMG_9592

Then I built a liner for it. The blue silk I hand dyed. I had hoped for a more purple colour, but this is what I got and it’s pretty as is. The green is lightweight cotton drill from another friend’s stash rejects.

.

It has a pretty zippered pocket in a mix of colours

.

Then I stitched the liner to the lace outer around the opening edge. I forgot to get pictures of that. Here is the whole thing finished though:

.

and a good detail of the beading with the liner in place

IMG_9615

She should have it by now. I very much hope she likes it.

Cornflower Hot Water Bottle Cover

Now this has been given as the birthday present it was intended to be, I can show you why I made that embroidered cornflower. Today’s birthday princess is fond of cornflowers and I prefer to make bed warming things from cotton velvet or similar, so nice to the touch. I had promised to make her a hot water bottle cover, and was thinking on what to do, when a lovely piece of blue velvet arrived in my life- yet again from a friend’s rejected stash. “Aha” thought I, perfect!

I made a simple drawstring bag of the right dimensions. The striped ribbon is vintage rayon. The velvet put up a fight as usual but we managed to get a neat rectangle even if some of the seam allowances ended up a bit random.

IMG_8617

Of course I had to fit a label in there somewhere

.

Here it is all drawn up and ready to go. After sitting wrapped for 2 months it has finally been given.

IMG_8635