Last winter I decided I wanted a brilliant red shawl. Just brightest red, no varigation. I did want some interest in the knitting though. I’d also been returning again and again to a pattern called Adularia which has a plain garter stitch body in wool and a deep, very pretty lace trim meant to be done in silk. I put those two thoughts together.
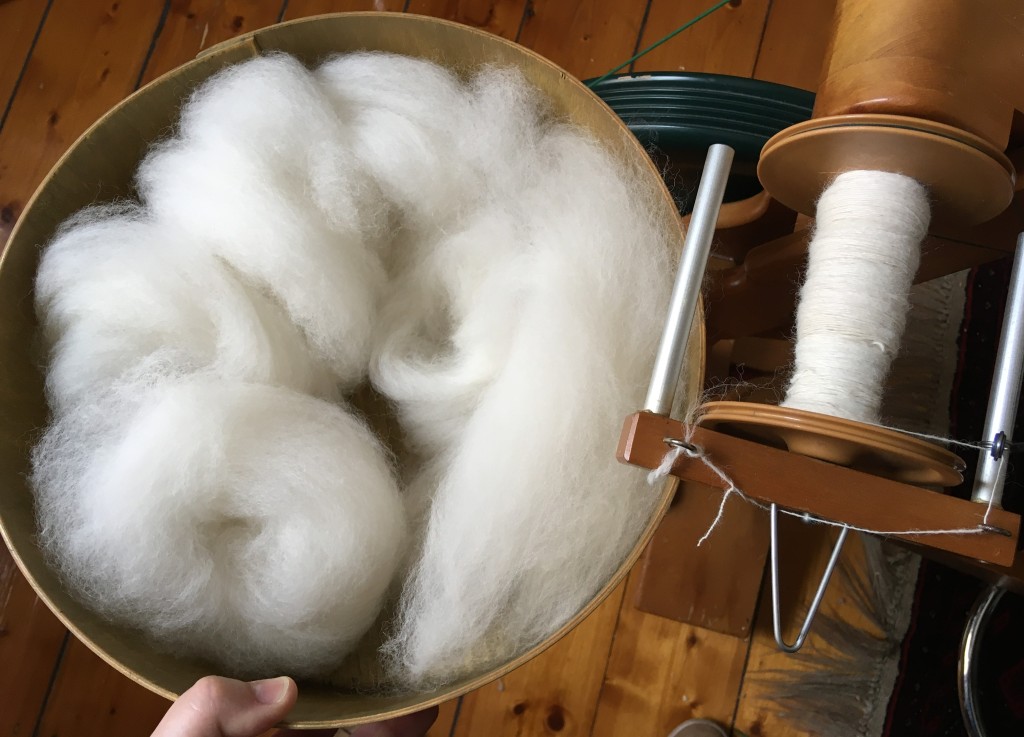
I had ~170g of palest fawn alpaca fleece which I washed, combed and spun, trying for a 4ply finished equivalent. This was back in January.
It came out beautifully and on target straight off the wheel, though it did bloom to become a bit boofier on wet finishing.
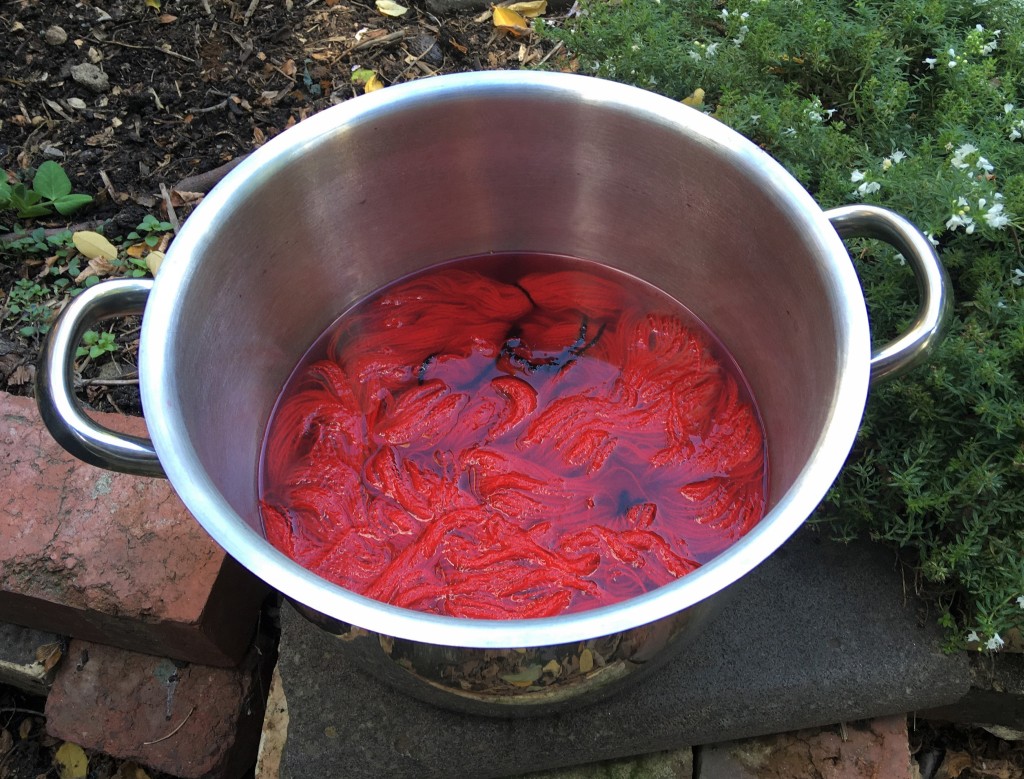
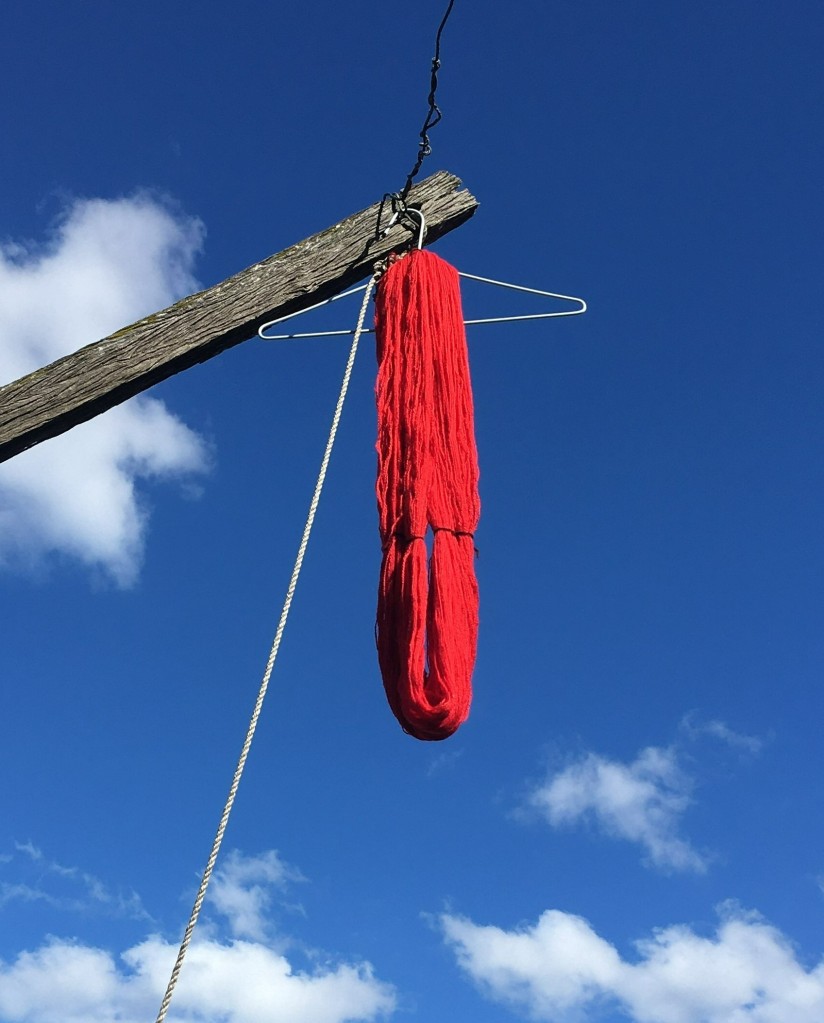
I dyed it with Landscapes dye “Desert Pea” which came out really well.
So, so bright and not blue tinted at all which is what I wanted. This is “my” red! It was such a marvellous contrast to the brilliant blue sky on the day.
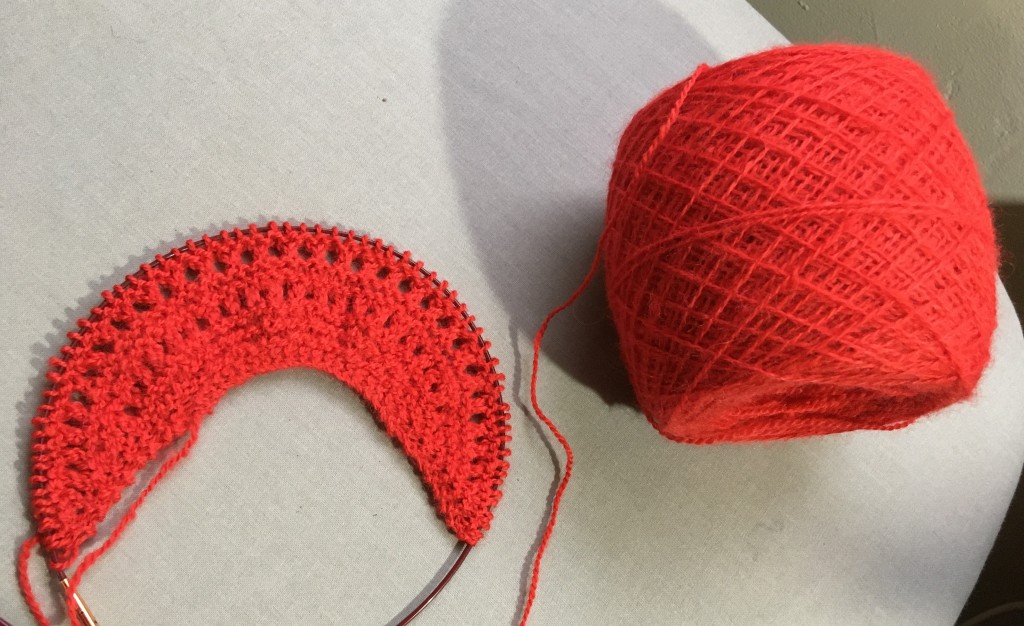
Knitting beginnings. I didn’t fancy doing so much utterly plain garter stitch. So I introduced a row of yarn over k2tog holes every sixth row.
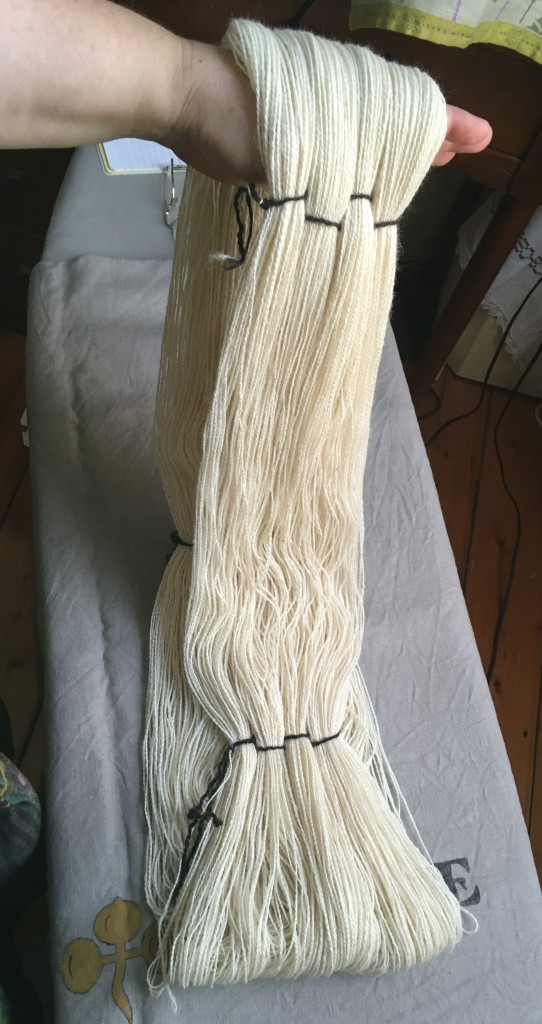
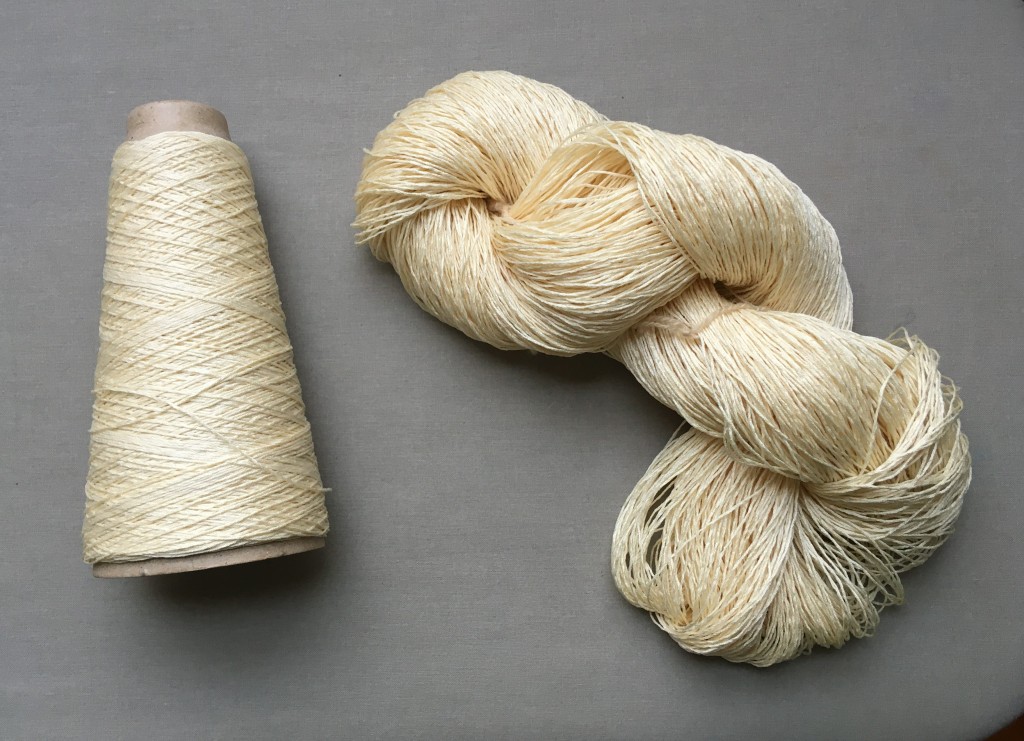
The silk was purchased from Colourmart, which is a dangerous mill end online shop based in the UK. I skeined off 116g (exact weight not important, I just wanted to make sure I had enough), scoured it and dyed it the same full strength Desert Pea as the alpaca. That came out a kind of dark coral pink, so I overdyed with food colours and very happily got something pretty close to an exact match.
Alpaca at the top, silk below.
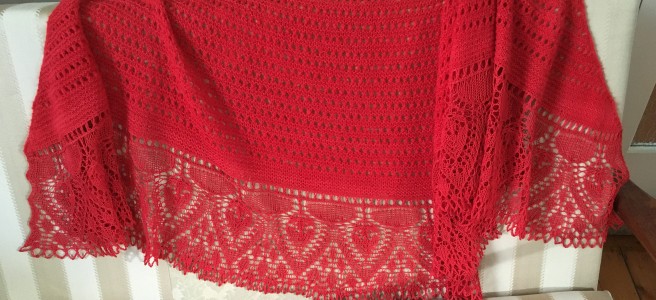
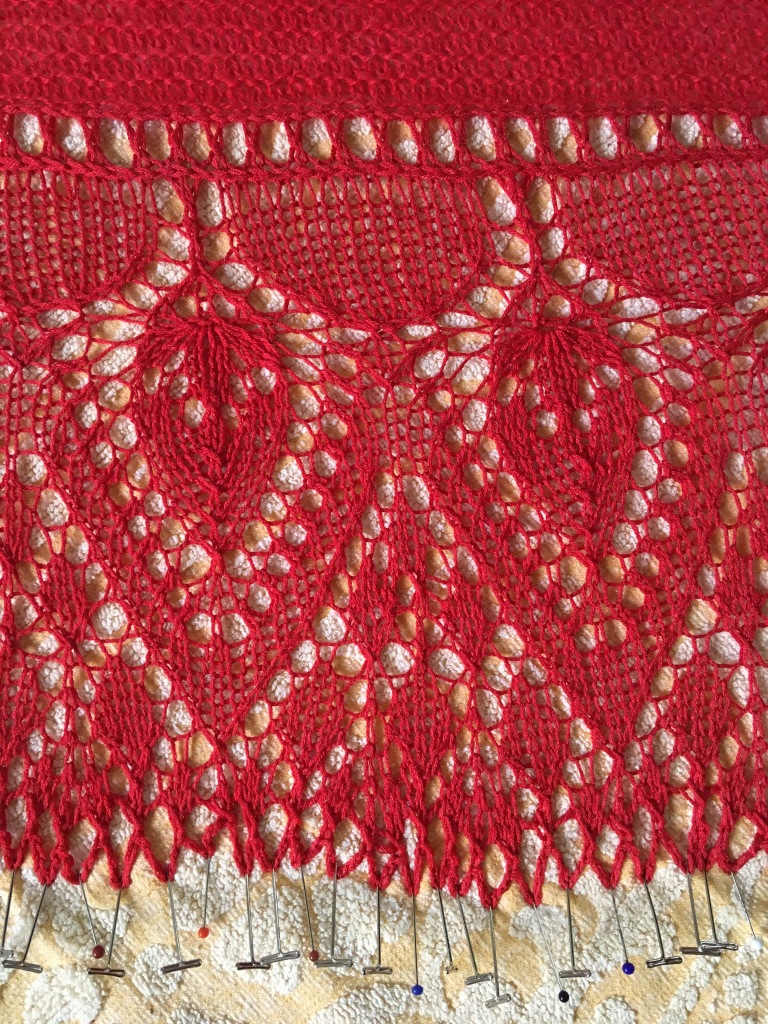
Here she is pinned out for blocking
Such pretty lace and oh so many pinsThe cast off involved a whole lot of little segments of crochet chain. I don’t really crochet, but I can manage bits of chain. I’ve done lots for provisional cast ons before but this might be my first crochet that has stayed in a finished garment.
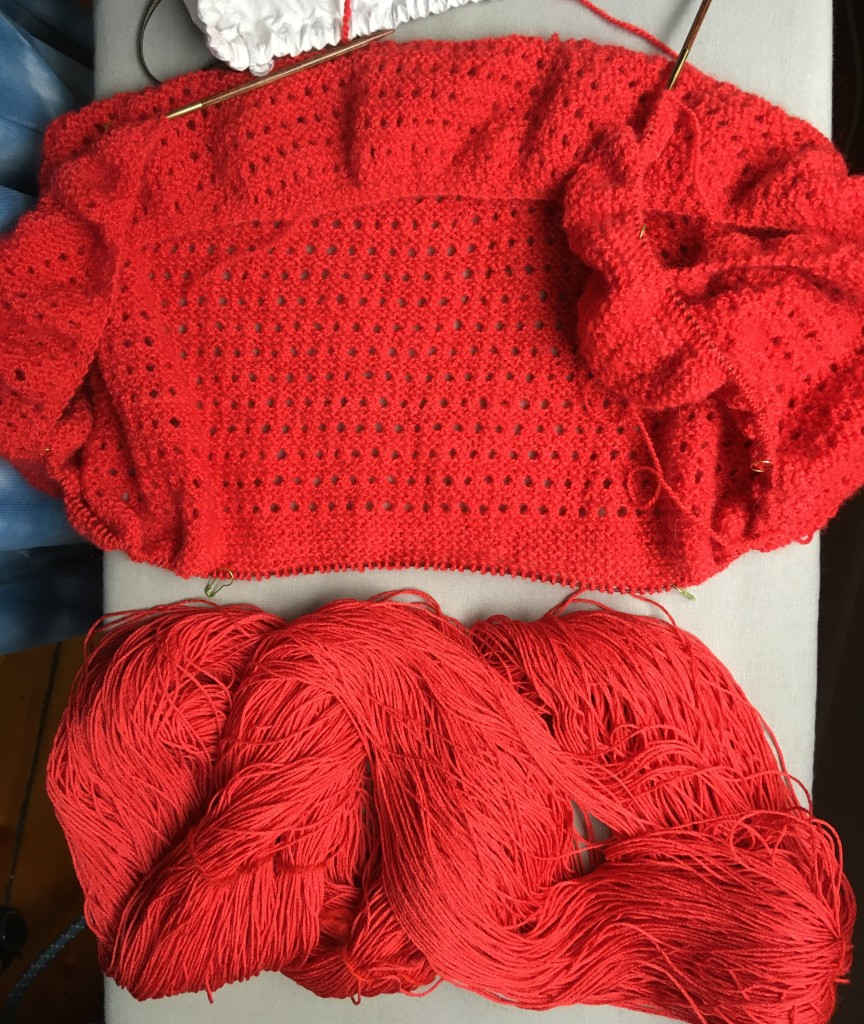
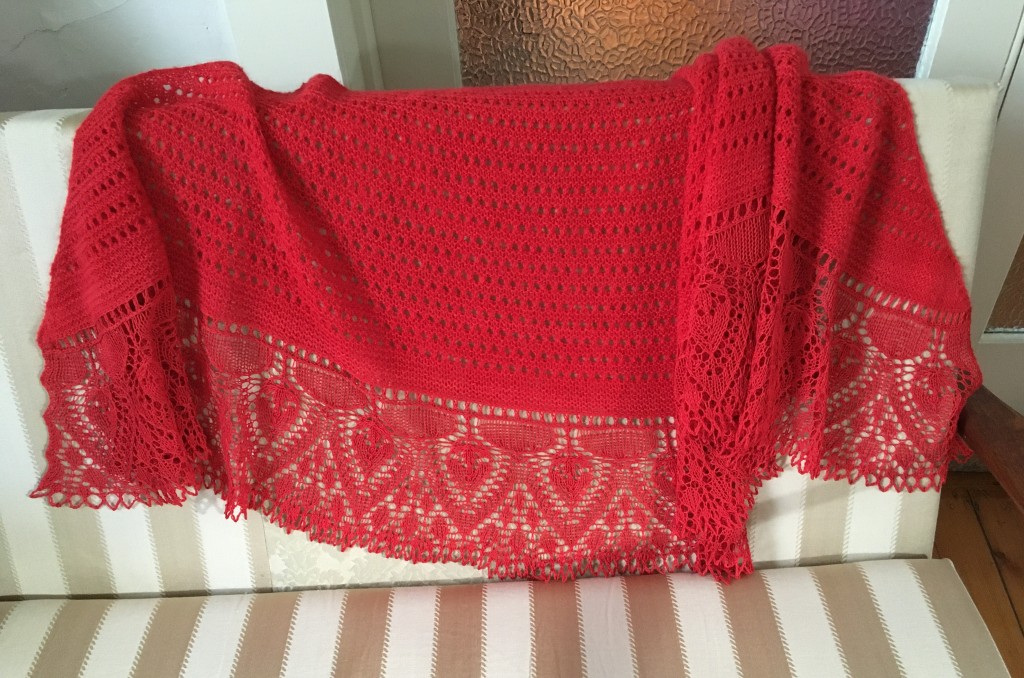
Done. I’m pretty pleased with it. About a month’s worth of spinning, some dyeing and something over two months to knit. Ideally the alpaca would have been a little finer. I had to go up a needle size to get a fabric that wasn’t too close, but that is really a bit loose for the silk. I still really like it though.
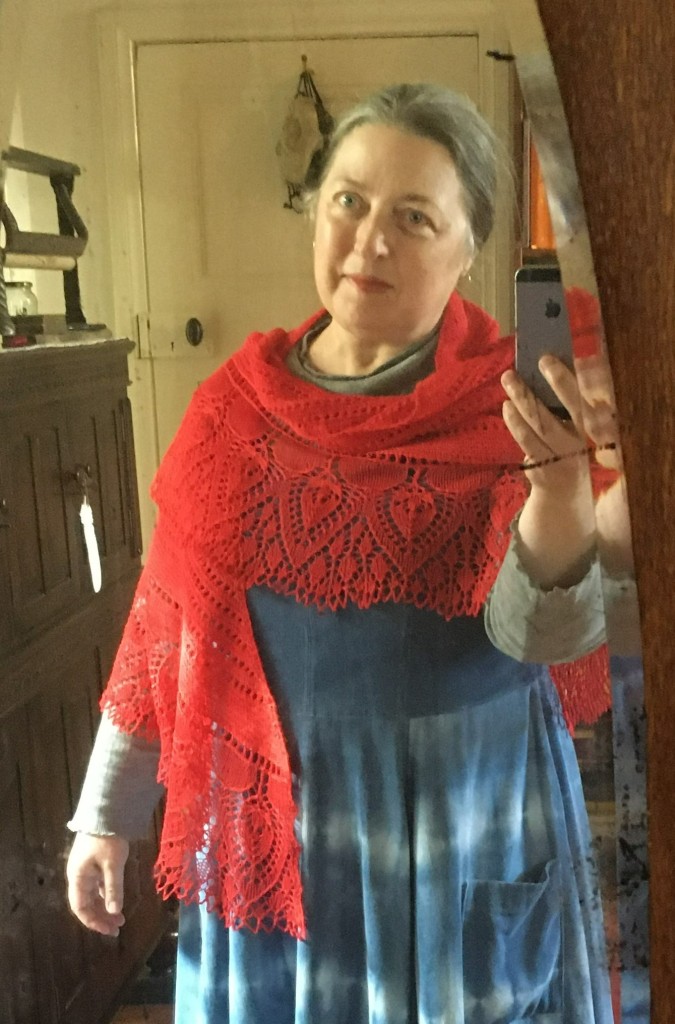
On me. It really is my red!
Hmm. I should take those cloth masks down and put them away somewhere. I’ve moved on to N95s.
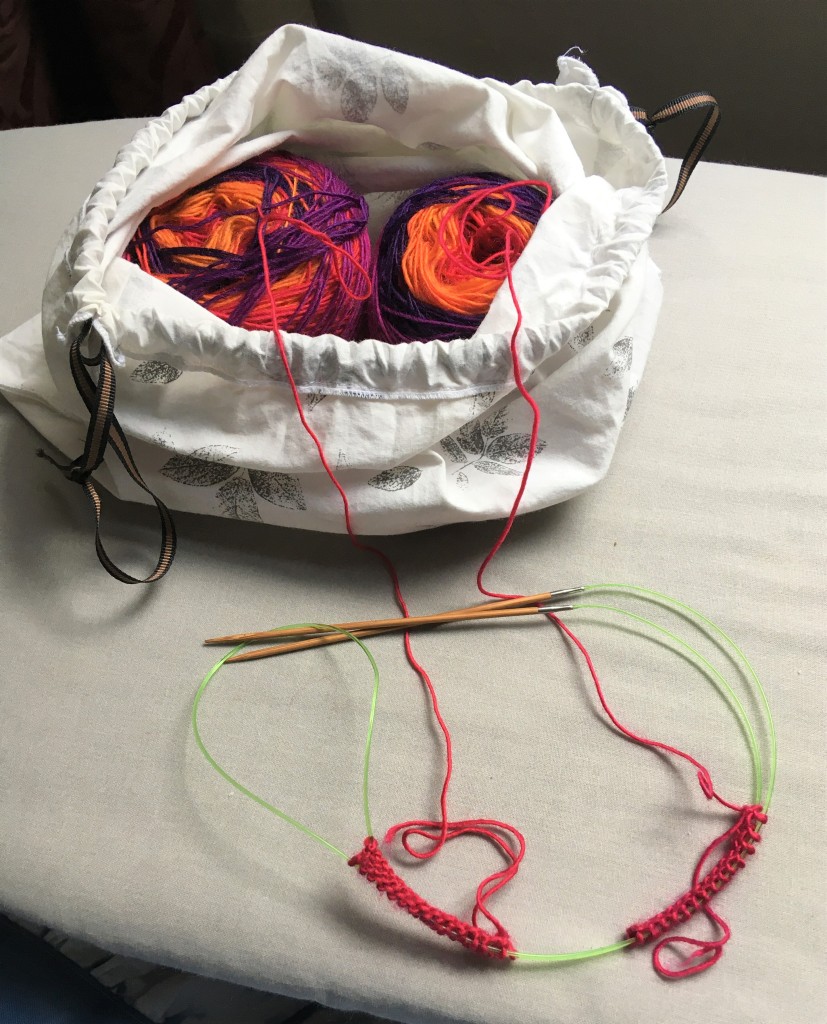
I needed a travel project. Sock knitting is great for that. Very compact, time hungry, mostly doesn’t need a pattern these days. I had some yarn that I was keen to knit but not in my colours. Orange shading into purples. I posted a picture and a friend who loves these colours had a big squee over the yarn. So of course I knitted them for her. To add interest to a simple plain knit sock, I decided to have my first go at knitting two socks at once, by the circular needle method, not the terrifying alternating stitch method. I had to make a special trip to find the right needle but it was worth it. Despite the beautiful colours I nearly “died of boredom” in the latter stages of the knitting.
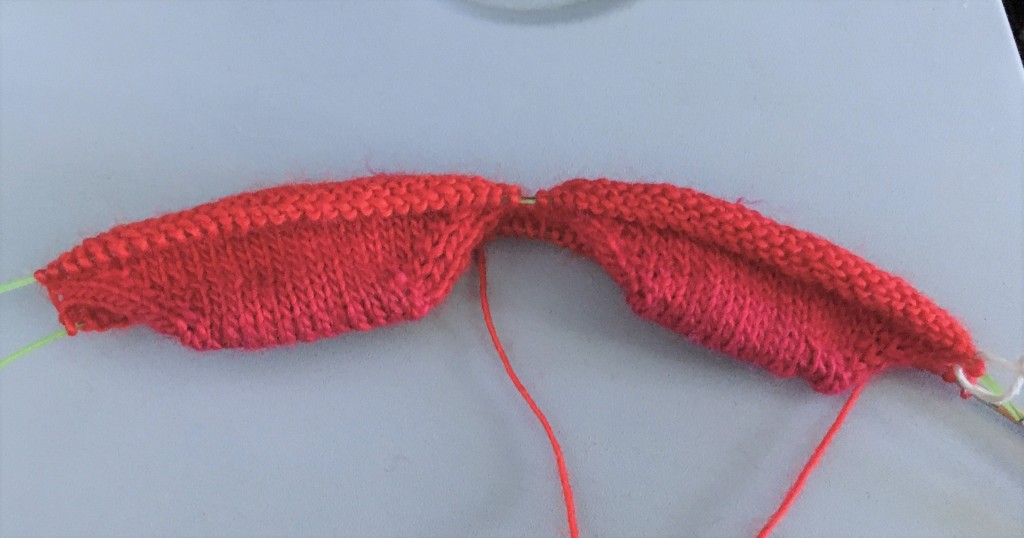
I managed to knit the toes and only the toes on the aeroplane. That’s the tray table grey rather than the ironing board grey that you usually see.
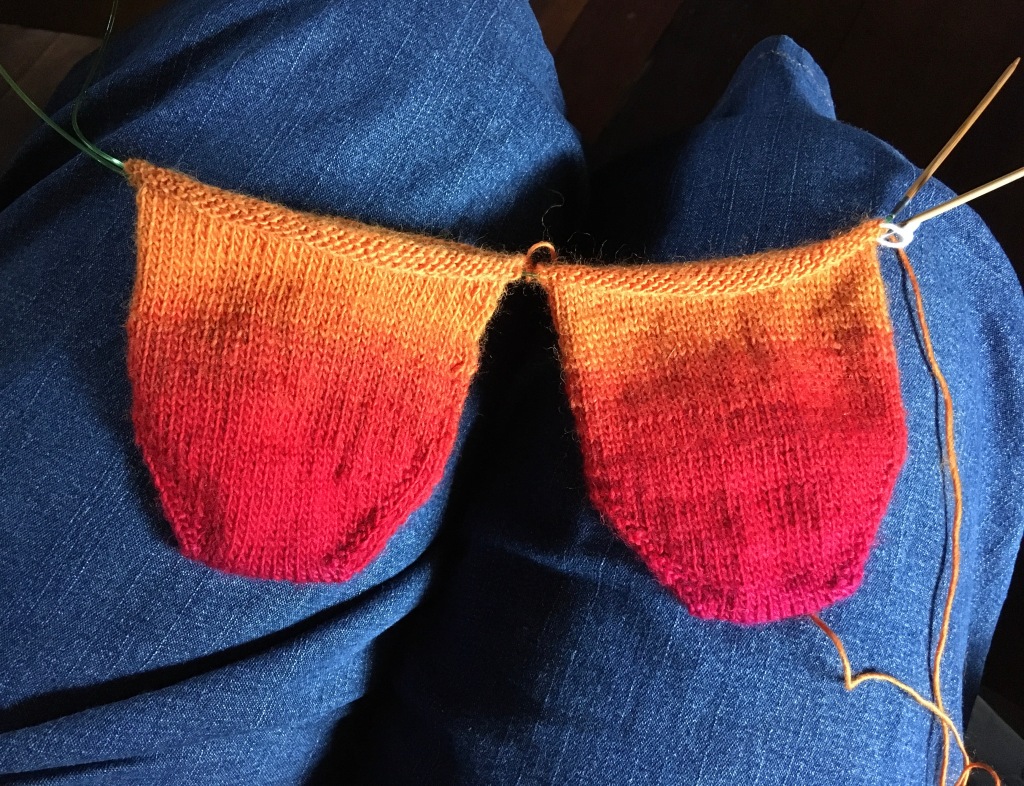
Another progress pic just because. Oh, and because this is the only pic that captures the pink glow at the tips of the toes.
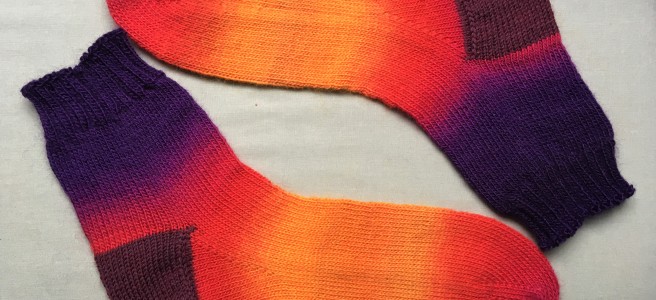
and the finished socks. Such a beautiful long colour gradient that the camera has not quite captured. It’s prettier than this in real life. I believe the yarn is Schoppelwolle Zauberballe but I had it unlabelled as a stash gift from a friend. I used a different yarn for the heels so as to not interrupt the gradient.
These have been delivered to my friend and she loves them to look at, but I don’t yet know if they fit. Fingers crossed.
18mths ago there was a conversation or two with my friend Alan about me maybe making a shirt for him. “A nice linen shirt” was what he said he wanted. Some time earlier he had sent me home with some surplus fabric including a really nice piece of tiny checked linen in navy and white. This wasn’t enough for a whole shirt, but if I made the back from something else? Well I had an idea. You see, Alan has a strong fondness for mermaids and I’ve been having fun making stitched shibori pictures. So back in April, nearly a year after the above conversation, I made a mermaid for him.
First draw your mermaid. I wanted a vertical design and a cheerful elegant mermaid. I couldn’t find exactly what I wanted but I found a scary mermaid in a good pose and softened her
Then transfer the design to some nice linen with soluble pen and stitch the lines.
Then draw up all the strings tightly and knot them off. Doing that in pairs is much easier.
Then pop her in a dye bath and after rinsing, pull all the threads out (that takes longer than you might think!) to reveal your creation. This picture is slightly amended. All the lines came out pretty well except the one outlining her bosoms. That didn’t work at all. Bother. So I carefully painted that in with white fabric paint.
Then for his birthday I made a completely different shirt out of a fun elephant tablecloth. This was my cunning plan to get sizing information for the mermaid project.
Then we got popped back into lockdown. I went ahead and made up the mermaid shirt. Nice neat checked linen for most of it. Looking at the buttonhole distortion, maybe i should sew my shirt buttons on with stalks, hmm.
And a fun mermaid for the back
Yesterday I was finally able to deliver it, hurrah and well received it was.
There is actually a second mermaid shirt under construction. The stitched resist works better on two layers of cloth, but my design was not symmetrical so I did the whole thing on two layers of linen. So there was a second mermaid to do something with.
I don’t normally buy merchandise but I’m a fan of Laura Kampf and her YouTube channel. I’d wanted a “Let Glue Dry” shirt for ages. Not only would buying it support her, it is nicely subtle merch plus I regularly need that reminder for my own woodwork. Sadly when I decided to order, I found that all the clothing was only available in straight cut styles. I’m curvy and pear shaped. Straight cut so doesn’t fit me! However, I’ve several times successfully altered large sized straight cut shirts to fit me better. I need a big size to get the width in the body. The only garment left in XXL was the logo hoodie. Never mind, I like the logo too.
Eventually it arrived. Hurrah! Here it is straight out of the post bag, wrinkled and of course the wrong shape for me.
I tried it on and found these problems that needed remedy, most expected: -Too long in both body and sleeves -Too narrow in the hips -Too wide in the shoulder -I dislike the central pocket and besides, it’s too low -I can’t stand the hood. Feels like it’s strangling me and conflicts with my default hairstyle of a single bulky plait.
This is ok. I can deal with all these. So, unpick the pocket, cut it off carefully where it joins the ribbing and slice it in half:
Chop a lump off the bottom:
Cut the sleeve off and take a slice to move the armhole inwards. This makes the armhole too deep but I need the width for bust circumference so I’ll put a piece in.
Unpick the side seams to the waist, try it on to see how much infill is needed:
Then chop the hood off, leaving enough for a collar. The rest of the hood provides fabric for the infill pieces:
Then to sew it all back together. I started with the collar. I wanted to keep the eyelets, and the cord with it’s aglets for interest. The hood was lined, so I had the two layers to form a new cord channel. So I folded the collar edges inwards and sewed them together. Then ran another line of stitching to make the channel.
Then I sewed the pockets back on near the sides, attached the infill pieces, redid the side seam and set in the sleeves. Later on I top stitched all those seams with a twin needle to imitate the original finish but I forgot to get a picture of that. I also top stitched the shoulder seams with woven tape underneath to support them and help the the garment keep it’s shape.
Then it was time to deal with the hem. I didn’t have enough ribbing to do a full width hem of course, but I could cut the old hem in half lengthwise to give a half width hem finish.
All done! It still looks like a real thing but now it fits me. Hopefully the mark from the original pocket position will go when I wash it. This was near a day’s work plus a bunch of thinking and planning. I say it was worth it.
and right next to it’s old self though possibly not quite the same scale
On me to prove it works. Front and back. It’s very comfy, a bit baggy but that is nice I think.
I had all sorts of plans for making clothing for myself this summer, but none of it happened. I got distracted by a bunch of other projects. This little plan was firmly stuck in my head however and I had a packet of navy dye that needed using before the water soluble enclosure succumbed to humidity.
This tiered frilly skirt was a 90’s Jigsaw brand number that I loved and wore a lot. I don’t wear this sort of warm colour combination any more though and besides, it no longer fit. I nearly consigned it to the opshop bag but the fabric is really lovely, fine and close woven cotton, near Tana lawn quality and all those gathers were already constructed. Surely I could rework it?
I pulled out the leftovers from the shirt featured in https://montjoyeblog.wordpress.com/2020/03/29/yoke-wrinkle-solved. Irish linen, orange and grey shot. Really lovely stuff. Stiffer than the skirt fabric but a bodice is allowed to be different. It tones with the skirt so hopefully they would work together after dyeing.
I then put them both through the navy dye bath with a bunch of other things
Happy with the colours. I cut a bodice from the linen, black facings from the leftovers of a different shirt. I chopped off the original top tier of the skirt, which yielded a piece to make the visible part of a button band to tie the two fabrics together and add interest. Hmm, somewhat wonky sewing there. I made a bunch of mistakes in cutting, all of which were retrievable. I’m peeved that I screwed up by making the button band the “wrong” way around, buttonholes on the left. No one else will notice, but it will annoy me.
Here is the whole dress. Of course I put pockets on!
and on me. Maybe I’m too old to wear this many frills? I don’t care. I love the new dress.
I had a small stack of under loved embroidered things. Garments, tablecloths, napkins, doilys, tea cloths, pillow cases, handkerchiefs etc. Some have already been turned into new garments but I kept any embroidered offcuts. I had been musing on the idea of making a patchwork quilt to use them up. We were in lockdown here due to Covid, not a bad time to embark on this.
I started in early July by settling on a block size driven by some of the larger motifs that I didn’t want to have to cut into. Anything smaller or awkwardly placed was built up to the right size using the plainer offcuts. I think that first round gave me about 50 pieces.
I have to share this cute puppy with you. The embroidery is not good but it was done by primary school me so it had to be included. There are so many memories in these embroidered bits. Quite a few were done by my grandmother, many by friend’s family. There are also pieces from childhood garments and my cot pillowcases sent over by Mama.
Eventually I came up with an overall design, which said I needed not just 50 pieces, but 144! So I put the call out to family and friends to make up the balance. This is partway through the collection. I think I still needed about 30 pieces.
Then in early September, the last donations came in, much of which was embroidery done by my friend’s family members. Lovely stuff to receive.
My plan was to checkerboard the embroidered bits with nine patches in nice strong colours, a pretty classic design. So I raided my hoarded cotton and linen offcuts, some of which are themselves embroidered.
Then shades of pale for the other “colour” of the ninepatches to blend with the background of most of the embroidered bits. I was in this stage developing a cunning plan for the arrangement of the dark pieces particularly. Way too much thought went into this and many, many rearrangements of the stacks.
Quite some intense time on “the zen of little bits of fabric” as I tend to dub this kind of repetetive construction and I had the needed ninepatches assembled.
A few more days of fun arranging and sewing got the patchwork done. Here it is all layered up ready to pin baste and showing nicely my cunning plan with the nine patches. The colours are arranged to give shades of red/purple on one diagonal and blue/green on the other. I had worried that it would be too hard to manage the orientation of the blocks to make this work but I did it with only a modest amount of unpickery. I’m really pleased with how this worked.
After it was basted, I was a bit over it so it rested for a couple of weeks until I could face the quilting. I was hoping that I could get that done before the weather got too warm to be sitting at least partly under a quilt for extended periods. To my pleased astonishment, it only took me 20 days! Ta dah!
Then another couple of days to do the binding, and now it’s a done thing, less than 4 months since I started. To clarify, it’s machine pieced, safety pin basted, and hand quilted. The binding is attached by machine and finished by hand. All rather quicker than the hand pieced Liberty Lattice quilt that took me a year for just the piecing.
Of course it has to have a label
and proving it fits on the bed.
All the materials were from some kind of stash, both mine and others, except a little of the sewing thread. The backing was from my mother who had been planning a quilt for many years but eventually decided she wasn’t going there. More power to her for releasing herself from that looming non-project. The batting was an opshop find, which I think might be bamboo, it’s a little too shiny to be cotton.
I’m so pleased with this. It’s light and bright and summery with so much interest and many memories to enjoy. The embroidery features so many things: flowers galore, butterflies, birds, deer, fleur-de-lis, cauldrons, shrimp, swordfish, people; a donkey, giraffe and a teacup. Also, all those under loved bits of embroidery have a new and useful life.
Um yes, I like dressing gowns. Besides, they are very 2020 Iso Couture.
I bought 2 metres of this gorgeous paisley velveteen a few years ago intending to make a skirt. However it isn’t where my style preferences are at for regular clothes at the moment and I had recently given away my mid weight dressing gown. There wasn’t enough for a whole gown but I had noticed the reddish colour in the print was a good match for the russet velveteen I have lots of. Then, in order that neither half be allowed to dominate and to put a pleasing colour near my face I liked the deeper of these two blue corduroy offcuts. There wasn’t enough of that, so I dyed the paler one to solve that problem.
See, they almost match now:
There was just enough of the paisley to get half the body, one sleeve and one pocket. Hurrah. I cut mirror images of all these in the russet too of course. The heavier corduroy was cut for collar facing and cuffs. The pinwhale gave enough for a belt.
After I’d cut everything and started putting the collar together, the pattern seemed to have some problems. Oh no! I had a version control issue and had cut the wrong one. Eep! Let’s see if I can describe the history in an understandable fashion
A Tale of Two Patterns
Once apon a time, I made a nice dressing gown from polar fleece and kept the pattern. Some years later, I wanted to make another but couldn’t find the pattern. So I took a pattern off the original gown, which didn’t work very well for the collar because the gown was both stretchy and well worn. By the next time I wanted to make a similar gown, I’d found the first pattern, but stupidly kept the second and worse one. I made up gown number three (Lady Macbeth https://montjoyeblog.wordpress.com/2020/04/13/lady-macbeth-gown/) with a bit of further improvement in the collar. Then, when I wanted to cut this gown I could only find one pattern. I felt that maybe I had captured the good points of both and only kept one version? Um, nope. The collar shape had looked odd to me while cutting and turned out to be bad when I started to try to put it together. I searched harder and found the first pattern, and then had to recut and piecen the upper sections of fronts, backs and collar facing. Argh. Currently, both versions are out on the cutting table. I really must condense them down to one and keep only that!
After all that excitement, I managed to get the collar put together. I’m getting better at this game.
I used very minimal added stabilising. There is no interfacing, the corduroy is stiffer than the velveteen already and I want this to be machine washable. I have taped the roll line, shoulder seams and back neck seam. I’ve also run a line of hand stitching to control the edge of the collar. The picture below shows the upper sides of the collar on the left and the underside on the right. You can also see the stitching for the roll line tape, plus a bit of stitching holding down the edge of the facing.
The collar was the hard part, the rest was pretty easy. I’m loving the colours though I know they won’t be everyone’s cup of tea. Oh yes, it’s unlined, again for easier washing and of course it has pocketses.
My only regret with this is having ended up with the paisley on the left. I’d rather cross the fronts with the paisley on top, but I always wear a wrap garment with right side over left. Oh well, I’ll cope. That preference hadn’t occurred to me during cutting.
About two years ago I knitted a capelet. “Laced with Leaves” by Liz Langford Knits.
Really pretty but it so didn’t fit me like the image on the pattern. That looked like it came down to waist level but on me it very much did not. I am probably rather larger than the dummy in the pattern pic.
I only wore it twice and found it annoying. Very warm shoulders, cold everything else. I dubbed it the ‘Stupid Shoulder Frill” and started thinking about how I could make it more wearable, which basically meant longer. I even thought of just pulling it back and reusing the yarn. I decided to start by pulling back just the bottom border, but when I tried, the halo fluff got all jammed up and it wouldn’t frog. Instead I ran one of my tiny circular needles around at a nice identifiable row, then pulled the next row out half a stitch at a time to get the edge section off.
I had some of the original yarn left, with which I knitted another round of the leaf pattern with needles a size up from the pattern. That didn’t make it long enough, so I overdyed some merino yarn that was near the right colours but not quite.
Merino beforeMerino overdyed with added possum/merino yarn
The resulting colours melded much better with the original variegated yarn. I also added in some hand dyed possum/merino yarn leftover from https://montjoyeblog.wordpress.com/2018/07/25/colour-coordination-win/ . Bonus, that hat should now look fine worn with this garment, whatever you want to call it.
With this I added a scalloped border and an extra band at the neck of the turquoise possum yarn to help tie in the stronger colours. Overall it is now about double the original length.
pinned out and in the sun to dry
I liked the extra weight of the beads in the edge of my last shawl, so I beaded this one too. Oh so many beads.
I am so much happier with it now. I suppose though it will go into the cupboard until I have somewhere to wear it. Ruddy virus.
This post was written with much frustration as I tried to figure out the new WordPress editor.
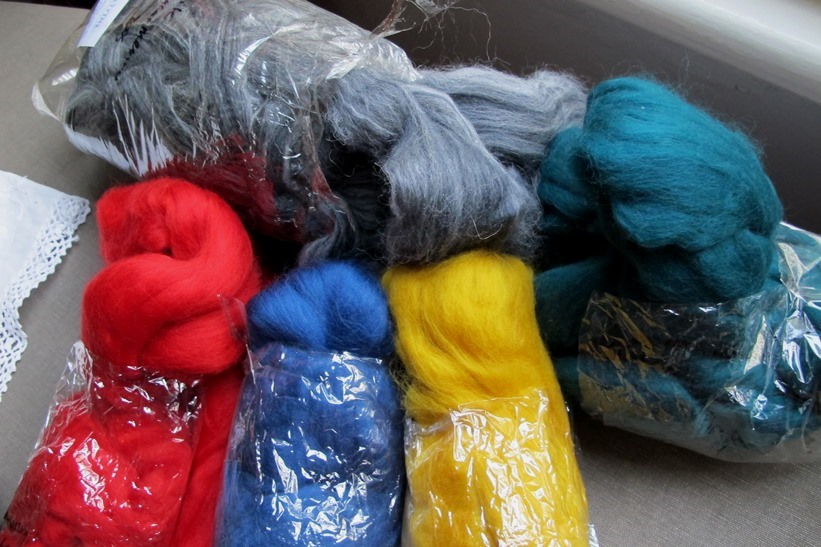
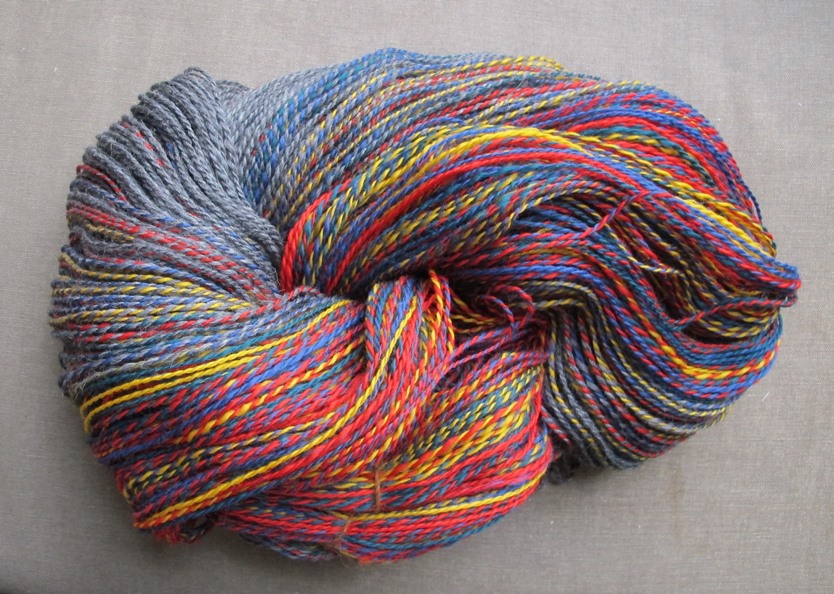
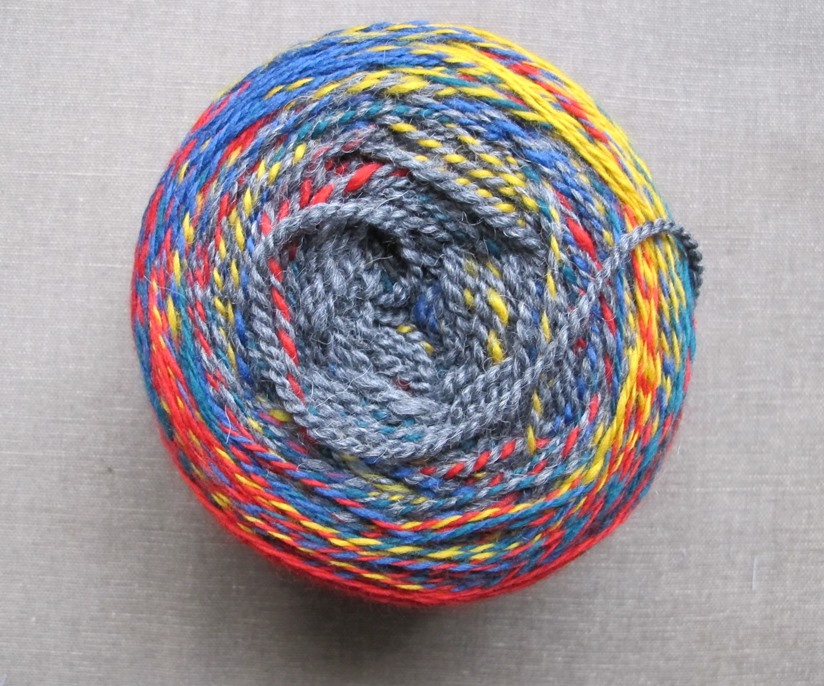
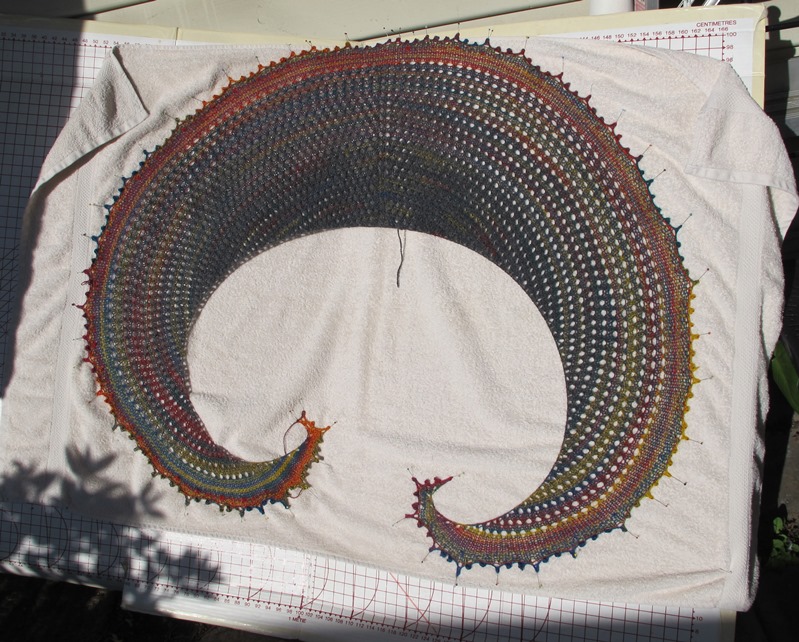
I tend to crave colour in winter and Covid lockdown intensified this. I really wanted something madly multicoloured to spin, but I didn’t have anything that answered and couldn’t find the colour combination I wanted in anything orderable. Then I made the Cabbage Coat instead, which filled the need for colour for a while. Eventually I decided to order individual colours and make my own madly coloured yarn. All of this is from the recently renamed “Fibre Arts Shed”. Feltfine as it was when I ordered. Granite alpaca/merino and dyed merino in scarlet, denim, mustard, and mallard
This thought evolved into trying for increasing intensity of bright colours after starting with a neutral. Much, much thought, planning and spinning delivered this delightful madness. I’m pleased it worked pretty much the way I hoped except that the grey bloomed on wet finishing and ended up bulkier than I hoped.
I had always intended to knit this up in the pattern “Turbinado” by Sharyn Anhalt. I made one of those earlier this year but gave it away to a friend as a birthday present. The knitting started with the grey and I wasn’t loving it until I got to the fully coloured yarn. Suddenly I was having much more fun.
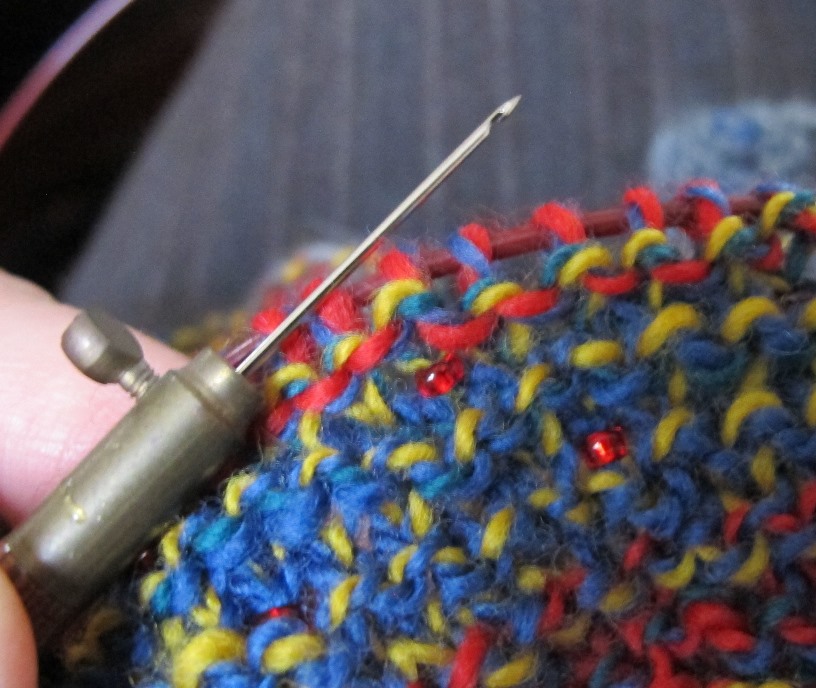
I was worried that the coloured yarn, being finer, would be too wibbly and not drape well. So I had my first go at adding beads to knitting. Happily the only beads I had of almost the right size were also a useful colour. I didn’t have a tiny enough crochet hook but I did have a tambour hook that was previously barely used.
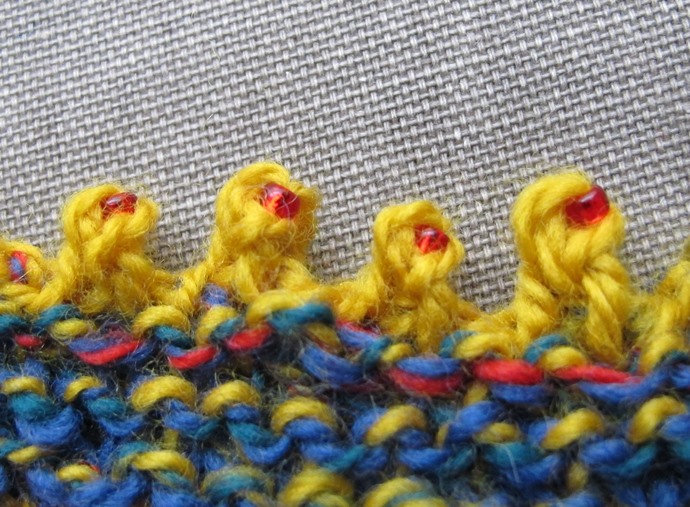
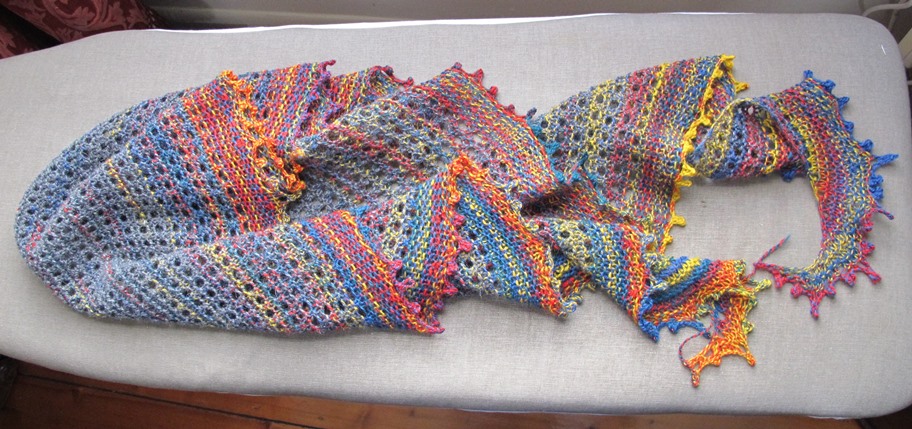
I put two rows of beads a couple of rows apart from each other and the cast off edge. I also beaded the tips of the picots in the cast off. So cute. They look like little creatures. Ducklings one friend said. The beads are not obvious in the finished garment but they do deliver the drape I wanted.
Knitting finished and blocked, in time to use the last hour of sun on the back of my house.
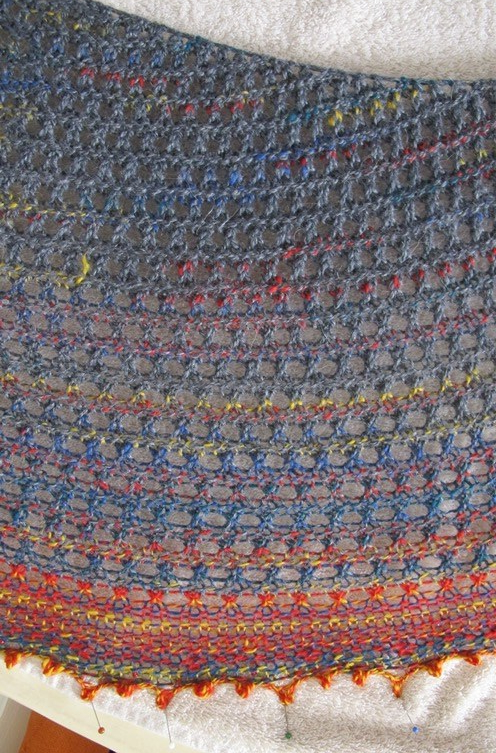
A detail showing the increasing intensity of colour
Dry, and draped on the ironing board so I could sew in the loose ends. So pretty
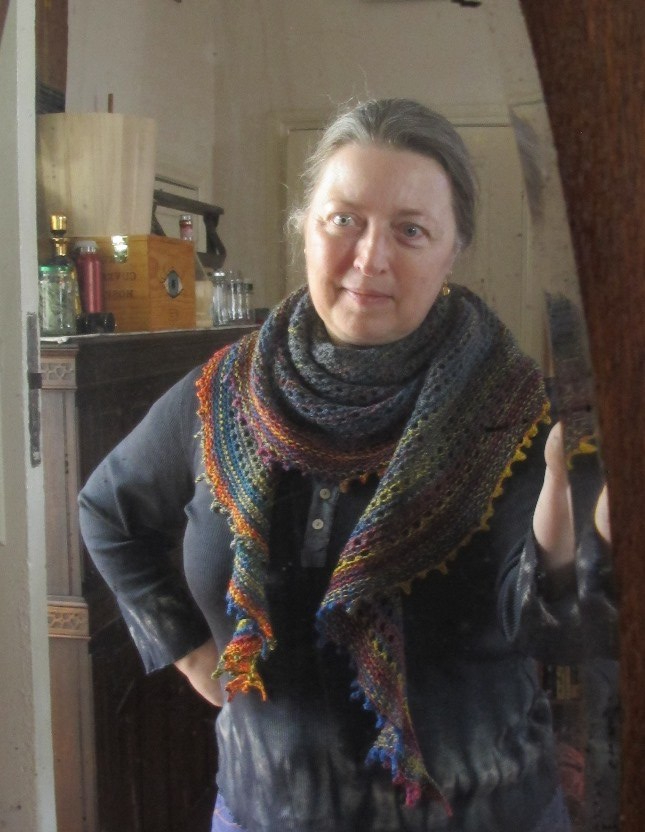
The colours themselves were chosen to go with the Cabbage coat, though I think the styles clash rather. Never mind, I like them both, whether I end up wearing them together or not.
and on. It was so hard to manage the right light to show off the colours without overexposure at the same time as a picture of me I was willing to publish. This doesn’t do either really well but is the best I managed.
Another new hat. I’ve used the American spelling because the post is named for the knitting pattern. Author Amanda Bell. I’ve liked it every time I scroll past it in my Ravelry favourites and the leftover off white alpaca merino blend yarn leftover from the recent cowl One for me seemed to be exactly right for it. It’s beautifully soft, the right weight and an appropriate and pleasing colour. It’s really not just one colour but pale grey and off white plied together, which gives it a bit more depth and interest. Not my spinning yet I can’t list a supplier or any other details. I bought it at a market several years ago and it wasn’t labelled with anything other than the fibre content.
The pattern has an interesting centre start
After the first lace chart is finished, one then needs circular needles but I didn’t have any small enough. So I treated myself to a set of tiny Chiagoo “lace” interchangeables. I may never use the smallest sizes but I needed both 2.5mm and 2mm for this hat. They are so dainty! the connectors need to be small enough for the 1.5mm needles and the cable is so fine that it has steel innards for strength. They are delightful to knit with.
Here is the hat straight off the needles
then wet blocked on a plate. The lace would have opened up even more on a larger plate but I didn’t want it that wide.
See, it really is a plate
and on, sadly overexposed
a better shot on, but not showing the pretty back/top
This is the large size done on slightly smaller needles. I have a biggish head and can’t bear pressure from the band ribbing. So I wanted it quite shallow. If I ever knit this again I might try knitting the small size in the lace pattern, with taller sides, but then not reducing for the band.