Sock Pair #37

Wow, it’s the third day in a row that I’ve finished a postable thing. Today it’s my latest pair of socks. They were started back in May when I needed to quickly come up with a small traveling project. I found three yarn leftovers that went really well together.

IMG_9861-1

The first turned out to deliver a lovely marbled pattern which was a nice surprise. Not my leftovers so I didn’t know how they would knit up.

61613360_2310964572298915_4100332001054162944_o

I’m really pleased with the finished effect. The colours are so good together. I’ve blended them a bit by doing alternating rows for a while each time I joined a new yarn in.

img_3268-1.jpg

another, slightly artier shot.

IMG_3280-1

and now of course, I need another traveling project!

Cashmere Eggs

A bunch of years ago, I brought home a pure cashmere cardigan in palest pink that I had found in a charity shop. I loved it. So, so soft, and it has pockets! It had drifted into too small territory so I stopped wearing it. I pulled it out in a recent wardrobe cull and found it was peppered with moth holes. No! The cupboard got a good clean and some moth papers. The cardigan got a wash and about half a day’s work.

IMG_2408

I darned 11 small holes or weak spots and patched two larger holes. I might not have bothered, but… pure cashmere! and…. pockets!

Aside from the moth holes, it was a bit yellowed in places. Too subtle to catch well in photos, but enough to make it dingy.

So I applied beads and elastic bands:

IMG_2420-1

and popped it in a yellow dye bath. Here are close ups of the most obvious mended section before and after dyeing. The mending was much more invisible before. The different materials took up the dye at different rates. Boo.

IMG_2423

IMG_2463

Still, the overall effect is nice I think. I’d so wear it if it was a bit larger. So I need to find it a home. Egg yolk yellow, decorated with fried egg donuts. Or possibly inverse cheezels.

IMG_2466-1

Second life for gauzy linen

Six years ago, I pounced on some pale pink linen mixed up in a bin of boring cotton drill and all priced at $3/m. I stripped out the colour with Runaway and made up a simple long nightgown, which got slightly more interesting after i accidentally made the neck hole way too big.

IMG_2517-1  IMG_2523-1

This became my favourite trans-seasonal nightgown and it was nicer and nicer to wear as the years went on and it became more and more gauzy. The air just moved straight through it. Last week it came out of the cupboard again as the weather warmed, but it suddenly announced it was done and shredded all across the back and elbows. I didn’t want to completely give up on that lovely fabric though, so I cut a very simple T shaped top from the hem section. Upside down so the least worn fabric is at the shoulders.

IMG_2122-1

IMG_2113-1

I also have some new cleaning rags and reclaimed buttons. I even recycled the label on the new top.

IMG_2112-1

See how gauzy it is. I mean to wear it under pinafore frocks, so decency is not an issue. It will be way cooler to wear than a regular knit t-shirt. I may well make some more. I think I will also see if there is enough of the original fabric left to remake the gown.

IMG_2116-1


Blackening for improved appeal

I was bored with cleanup from camping, so I boiled some socks. 🙂

It had become clear to me that I much prefer dark socks. I have short legs and pale socks just make them look shorter. So on the long list of projects was a plan to dye my less favourite pale socks. Today I bunged them in with a jar of black dye. I’m wearing more black and grey these days. As long as they haven’t shrunk, this was well worth doing.

Before. Damp and about to go in the dyepot.

IMG_9591-1

After, gently steaming, straight out of the dyepot.

IMG_9594-1

Hung to dry post rinse, wash and sunset.

IMG_9598-1

Sock Pair #35

The latest pair of socks have gone to their person, so I can show you them here.

IMG_9123-1

They needed to be a fairly strong colour, and I didn’t have quite the right yarn. So, surprise, I overdyed three different sock yarns with food colour. Before and after pics below.


I rather like the subtle shading. They fit and seem to please my dear friend for whom they were made.  Knitted toe up as usual. I’ve used the k2tog bind off for the first time. It’s good. Easy and well stretchy.

IMG_9130-1

Painted mats

Medieval painted cloths are turning up in my feed quite a bit at the moment. I wanted a little door mat or two for reenactment camping. These are not truly medieval but will serve the purpose and painting them up was a lot more fun than the weeding that I spent the rest of yesterday doing.

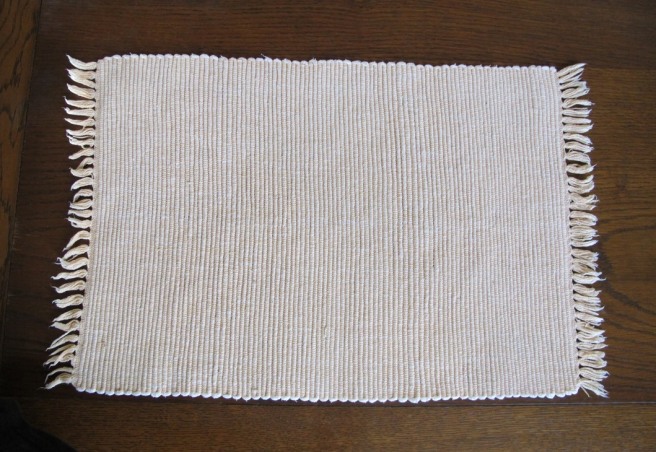
Started with a couple of $1 opshop sourced placemats.

IMG_9073-1

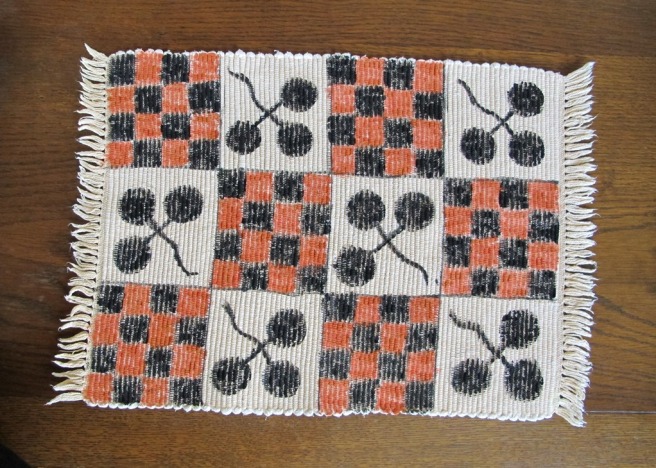
Then marked up a grid to paint into pretend medieval tiles. I used a ruler for that part and then drew up the rest by eye.  The paint is cheap acrylic art paint with Jo Sonya textile medium mixed in. My first try at this paint combination.

This is the first one I did. Is ok. I learned how hard it is to paint on such a rough surface. I also decided that I wasn’t happy with the black.

IMG_9076-1

Here is number two. I like this a lot better. I’d like it better still if I hadn’t used the yellow ochre. I am pleased with the terracotta colour I managed to mix up (equal parts red + yellow ochre, plus a tiny bit of black from the paint water). My silly free hand birds amuse me. Cave paintings? I tried to put a tail on one but that looked a bit too demonic so I left that off the others.

IMG_9070-1

More yarn tidying

This is the other lot of “thread waste” bought recently that needed rewinding before I could reasonably do anything with it. That’s a rather sweet price for such nice fibre. Any dye marks were no more than slight colour variation. Barely noticeable.

IMG_9019

This cross wound remnant did not unwind easily unless it could rotate along it’s long axis. This set up worked reasonably well:

IMG_9023

Until it became clear that I had not managed to stab it quite through the middle.  The last bit was more laborious to unwind, but I managed it without much tangling.

IMG_9025

All on the niddy noddy. I’m not very practiced at wielding this. There is one bit where I must have got confused and reversed direction or something. I’ve tried to catch that in the tying up.

IMG_9031

Now it’s a fairly neat skein. I might dye it before winding into a ball. Maybe in the next indigo adventure.

IMG_9036

Success! Severally

Long time no post. Much due to Flickr changes and new charges. The need to sort out new photo hosting stalled me. I’ve only just figured out that WP will store pictures in-blog! I don’t know what sort of count or size limit yet, but here I am experimenting with the feature.

This below is 385g of Skeinz “Sockmaticion” yarn, in a pleasant charcoal colour, bought cheaply because of some cuts in the skein. It didn’t look too bad and was a good price for a nice soft 4ply wool yarn with 10% possum content. I had hopes of just using my normal swift, possibly after separating the skein into sections. However, there is a lot of yarn here, about 4x as much as my little swift can handle. Also, the skein would not be separated, it seemed to be cross wound over the whole height. Industrial scale! Not domestic.

IMG_8980-1

So I came up with a Macgyvery kind of solution involving two chairs, tilted to make the backs more vertical over the relevant area. See, it really is a LOT of yarn.

IMG_8984-1

The winding off went better than I feared. I stopped the cakes at near 50g or when a cut end turned up, whichever came first, and ended up with this lovely lot:

IMG_8988

I call that worth doing, even though the winding did take me several hours. I am confused though as to why Skeinz has made a yarn called “Sockmatician” and then says it isn’t intended as sock yarn?

Simple recycled bags

Not impressive sewing, but a nice bit of thrifty remodelling. Making use of quality fabric and keeping some memories. I had a bunch of too small and/or worn out garments made from liberty lawn and other fabrics that I loved to much to part with. I’ve made the largest pieces from six of them into four simple bags. These will I think mostly serve as shoe bags for travel. They are near weightless.

Here is one of the shirts when it was newly made. I love the fabric so much. I could have hung on to it in hope of weightloss, but it turns out the neckline wasn’t ideal anyway. So even if it fit again, I’d rather make new shirts.

IMG_3869

Bags of prettiness, thrift, practicality and memory. Hmm, I might see if the rest of the garments might yield big enough pieces to try making waxed fabric cloths for food storage.

.

Reworked Hair Sticks

About six months ago, I nearly jabbed a friend in the eye with my hair stick when turning my head for a hug. I decided that my over long and too pointy hair sticks had to go or be altered. I’ve put aside some of the metal and plastic dpns* I was using and have had fun converting a couple of wooden ones and paint brush handles into appealing and somewhat safer hair sticks.

.

The only one that went as planned was the white pearl stick. That was a worn out paintbrush with the ferrule pulled off. Sanded back, coated with white gouache paint, said paint rubbed off as much as possible with a damp cloth, let to dry, then varnished. I’m really pleased with the effect.

The wooden dpns were much more troublesome. That wood turned out to be very brittle, so I couldn’t achieve plan A. The shorter one splintered several times during both sawing and drilling before I gave up on plan B and came up with plan C. I’m amused by the piercing effect. Hoping that one is in fact long enough to function properly (edit: Woot, it does)

This is a better shot of the first two I made:

.

A demonstration of one in use:

.

The smaller paint brush one was previously my favourite hair stick in it’s paint brush form. I didn’t want to clean it up too much so I didn’t at all. I just pulled the ferrule off, glued a wooden bead on the end and gave it rough coats of black, then gold acrylic paint. I love the finished piece despite the grungy handle.

.

*dpn=double pointed (knitting) needle.