Embroidery Quilt

I had a small stack of under loved embroidered things. Garments, tablecloths, napkins, doilys, tea cloths, pillow cases, handkerchiefs etc. Some have already been turned into new garments but I kept any embroidered offcuts. I had been musing on the idea of making a patchwork quilt to use them up. We were in lockdown here due to Covid, not a bad time to embark on this.

I started in early July by settling on a block size driven by some of the larger motifs that I didn’t want to have to cut into. Anything smaller or awkwardly placed was built up to the right size using the plainer offcuts. I think that first round gave me about 50 pieces.

I have to share this cute puppy with you. The embroidery is not good but it was done by primary school me so it had to be included. There are so many memories in these embroidered bits. Quite a few were done by my grandmother, many by friend’s family. There are also pieces from childhood garments and my cot pillowcases sent over by Mama.

Eventually I came up with an overall design, which said I needed not just 50 pieces, but 144! So I put the call out to family and friends to make up the balance. This is partway through the collection. I think I still needed about 30 pieces.

Then in early September, the last donations came in, much of which was embroidery done by my friend’s family members. Lovely stuff to receive.

My plan was to checkerboard the embroidered bits with nine patches in nice strong colours, a pretty classic design. So I raided my hoarded cotton and linen offcuts, some of which are themselves embroidered.

Then shades of pale for the other “colour” of the ninepatches to blend with the background of most of the embroidered bits. I was in this stage developing a cunning plan for the arrangement of the dark pieces particularly. Way too much thought went into this and many, many rearrangements of the stacks.

Quite some intense time on “the zen of little bits of fabric” as I tend to dub this kind of repetetive construction and I had the needed ninepatches assembled.

A few more days of fun arranging and sewing got the patchwork done. Here it is all layered up ready to pin baste and showing nicely my cunning plan with the nine patches. The colours are arranged to give shades of red/purple on one diagonal and blue/green on the other. I had worried that it would be too hard to manage the orientation of the blocks to make this work but I did it with only a modest amount of unpickery. I’m really pleased with how this worked.

After it was basted, I was a bit over it so it rested for a couple of weeks until I could face the quilting. I was hoping that I could get that done before the weather got too warm to be sitting at least partly under a quilt for extended periods. To my pleased astonishment, it only took me 20 days! Ta dah!

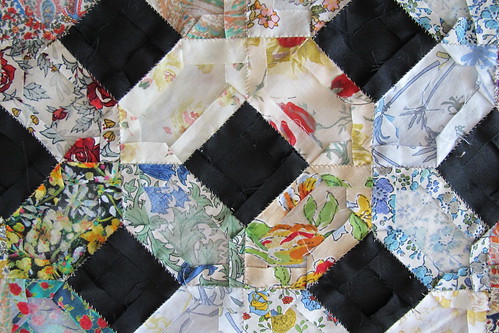
Then another couple of days to do the binding, and now it’s a done thing, less than 4 months since I started. To clarify, it’s machine pieced, safety pin basted, and hand quilted. The binding is attached by machine and finished by hand. All rather quicker than the hand pieced Liberty Lattice quilt that took me a year for just the piecing.

Of course it has to have a label

and proving it fits on the bed.

All the materials were from some kind of stash, both mine and others, except a little of the sewing thread. The backing was from my mother who had been planning a quilt for many years but eventually decided she wasn’t going there. More power to her for releasing herself from that looming non-project. The batting was an opshop find, which I think might be bamboo, it’s a little too shiny to be cotton.

I’m so pleased with this. It’s light and bright and summery with so much interest and many memories to enjoy. The embroidery features so many things: flowers galore, butterflies, birds, deer, fleur-de-lis, cauldrons, shrimp, swordfish, people; a donkey, giraffe and a teacup. Also, all those under loved bits of embroidery have a new and useful life.

Finished!

Celebrate with me if you will. The Liberty lattice quilt is finally done. Finished. Complete.

.

From the concept and set up back in December 2016. Nearly a year of patchworking, then a summer laid aside while it waited for cooler weather. Then the quiltening, which I had to talk myself into. It’s the patchworking that brings me joy. The quilting just had to be done despite me not loving the process. The centre needed a tiny bit of quilting, so it got a little flower for interest, fun and the ceremony of the last stitches in such a long project.

IMG_7204

The pre binding experiment worked well enough. I found I needed to run a line of quilting right next to it to catch all the layers together before trimming off the excess batting and backing. I think I did stretch the edge of the top slightly in applying the binding in the first place, which is not ideal but the finished piece is tolerably flat.

IMG_7230

On the bed! The black squares and the black bed frame work so well together. Yet the overall effect is light, bright and neat. I’m so pleased.

IMG_7211

Concentric HST little quilt

This has just gone to its family, so I feel I can share it here.  When a new baby in my circle intersects with a quilting enthusiasm…… I do so enjoy making these little bright quilts.

Design inspiration from an internet image search of HST quilts. I’ve done a few Half Square Triangle (HST) quilts before. This is just HST paired in light/dark contrast, arranged in concentric diamonds.

Pull a bunch of fabrics from stash, make sure I had an even split between light and dark (a few were hard to assign and I’d make some different choices if I was starting again). Cut enough squares.

.

Sort the squares into light/dark pairs. Draw a diagonal line point to point on the pale squares. Sew a careful seam width either side of said line, cut along it. Press open and end up with a bunch of triangle pairs.

.

Arrange them to please your eye.

IMG_2326

Then sew them all together. Rows then columns. Press so that the seams offset neatly. Layer, quilt, bind, label.

IMG_3823

Unlike the lattice insanity, this is machine pieced. I do quilt by hand though. Partly because the quilting stitches are visible, partly because I’ve not yet figured out machine quilting. I tend to do large stitch quilting for baby quilts though. This one was quilted in #8 perle cotton in shades of green/teal and blue. I rather like how it came out. Bright, fun and slightly brain twisty in the way that I like.

20171231_102935(0)

Lattice is Layered

I had meant to do just one post to cover the latest stages of the insane lattice quilt. I’ve broken the prep of backing and binding down into two separate posts or this would have been a huge monster post. This post is really just a pic-fest celebrating having gotten this far.

Using proper layering technique as taught to me by a good friend makes more sense when working on a queen size quilt rather than the small cot quilts I’ve done more recently. There is just so much fabric and batting to deal with. This is the (wool) batting half laid out. The backing is already positioned underneath it.

IMG_3243

The patchwork beginning to be added, still folded in quarters.

IMG_3244

Last chance for pictures of the back of the patchwork sans papers

IMG_3248

IMG_3249

All layered and safety pinned

IMG_3262

A final arty shot

.

Now I need to refine my plans for the quilting pattern. I started to chalk it in but I’m glad I had to leave the house for an appointment because I’m not happy with plan A. More thoughts needed.

Quilt Pre-Binding Experiment

I spent all day Sunday getting the lattice quilt ready to layer. This was the second stage after piecing the backing. This lovely cotton shirting woven satin stripe fabric is what I landed on for the binding.

.

It looks good with the backing (and you will see it with the patchwork a little later)

.

I had spent a bunch of time thinking on how I was going to bind this quilt. The way I had stitched the blocks meant that I couldn’t open the edge seams without cutting the fabric or unpicking the hand stitching, neither of which I was up for. I usually apply the binding after the quilting is done. However if I did it then, I really didn’t think I could apply it this close to the edge with the squishy batting as part of the mix. So I thought I’d try sewing the binding strips on before both layering and quilting. It worked fairly well, but I had forgotten that all the edge pieces are on the bias. So sewing on the binding had the risk of stretching or condensing the edge. I seem to have stretched it just a bit, but I’m pleased with the accuracy in terms of closeness to the edge. I very much hope that slight stretching is tolerable in the finished piece.

First the binding strips are joined to be long enough for each side, then pressed in half lengthways. No pics of this, sorry.

Then I cut the protruding edge squares back to provide a cut edge guide. Leaving a neat 1/4″ from the block edges was the right measure to use the machine foot edge as the seam guide and just barely catch the block edges in the seam.

IMG_3220

The little black offcuts look a bit like moths or bats 🙂

IMG_3225

Machining the binding on:

.

Pretty happy with this

IMG_3255

Then the binding is pressed away from the edge. I do like the colours and the stripe effect next to the patchwork. It will be a little less than half this width in the end.

IMG_3239

Pattern Matching Success

This rather pretty large scale print is going to be the backing for the lattice quilt. I had enough acreage but needed to piece it to make the right shape. I haven’t done a lot of pattern matching, big prints not being something I work with much. When I had tried, it hadn’t gone well. With prints, you can’t rely on the pattern being positioned squarely or evenly on the weave and they can be hard to match by eye when seaming them face to face. So I came up with a technique that worked a lot better than my previous attempts. I shall share it here, though I rather suspect I’m not the only one to use it.

Cut (or in this case tear) your sections with some extra seam allowance for shifting of the fabric to match the print. In this case, I had 2cm on one side, about 4cm on the other. Press under the smaller allowance and pin close to the fold over the other piece, matching the print as best you can.

Flip over the top piece without shifting the seam allowances. Pin as close to that soft fold as you can.

IMG_3195

Flip back and take out the first lot of pins.

IMG_3199

Flip over again and sew along the pressed fold

.

I was pretty pleased with how this came out. It’s now all ready for the quilt layering.

IMG_3208

Lattice patchwork finished-again

.

There. The two new strips of blocks have been added to make a slight rectangle. They have blended well, as I hoped. You wouldn’t know they were a late addition except that I’ve told you.

Now I need to decide on edge treatment before I remove the papers in the edge pieces. I had thought I would put this aside for a few months, but I really want to continue with it and I think this will fit as the next major hand work project in my (extremely rough) project schedule.

Next Stage Lattice

.

Wow, that went quickly. I’ve done all the extra blocks and joiners. 28 blocks and 30 blacks.

Below I’m laying out the new blocks to get a good spread of fabrics. I shifted a couple after looking at this photo, including softening the proximity of those two bright yellow pieces at top right. I’m sure I’ve said it before, but taking a photo, or even just looking through a camera gives one a different view and can show up things that might be better changed.

IMG_2557

Now the blocks are stacked in order and labelled so I have a better chance of not confusing things.

.

Then I realised I’d better label the main section too. It’s square and I mean to hang it again shortly to release the cutting table for other work. I ought be able to tell by the orientation of the colour categories in the blocks, but this makes it easy to tell which sides I’m supposed to be adding to.

.

Yeh, this is still fun.

.

This is just over half the pieces needed to finish the lattice patchwork by the latest plan. I wondered if I would have any trouble resuming production. Nup. The whole process is embedded in physical memory. I’m amused by that. Thankfully after a 3 month break, it’s all again.