Damson Jam

I write many of my posts, food posts particularly, mostly as a sort of online journal for my own use. As in: “I know I’ve made raspberry jam before, how did I do it?”. It’s lovely bonus that other people seem to get some enjoyment from reading.

I picked another couple of kilos of slightly riper fruit this morning. I’ve made jam and 600g fruit is set aside (with a banana, covered in paper to ripen further) for tomorrow’s possible curd making experiment.

IMG_4139

This is a basic jam, but it took ages due to the small size of the fruit and the stone removal step.

2.7kg whole fruit (minus 400g stones=2.3kg)
~100ml water
2kg sugar

Rinse and drain fruit. Remove stalks and any nasty looking bits. Cut a slit each plum to help the stones emerge. Weigh. Put in a large pot (I used my 7L stock pot) with a little water over a low heat. Stir fairly often, first until the fruit liquidises, then to keep it from sticking and burning on the bottom of the pot. Continue stewing until the stones start emerging. I tend to encourage this by squishing the reluctant fruit against the side of the pan. It would likely be less work if I were more patient. Lift the stones out with a spoon into a sieve set over a dish. I then rub what plum juice and pulp I can back into the pan, you could not bother if you’d rather. Weigh what you’ve removed so you can judge how much sugar to add. For this, a 2kg bag of sugar was ~0.85:1 ratio, which is about how I like to do jam. Convenient eh?

I then turn off the heat, stir the sugar in gently and leave to sit for up to an hour. This is both to let the sugar dissolve and for me to have a rest. Then bring the pot up to a rolling boil for about 10min or until a set is achieved on testing. Bottle in sterilised jars.

I’m thinking these aren’t wonderful quality damsons. They have many of the characteristics but I haven’t yet managed to ripen them to the lovely dark colour one sees in pictures. I expected more flavour too I suppose. I’d love to know what variety they are, but the tree is from the Flemings range and they don’t give any more information than “Damson”. I’ve left some fruit on the tree to see how it develops over the next week.  On the other hand, I’ve never met fruit I know to be damsons other than mine, only seen pictures and heard descriptions.


Damson Gin Beginnings

The damson harvest has started. They are not as ripe as I would like but I have only a few days to get them processed. This bowl is a neat 3kg from maybe about a quarter of the tree?

IMG_4117

I rinsed and drained them and picked through for the ripest ones. 900g of those have been pricked with a fork and loaded into a sealable jar with about 150g sugar and enough gin to cover (this time ~650ml Houndstooth brand). They look prettily wintery with just the sugar poured in.

.

Here with the gin added.

.

Now they have to sit in a dark cupboard for a year. Up end the jar a few times early on to dissolve the sugar. Then ignore. At harvest time next year, strain off the liquor and enjoy.

Tomorrow I’ll pick some more and make jam I think, despite the forecast being for horribly hot.

(mostly) Damson Chutney

.

I have a young damson plum tree named Dorcas. She is laden with her first decent crop, now netted. I’m keenly monitoring the ripeness of the fruit. It’s starting to soften, I think I’ll be jamming in a few days.

The chutney is from fruit picked early for various reasons.  Mostly because I cut the top of the tree out to both make it easier to net and to keep tree small. Those branches had some underripe fruit which I’ve been ripening indoors. I’m turning this into chutney because any lack of flavour from the fruit will be masked by the heavy spicing.

There was only half a kilo of damsons, so I added some other plums and some cherry flesh that I’d pitted and frozen (they were disappointing eating as fresh fruit).

IMG_4081

I’ve used this recipe. It’s lovely, I’ve cooked it before. I altered the method a bit. Stew the fruit and spices with a tiny bit of water over a low heat until the stones are released. Pick out the stones, rub what fruit flesh came with them through a sieve back into the pot. Add the vinegar and sugar and cook until done.  It was only a tiny batch. ~900g fruit doesn’t fill many jars. Good colour though.

.

Pickled Cherries

I saved this recipe from a newspaper back at about the turn of this century. Then I made it up 2-3 years ago. At christmas lunch we finally broached a jar. They were about as amazing as I had hoped, and wonderful with the baked glazed ham. Also grand in a toasted ham and cheese sandwich. So I’ve just bottled another half kilo before cherry season ends.

.

Pickled Cherries
1kg cherries
750ml white wine vinegar (I used ACV)
2 cups sugar
6 cloves
3 cinnamon sticks
3 sprigs thyme
3 bay leaves
9 peppercorns

Bring the vinegar and sugar to boil in a saucepan*. Allow to cool.
Use clean, unmarked fruit. Snip the stems of the cherries back to 1cm. Pack into sterilised jars, fill the jars with the cooled vinegar mixture and seal. Leave for 1-2 weeks (I say years) before using.

*I misread the recipe this time and included the spices in the boil, never mind, other pickle recipes do this.

Gathered inset chemise

To my non reenactment readers I apologise. This post is long as it is and I realise has a bunch of assumed knowledge that I haven’t explained.
__________________________________________________________________________________________

I’ve seen several extant “late period” chemises with the hip fullness enhanced by gathered insets rather than the more usual triangular gores at the sides. Here is one from 1660, the picture is from Janet Arnold 4.  I really like them and would love to make one (or more). (I’ve now added a couple more gathered inset extant garments at the bottom of this post).

.

However I’m currently making and wearing early 14thC garb. Then a friend shared photos of a fine linen alb from Switzerland dating to ~1310.

22050123_800398055765_3358846686553267422_n

Woo hoo! I thought. I’m going to use these two garments to inspire a chemise. I need another for a long event anyway and one in very fine fabric might make the too tight sleeves of my new blue gown a bit more buttonable. The picture above looked to me as if the gathered inset was set directly below an underarm gusset. I now think that is not quite the case. The extant alb has a bit more drapiness above the gathers than my version.

IMG_3924

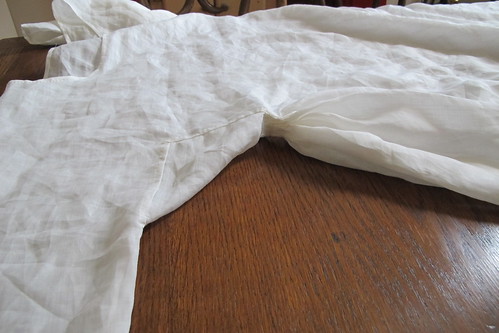
I’ve used a very fine ramie voile which I bought cheaply. So I can make several of these if I like and not break the bank, which buying fine linen voile would, if one could even find it (the alb may well be in a particularly fine strain of linen which is now extinct). I cut out the garment, and then almost immediately wished I’d done it differently. I did the gathered side pieces cut together with the garment body. I now think they should, and would better be done as separate sections, sewn to the garment body. I did manage to hide the side seams pretty well in the actual gathers. The fabric is very wide, so I was able to cut the sleeves with the body piece also. the only separate pieces were the underarm gussets and the neck facing.

IMG_3861

I constructed each of the side gathers differently. Both are cartridge pleated. The first one doesn’t have a turn down at the top of the gathered section, and is bound by the bottom tip of the underarm gusset. This came out a bit uneven, but is nice and flat. Right side, then reverse view below.

IMG_3898 .

The second side came out much neater, but has more of a lump from the bulk of the pleats. I’ve turned down the top of the gathered section before running the stitches for the cartridge pleating. Then I’ve used a small piece of straight grain double fold facing (left over from the neck facing) to stabilise the gusset section the gathers are sewn to.

. IMG_3911

The hem is a deep (7cm) double fold. Which is a good thing to do in very fine fabric. Gives it weight so it behaves better.

.

However although the alb has a deep hem, looking again that seems to have basically a double fold hem with only a small turn under at the top.

22089255_800398015845_2896447492289793572_n

Here is the whole thing on. I will wear it with the blue gown in a couple of weeks and see if the gathered sections annoy me or not.

.

And a silly action shot, just for fun. New garments often inspire me to dance.

.

Adding in a couple of other extant side gathered garments:

The tunic found at Guddal. I think this might be 12thC? Probably a short man’s garment.

pleated and split gore, Guddal tunic (kjortel)Universitetsmuseet i Bergen 030984

A beautiful garment from “somewhere in the middle east”. Foolish me didn’t capture the information. I will see if I can track it down.  Make that 14thC Persian. I don’t understand how this would have been worn though.

1424506_10203015066337801_1119428498833148027_n

Repeating the prettier gathered section so it will be picked up when shared on other sites.

.

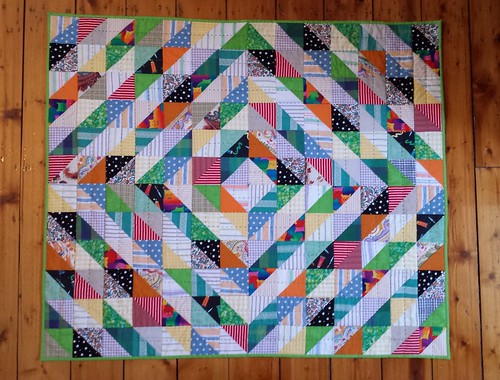
Concentric HST little quilt

This has just gone to its family, so I feel I can share it here.  When a new baby in my circle intersects with a quilting enthusiasm…… I do so enjoy making these little bright quilts.

Design inspiration from an internet image search of HST quilts. I’ve done a few Half Square Triangle (HST) quilts before. This is just HST paired in light/dark contrast, arranged in concentric diamonds.

Pull a bunch of fabrics from stash, make sure I had an even split between light and dark (a few were hard to assign and I’d make some different choices if I was starting again). Cut enough squares.

.

Sort the squares into light/dark pairs. Draw a diagonal line point to point on the pale squares. Sew a careful seam width either side of said line, cut along it. Press open and end up with a bunch of triangle pairs.

.

Arrange them to please your eye.

IMG_2326

Then sew them all together. Rows then columns. Press so that the seams offset neatly. Layer, quilt, bind, label.

IMG_3823

Unlike the lattice insanity, this is machine pieced. I do quilt by hand though. Partly because the quilting stitches are visible, partly because I’ve not yet figured out machine quilting. I tend to do large stitch quilting for baby quilts though. This one was quilted in #8 perle cotton in shades of green/teal and blue. I rather like how it came out. Bright, fun and slightly brain twisty in the way that I like.

20171231_102935(0)