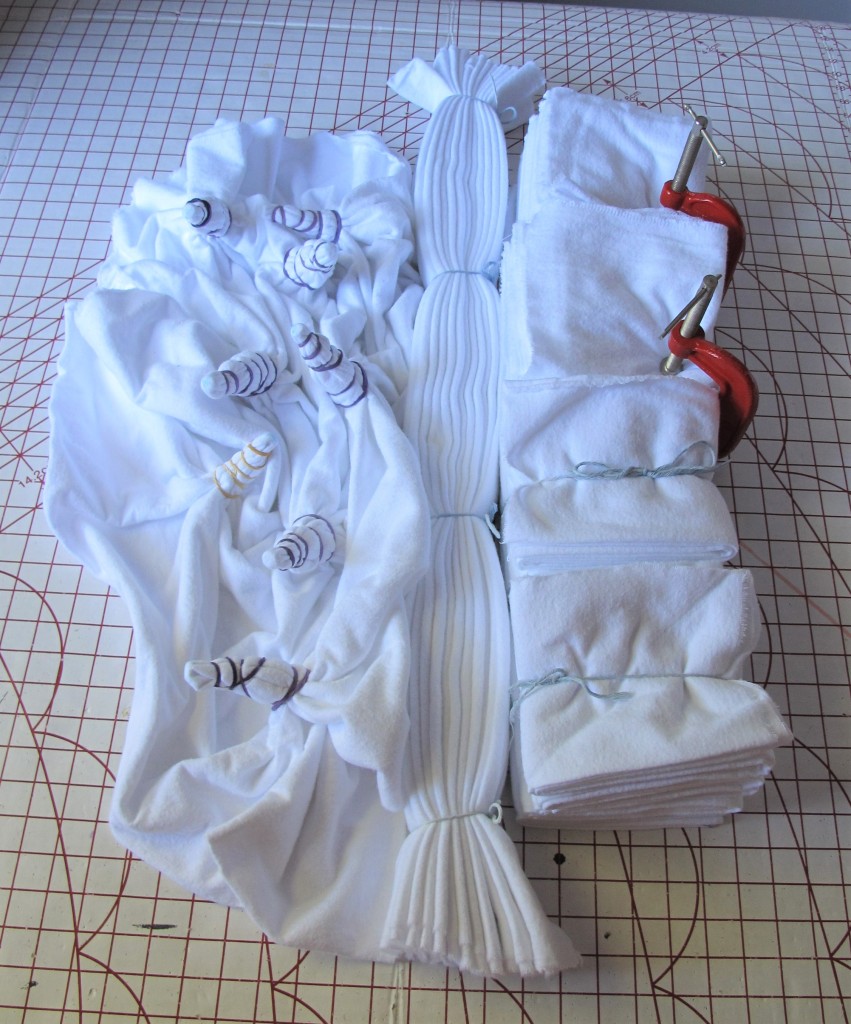
I have a good friend for whom the quatrefoil is significant. This is a four petaled flower thing used in heraldry. Something over a year ago I got excited with the idea that I could make quatrefoils with shibori. Just do a standard square type fold and clamp it near one corner. But what to make and therefore what fabric to dye? Well, I have the coat pattern I made for her back in 2015 and she lives in Tasmania which is is on the cold side. So maybe a dressing gown? I’d had the thought for a while that such a thing might be nice done in cotton flannelette, which is also easily dyeable. Voila I had a plan. I managed to source some white flannelette, whew.
The small flaw in this plan was that flannelette is bulky, and I only had two appropriate clamps, so I could only do two quatrefoil panels, bother. Never mind, these became the gown fronts. I did another two with similar square folding but just tied which became the back panels. One was done pleated which i used for collar and facings. The last piece was done wrapped around long screws which gives a pretty effect that makes me think of dandelion clocks. This I used for sleeves and pockets.
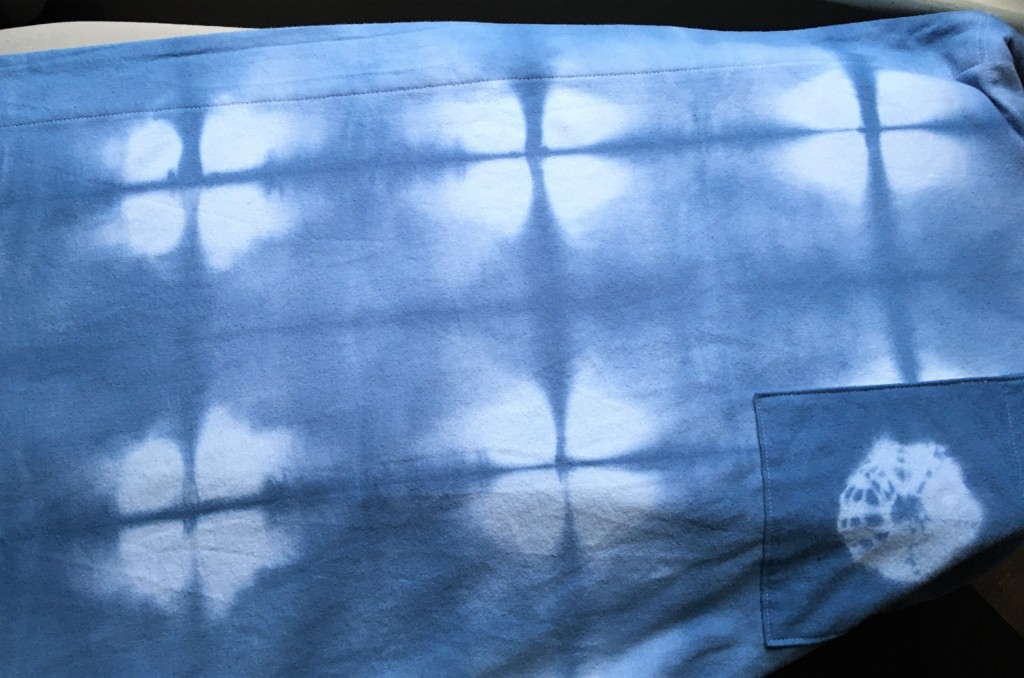
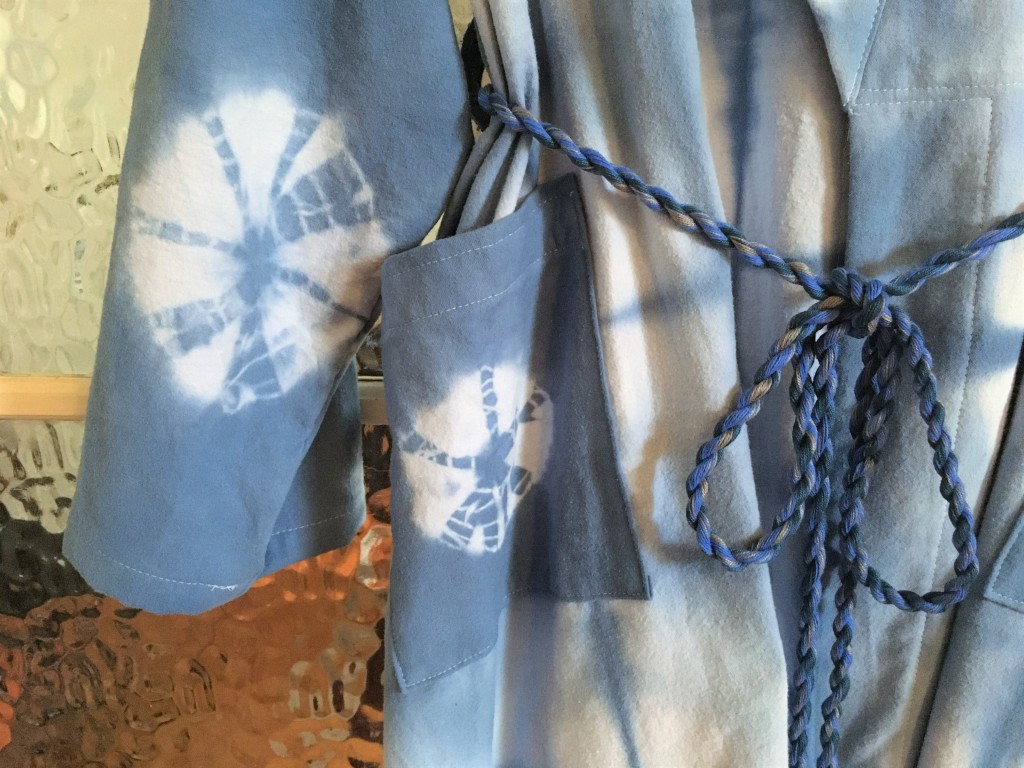
The best quatrefoil effects I managed, photobombed by a pocket:
A dandelion clock sleeve:
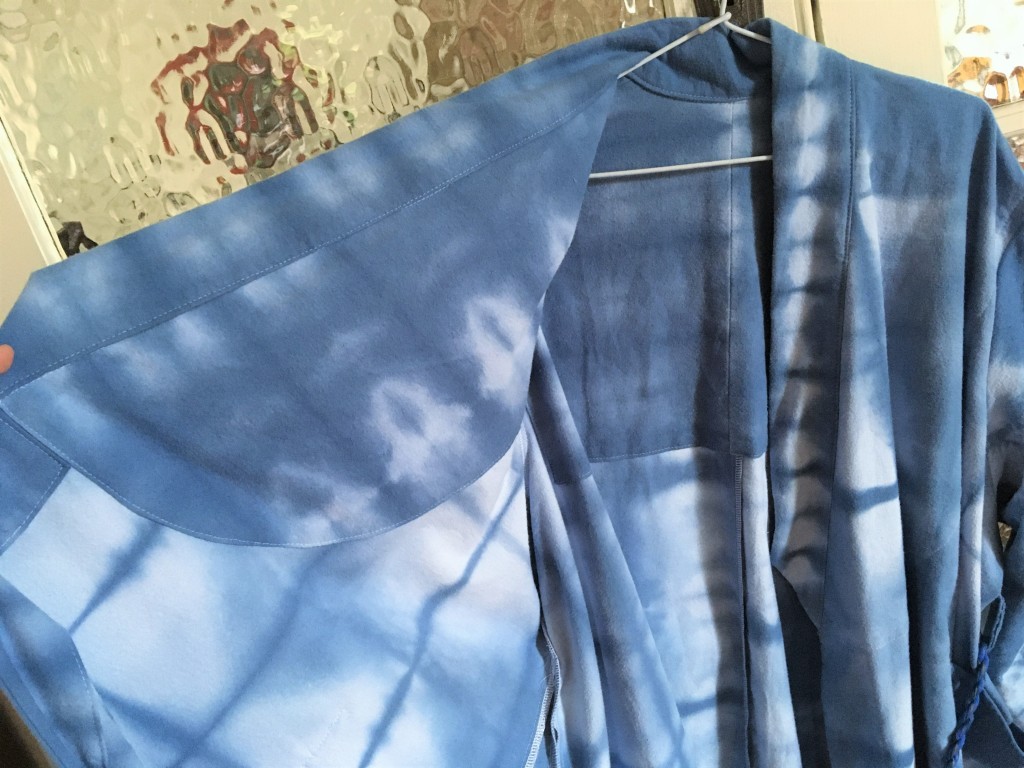
It has deep facings front and back to increase warmthPocket and belt shot. The belt is made of three colours to come the closest I could to the blue of the dye, if you squint and let the colours blend. I had enough fabric to make a self belt but given how flannelette sticks to itself, I thought that was a bad idea.
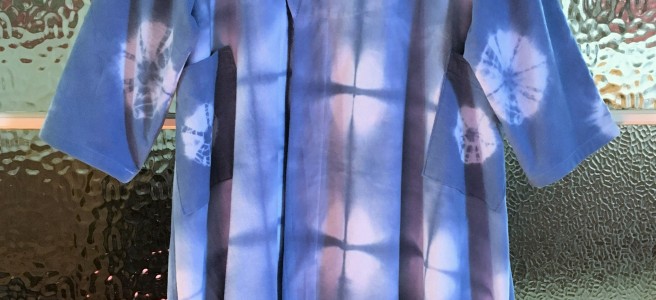
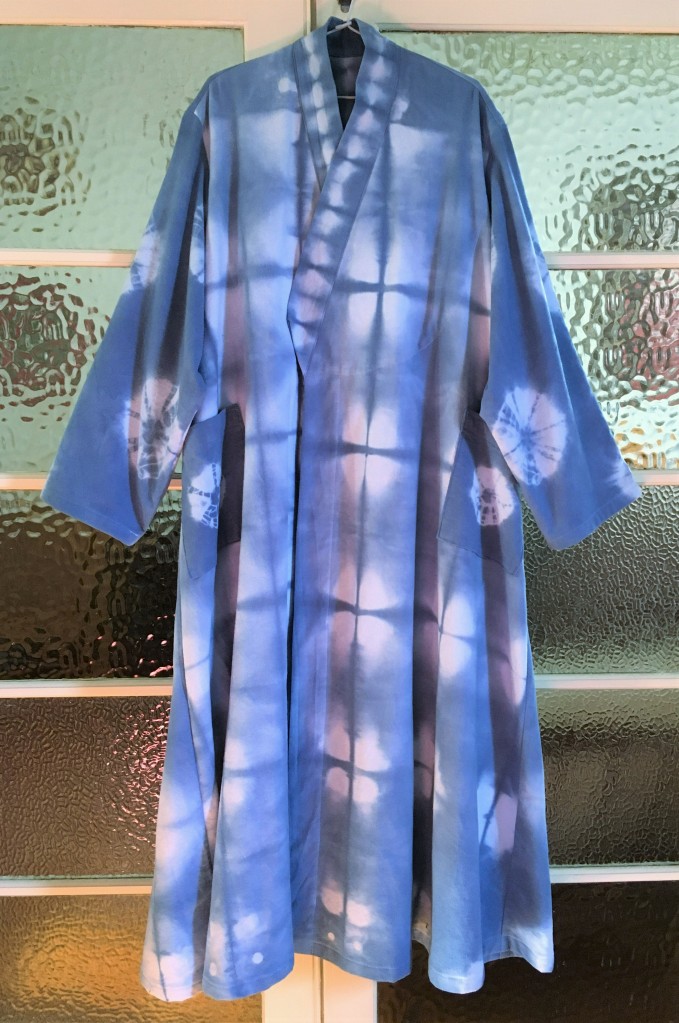
Here is the whole thing from the front. It’s a fusion garment. A-line body, western cut sleeves and armscye, kimonoesque collar for good chest coverage and I confess, ease of construction.
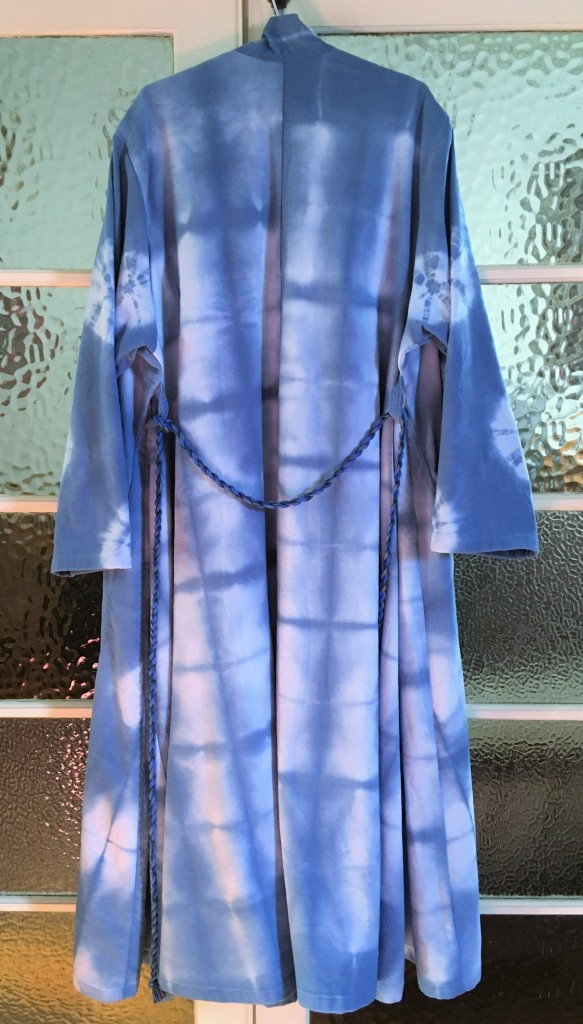
and from the back
I really like it. It is one of those gift makes that I would be very happy to keep! I didn’t though, I was good and posted it off to her as was intended.
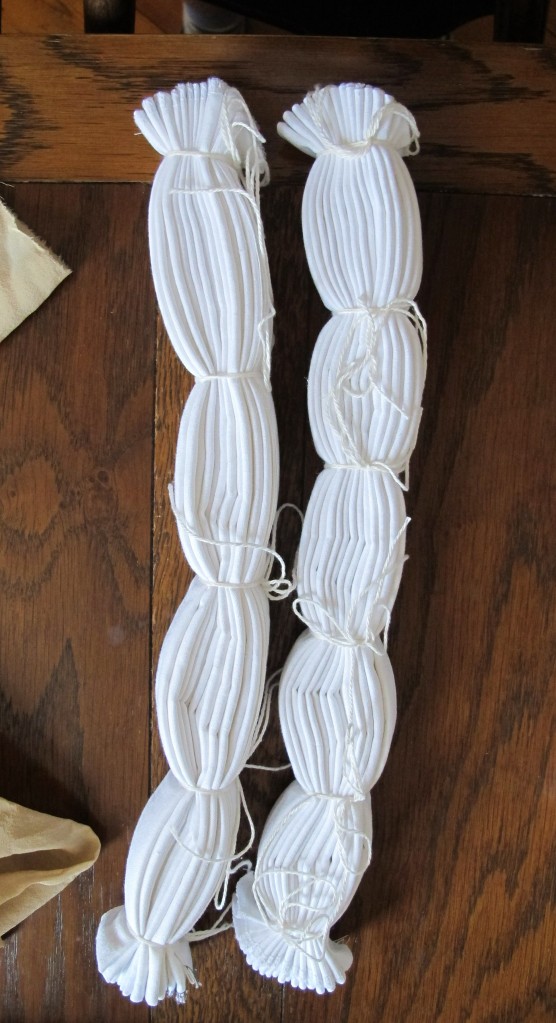
When prepping materials to dye in our indigo adventures three years ago now, I pleated up some fine, crisp linen(?)* with the intent of making a tiered ruffled skirt. I was working at speed to get everything ready in time and didn’t think hard enough about how much fabric I needed. This turned out to be only enough for a bit more than the lowest ruffle.
*Possibly not flax? Definitely cellulose fibre. My best guess is a cotton ramie blend. It was bought very cheaply in folded bales from a closed shop clearance sale.
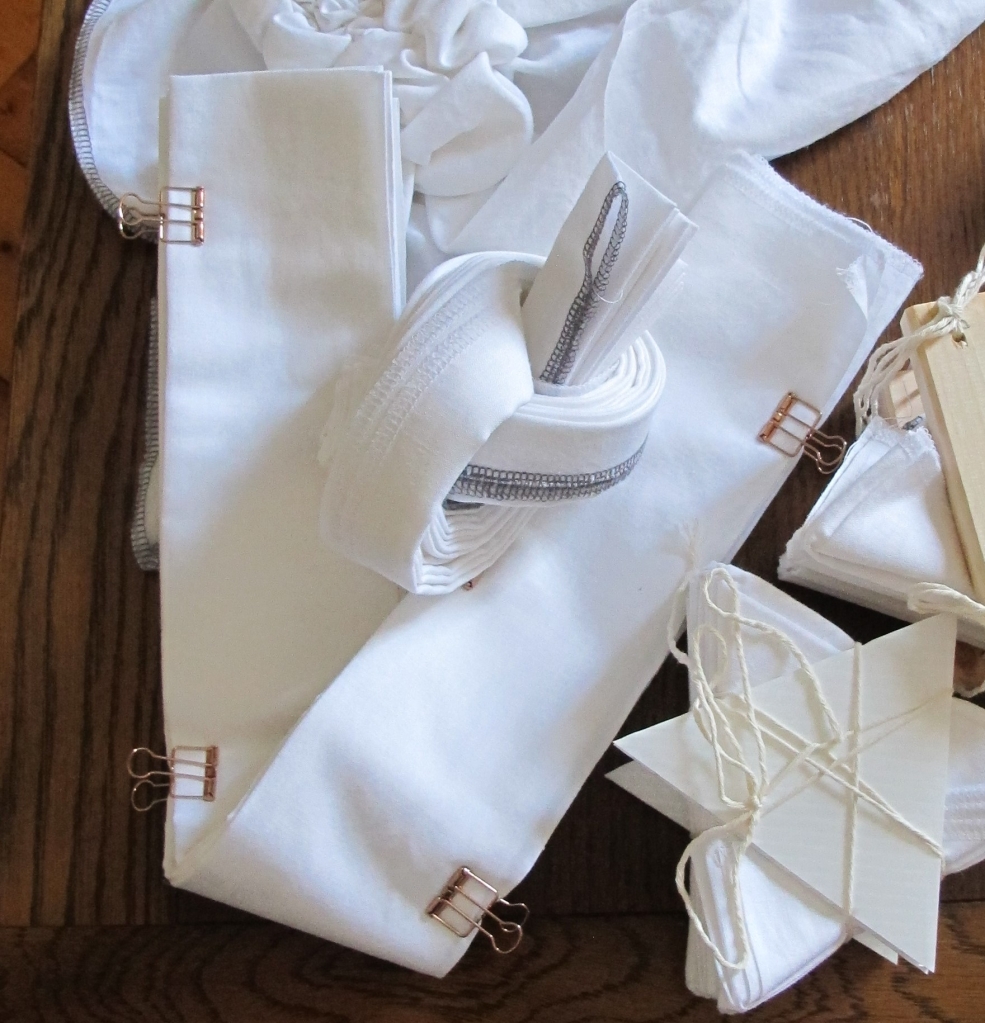
Happily, I also pleated up another piece of the same fabric but slightly differently and with no specific plans attached. This is the piece with the copper coloured clips below
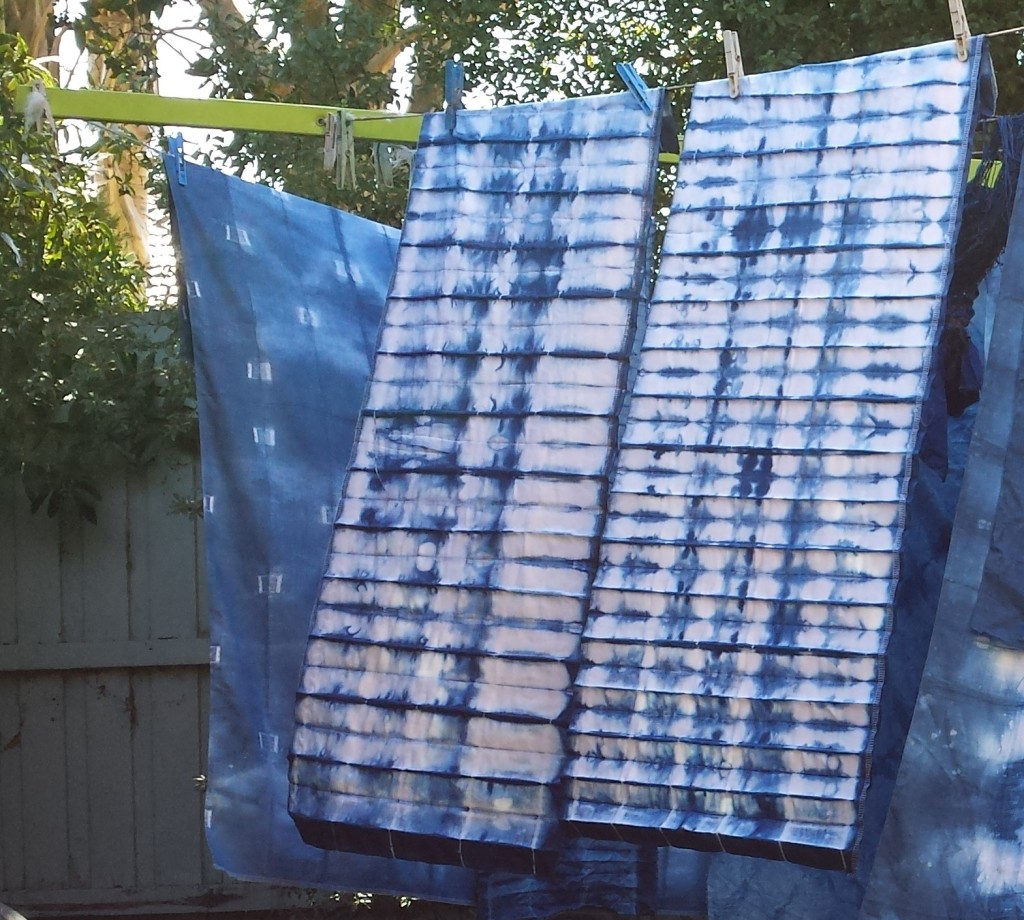
by chance, I have a picture of these three pieces next to each other straight out of the dye vat
Argh. These images are bigger than I would choose to use. I’ve moved to a different computer and don’t currently have a copy of my usual photo editing program. Maybe I have to bite the bullet and shell out for it.
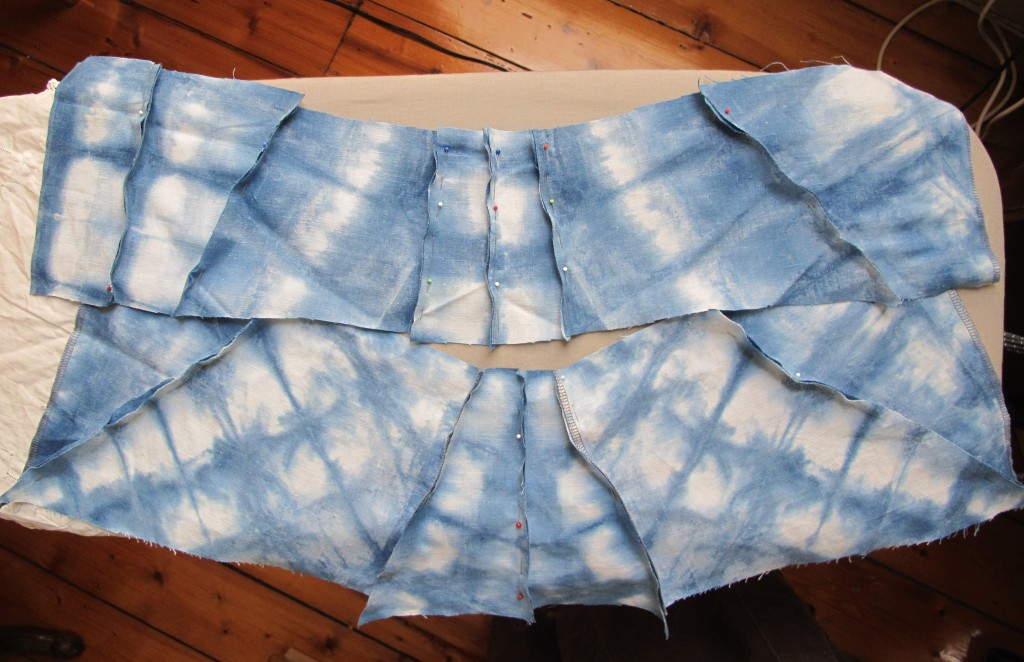
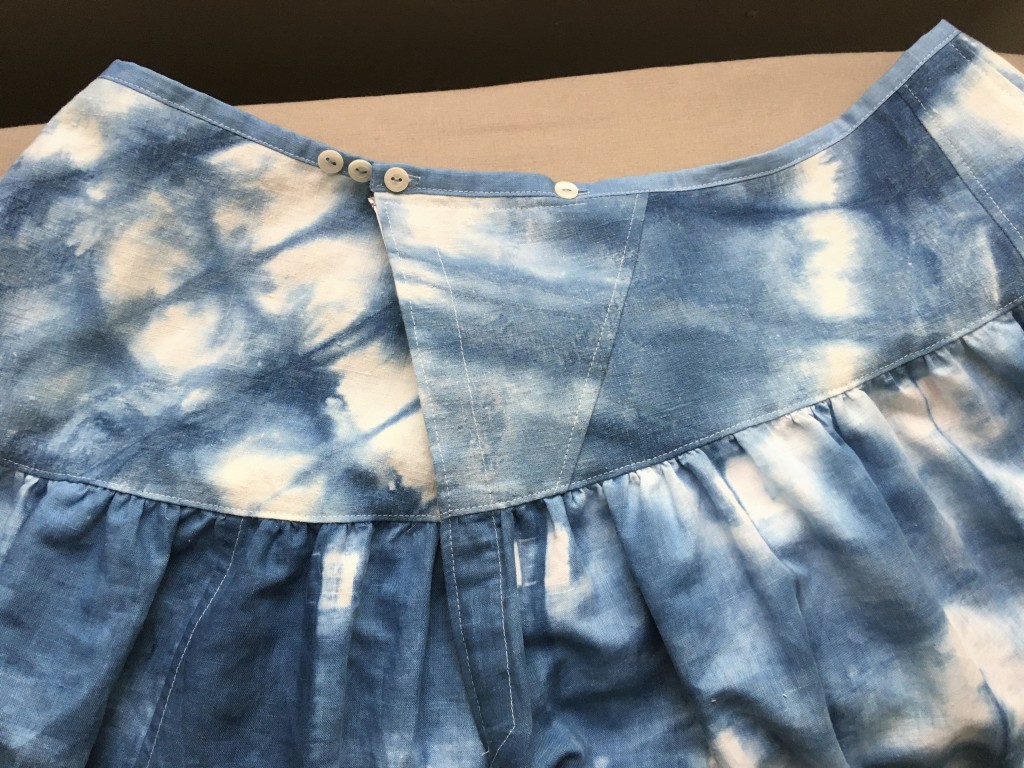
Anyway, All these pieces started the same size and were folded in three before pleating. So they all broke down most neatly to three 38cm wide strips. I used the darkest three for the middle tier and ended up needing 5 of the remaining six for the bottom tier. I still needed a top section to get the overall length I wanted. I originally meant to make another rectangular cut gathered arrangement for the top part, but flat to the body is more flattering even though it will mostly be covered in wear. So I fiddled appropriate shaped curved pieces out of the bits leftover from the indigo rays frock which is also and usefully, a slightly heavier fabric. This is just pinned, prior to final adjustments. Silly me fitted it over another skirt though so it ended up needing more overlap than intended.
The fastening is similar to the overlap method used in this colourful remodel but buttoned instead of the ties used there. A friend suggested the buttons and I think I like them. They are more comfortable than the ties I think, but require sewing on many buttons to provide the same breadth of adjustment. Optimistically I have placed buttons for my current size and a couple of smaller options. Fingers crossed I don’t need to add more.
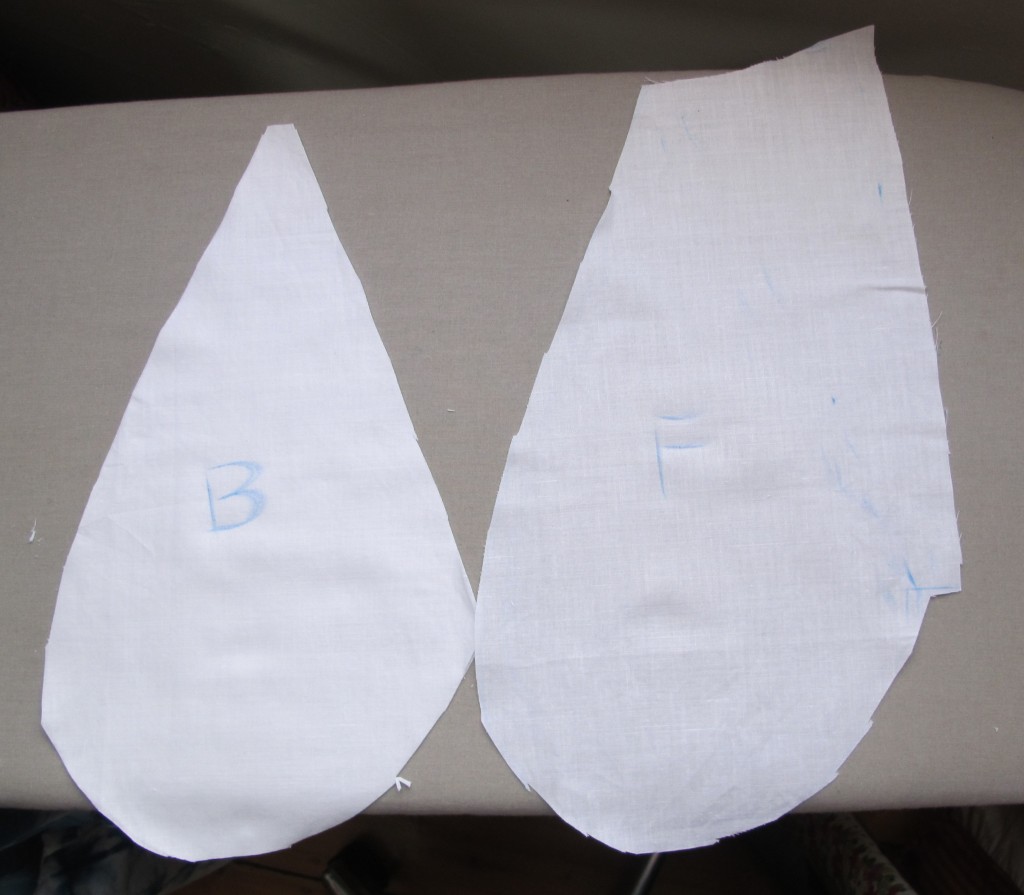
I couldn’t face braining the pockets until I’d finished everything else. So they are not sewn in as elegantly as if I’d planned them from the beginning. I’m happy that they work though, and I ought to be able to make nicer versions if I make another skirt of this kind. Here are the shapes. The front and back need to be different because of the overlap.
and after insertion: the two sides are sewn together below the opening shown. The front section is sewn in under the waistband to support the pocket and contents, so the pocket bag can’t be fully closed or one can’t get in and out of the skirt!
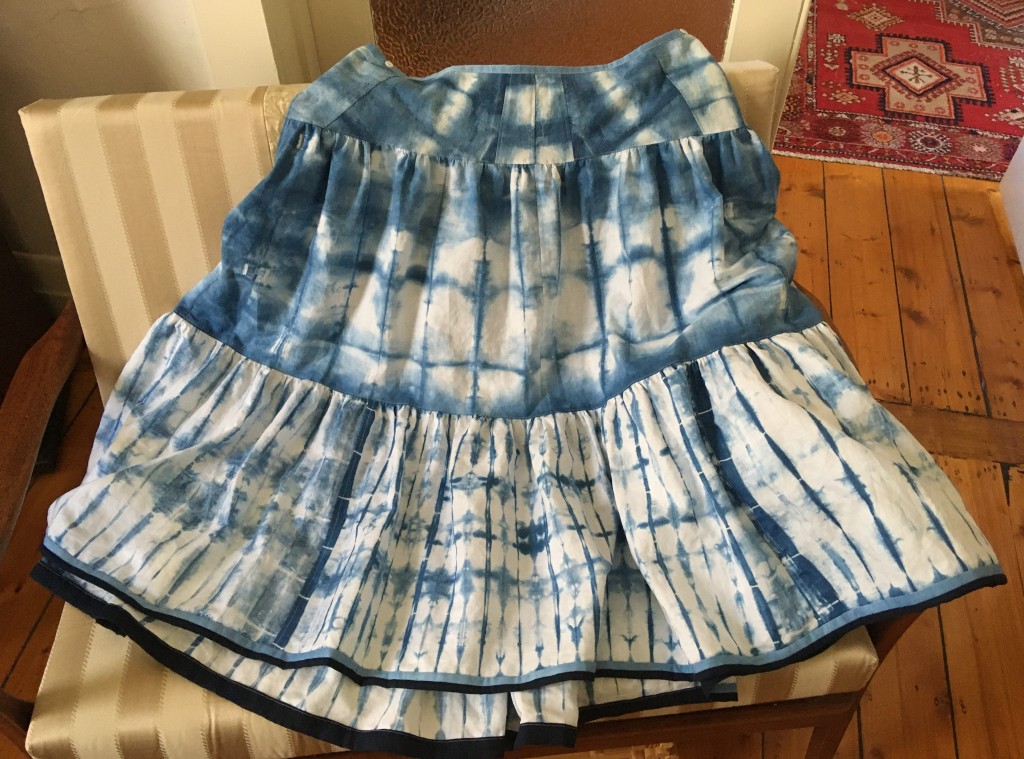
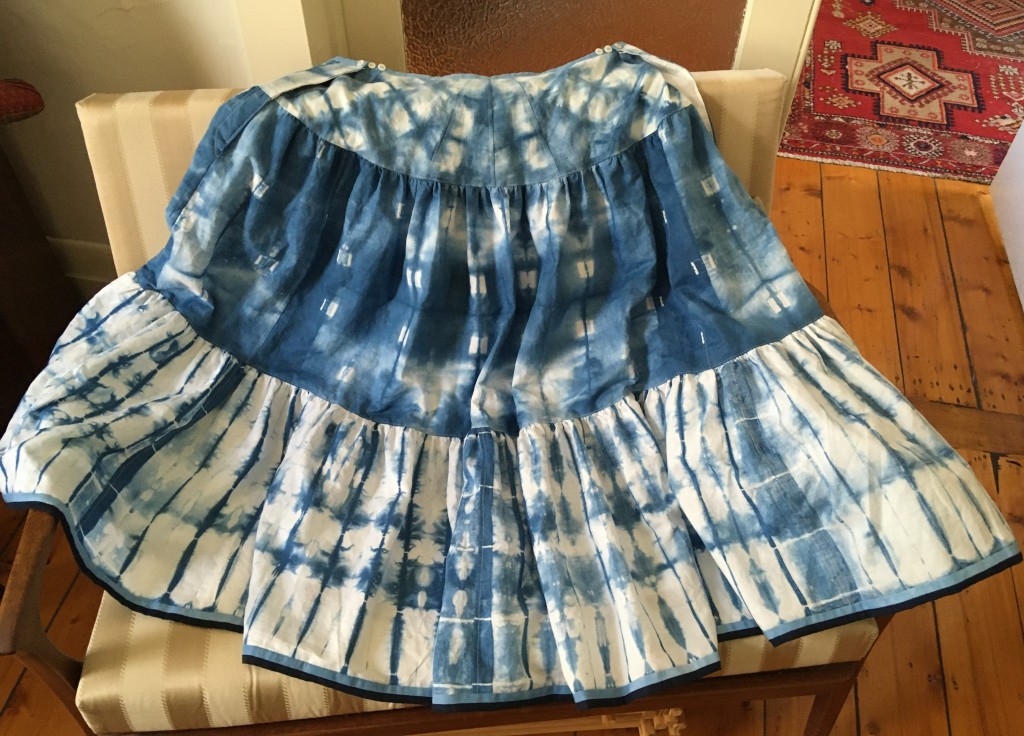
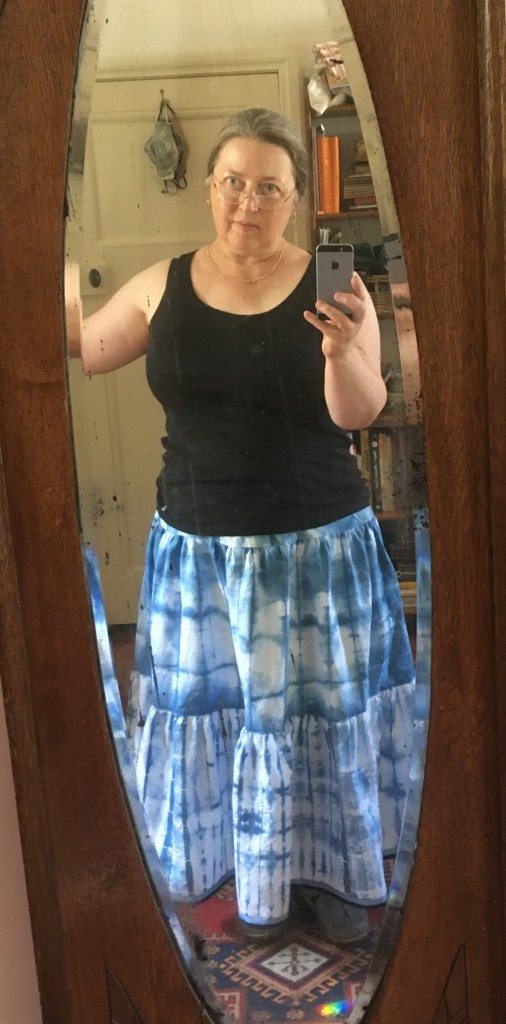
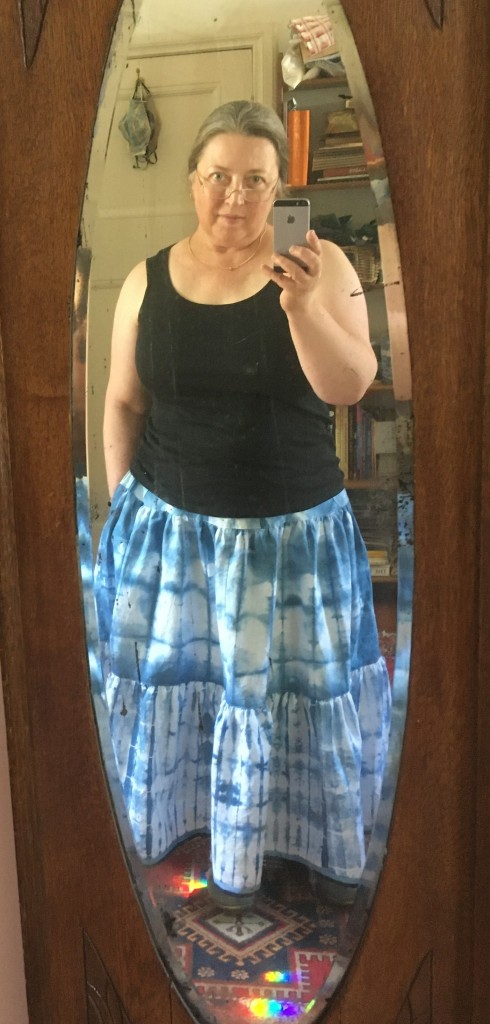
Here is the full thing, front and back
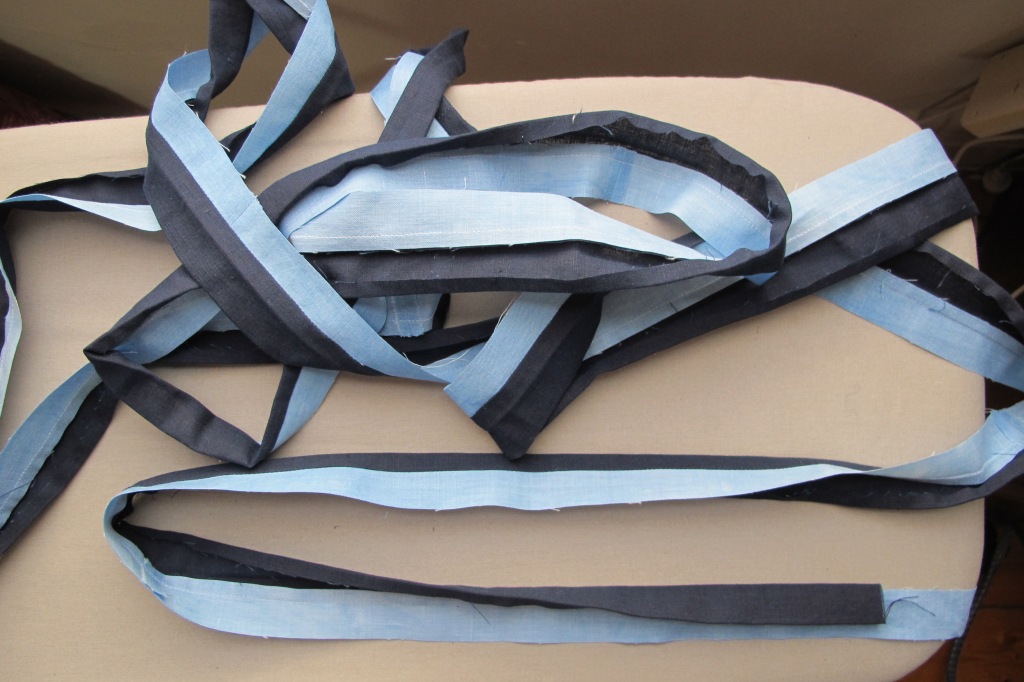
I’m delighted with the hem. I didn’t want to sacrifice any length, so I needed to bind it. Neither the pale blue or dark navy cloth sparked joy on their own for this purpose, but both together felt like a sweet solution, a subtly fussy detail. It took quite a few hours to achieve though. I used patchwork style rotary cutting for accuracy of the strips and fully assembled the border, sewn and pressed before attaching it to the skirt. Worth the effort I think.
A couple of shots of it on me, one demonstrating the pockets of course. My mirror is the wrong shape for taking pictures of full skirts, but full swishy skirts make me happy. I was worried this one might feel too silly, but happily I like it.
18mths ago there was a conversation or two with my friend Alan about me maybe making a shirt for him. “A nice linen shirt” was what he said he wanted. Some time earlier he had sent me home with some surplus fabric including a really nice piece of tiny checked linen in navy and white. This wasn’t enough for a whole shirt, but if I made the back from something else? Well I had an idea. You see, Alan has a strong fondness for mermaids and I’ve been having fun making stitched shibori pictures. So back in April, nearly a year after the above conversation, I made a mermaid for him.
First draw your mermaid. I wanted a vertical design and a cheerful elegant mermaid. I couldn’t find exactly what I wanted but I found a scary mermaid in a good pose and softened her
Then transfer the design to some nice linen with soluble pen and stitch the lines.
Then draw up all the strings tightly and knot them off. Doing that in pairs is much easier.
Then pop her in a dye bath and after rinsing, pull all the threads out (that takes longer than you might think!) to reveal your creation. This picture is slightly amended. All the lines came out pretty well except the one outlining her bosoms. That didn’t work at all. Bother. So I carefully painted that in with white fabric paint.
Then for his birthday I made a completely different shirt out of a fun elephant tablecloth. This was my cunning plan to get sizing information for the mermaid project.
Then we got popped back into lockdown. I went ahead and made up the mermaid shirt. Nice neat checked linen for most of it. Looking at the buttonhole distortion, maybe i should sew my shirt buttons on with stalks, hmm.
And a fun mermaid for the back
Yesterday I was finally able to deliver it, hurrah and well received it was.
There is actually a second mermaid shirt under construction. The stitched resist works better on two layers of cloth, but my design was not symmetrical so I did the whole thing on two layers of linen. So there was a second mermaid to do something with.
These went to their recipient last night so I can finally post about them. A friend wanted a lap rug and she likes both blue and the ink blot randomness of shibori . A different friend had given me some creamy cot sized blanket pieces after a stash clearing. I like dyeing things. Put all of that together and I had a plan.
Two blanket pieces, each pleated up and tied. One horizontal, one diagonal.
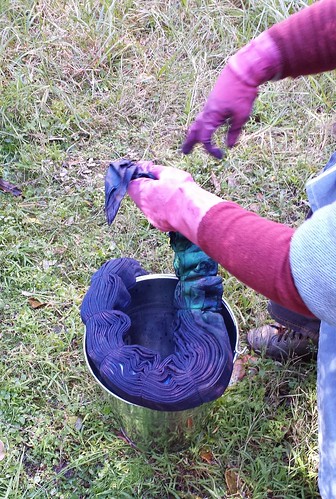
Dip them in a blue dye bath and enjoy the resulting patterns. Only pretend indigo this time. Earth palette wool dye in navy. Much easier than indigo and I had it in the house.
Protect the non selvage edges with blanket stitch and pop on a label
and call them done!
Then wait impatiently for 6 weeks or so until birthday and gifting have happened so posting can too.
“How much shibori can one woman wear” I said once to a friend. The answer it seems is “quite a lot”. I found this book in december and pounced apon it as a Chrissie present to self. It’s brilliant.
I combined my first experiment inspired by the book with a dissatifaction with the dingy yellow of my Jethro Jumper.
Natural dye from my own crabapple tree. That’s nice, but I was forever having to spot clean it. I’ve also been wearing more and more black. So I had a bit of fun.
I did some spot smocking on sleeves and hem
Here is the whole thing ready to be washed, then dyed.
and here are the patterns that resulted. Earth Palette wool dye again.
I’m really pleased with the outcome.
It’s even significantly more flattering than the original
This little T top used up the last piece from my first indigo dyeing session. Oh! no it doesn’t, oops. There is another small piece I haven’t cut into yet. That actual last one is in my “probably for patchwork” pile. Well, this uses the last of the ramie voile pieces anyway, augmented by a couple of strips left over from the little kimono jacket I made earlier, and which I don’t seem to have written up here?
Just a little project. One of five with fabric prepped and fairly firm intentions. One more turned into a garment and not just bits of fabric cluttering up the place.
Front
and back, which I now see isn’t hanging evenly.
a detail shot. The darker strips increase interest, make up the desired length and increase the decency factor.
and on. Not shapely but it will be very cool to wear. Yet again I’ve finished a garment when the weather is not appropriate for wearing it.
Quite some years ago I saw a child’s dress in Glasgow’s Kelvingrove museum. Custom batik decoration, indigo dyed, and with an intriguing but simple cut. An Arts and Crafts movement piece. I was very taken with it and it stuck in my head.
Then about 14 months ago I prepared a length of silk with custom stitched resist pattern, intending to make a dress inspired by this. See Indigo stitch resist experiment.
A month ago I realised I had a delightful excuse for a new semi formal day dress in the form of Christmas lunch. So I decided to make this up. I laid the fabric out and was about to cut but felt fuzzy headed and left it until a little later. This turned out to be a very good thing because during the pause I remembered that I wanted to embroider the leaves, which had not worked as well as the stem of the design, and that is much easier to do with the fabric uncut.
I worked the embroidery over the next week or so. The neckline and one sleeve edge is done in stem stitch with one thread of Madeira stranded silk. The other sleeve and the front hem are done more simply with just a running stitch. The fascinating background fractalish pattern is I think because I washed but didn’t fully scour the fabric before dyeing.
That done, I finally did the very minimal cutting out and assembly. There is a little machining for the main seams but I did most of the stitching by hand. Partly in keeping with the rather labour intensive custom decoration but also to make the non pattern stitching less visible and let the silk sit well.
Here is the finished thing. By no means a close copy but very much inspired by. Amongst other things, mine is less full (limited by fabric width) and has added pockets. Sleeve edge to sleeve edge is selvage to selvage.
A detail shot of the finished neckline:
and on:
I’m pretty pleased with this I think. It’s loose and very comfy. A great dinner dress. A bit matronly perhaps? I was going to add ties to pull it in but it really didn’t want them, unlike my first go at a dress with this cut. I think that might have something to do with the level of the waist cut. I must do a proper comparison of the two. I’m feeling I might make another of the same cut with a fuller skirt and with the front waistline cut angled downwards to allow for the bust lift.
Yes, I’m dressing like a Victorian child again. I noticed some time ago that clothes popular with middle aged women have a certain intersection with designs used for children. There are good practical reasons for this but it does amuse me.
A bunch of years ago, I brought home a pure cashmere cardigan in palest pink that I had found in a charity shop. I loved it. So, so soft, and it has pockets! It had drifted into too small territory so I stopped wearing it. I pulled it out in a recent wardrobe cull and found it was peppered with moth holes. No! The cupboard got a good clean and some moth papers. The cardigan got a wash and about half a day’s work.
I darned 11 small holes or weak spots and patched two larger holes. I might not have bothered, but… pure cashmere! and…. pockets!
Aside from the moth holes, it was a bit yellowed in places. Too subtle to catch well in photos, but enough to make it dingy.
So I applied beads and elastic bands:
and popped it in a yellow dye bath. Here are close ups of the most obvious mended section before and after dyeing. The mending was much more invisible before. The different materials took up the dye at different rates. Boo.
Still, the overall effect is nice I think. I’d so wear it if it was a bit larger. So I need to find it a home. Egg yolk yellow, decorated with fried egg donuts. Or possibly inverse cheezels.
After dyeing other peoples handspun yarn blue, I had a bit of prepared dye left. It’s a kind of dye I’d not used before and I found unusual, though it did work well. The brand is “Earth Palette”. For their wool dye, you mix up 100g powder with 600ml hot water. It turns out more care is needed in that step than I used because there were some unmixed lumps at the bottom of the pot, that didn’t want to redissolve. You get a thickish liquid, which is not supposed to be further diluted but allowed to cool, then added to either dry or barely damp wool by pouring or dipping and squeezing etc. Then you wrap and leave it for 24 hours!! Oo that waiting part was frustrating!
While being frustrated that I couldn’t rinse the yarn yet, I cut a skivvy top from the last of some off white double jersey. There wasn’t a lot of dye left, so I pleated and tied the pieces for a shibori effect.
I dipped each side of the dry bundles into the dye. There was barely enough. I resorted to a bit of dilution to get the collar done, which worked and says dilution is at least some kind of feasible. There certainly wasn’t enough to soak the fabric. Never mind, I got some good bold stripes this way.
Here are the bundles before untying the strings, and partially untied. A friend said the right hand picture looked like blue cabbage to her. I was amused. Both pics are underwater. I wasn’t doing well at slowing down to take pictures, partly because I was working in gloves while the dye was being handled.
Very little colour was released on rinsing.
After the pieces were dry, I felt they were too stark. Too pale where they were not blue. So I grunged them up with food colour. This also helped to deepen the blue and dull the green content.
Sewn up, I couldn’t get it over my head! Turns out I’d stupidly cut the neck band/collar lengthways instead of widthways. So I spent some tedious time unpicking it. Because I had no more dyed fabric, I cut it in three, and re-seamed so that the stretch ran the right way. It puts two extra seams into the neck, which is sad, but salvages the project, of which I am glad.
And all done. I might well buy this dye again later for more experiments.
I’ve made up one of the planned garment pieces from the indigo dyeing day.
Two lengths of cotton/linen blend fabric, twice the length of the fabric width, seamed to make a huge square. Fold in half and manipulate into rough “sunray” pleats. This bit was harder than I expected but I managed it.
Tie off tightly at intervals with string you might like to have turn blue for later use. The wider bulgy bit was deliberate, to provide a darker circle for the hem.
Wet it, pop into the dye batch for a while, then pull out, untie and hang to develop and dry. Then wash, rinse etc until it stops shedding colour.
Some months later, I’ve made a dress from it. Cut as big a circle as I could, cut the bodice etc from the corners. Cut a smaller circle from the centre of the big circle to match the bodice waist measurement.
My bodice has side bust darts, and I’ve used my trick of attaching ties from what would be the under bust dart position. This forms a casual and adjustable tuck when tied. In this case I’ve used buttons and hand sewn loops to attach them. I’m not fond of battling long ties in my laundry.
A close up of the waist tie attachment:
The bodice slit closure, featuring some rather manky machining that turned out to be caused by a bad needle. I changed that and the rest was much neater. See the edge stitching is much better.
The loops and buttons are sewn with the perle cotton used to tie the cloth for dyeing. Lovely matching blue string.