Quatrefoil Gown

I have a good friend for whom the quatrefoil is significant. This is a four petaled flower thing used in heraldry. Something over a year ago I got excited with the idea that I could make quatrefoils with shibori. Just do a standard square type fold and clamp it near one corner. But what to make and therefore what fabric to dye? Well, I have the coat pattern I made for her back in 2015 and she lives in Tasmania which is is on the cold side. So maybe a dressing gown? I’d had the thought for a while that such a thing might be nice done in cotton flannelette, which is also easily dyeable. Voila I had a plan. I managed to source some white flannelette, whew.

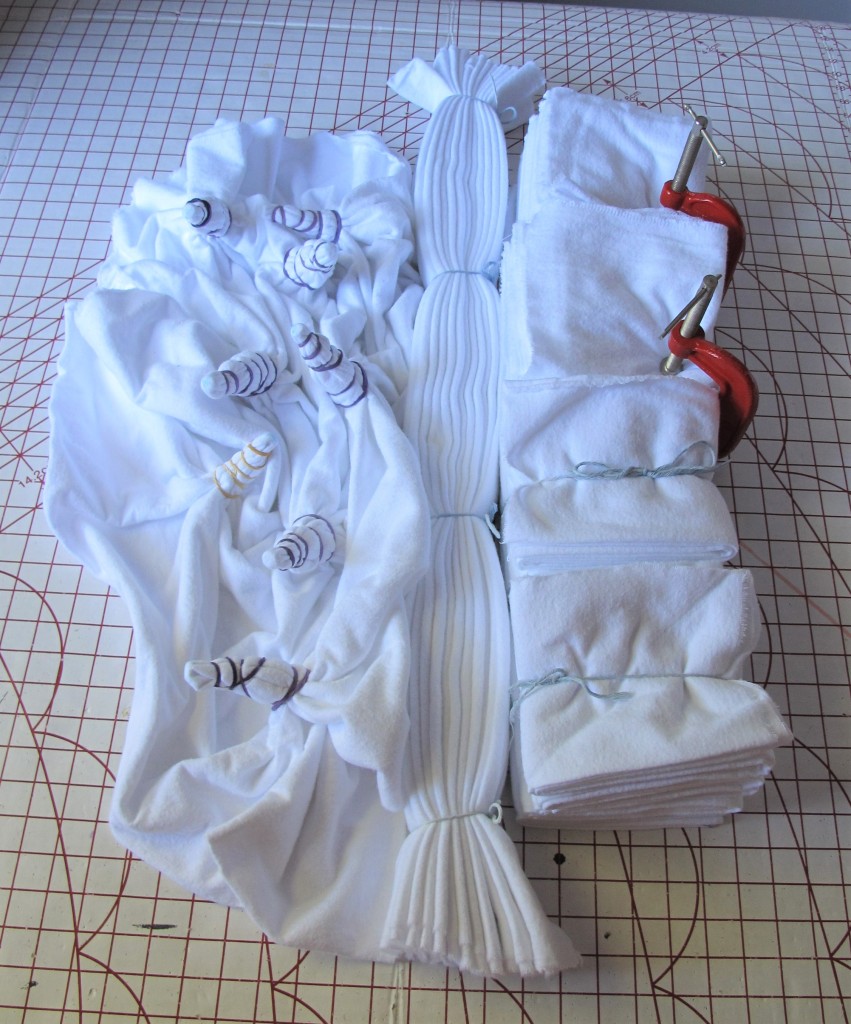
The small flaw in this plan was that flannelette is bulky, and I only had two appropriate clamps, so I could only do two quatrefoil panels, bother. Never mind, these became the gown fronts. I did another two with similar square folding but just tied which became the back panels. One was done pleated which i used for collar and facings. The last piece was done wrapped around long screws which gives a pretty effect that makes me think of dandelion clocks. This I used for sleeves and pockets.

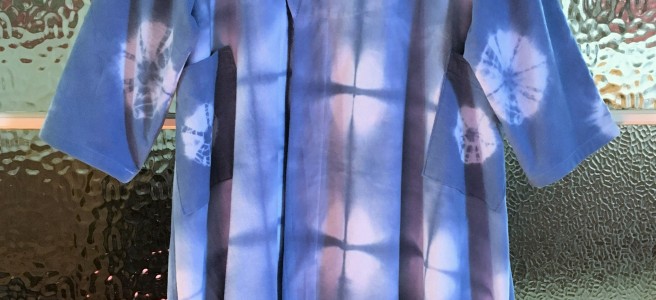
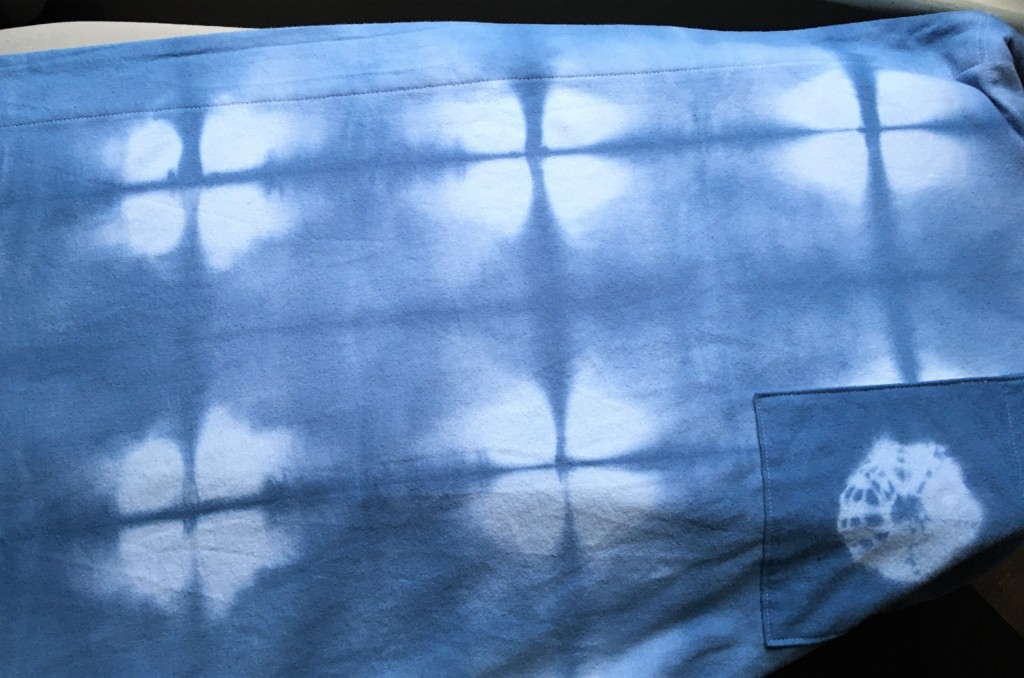
The best quatrefoil effects I managed, photobombed by a pocket:

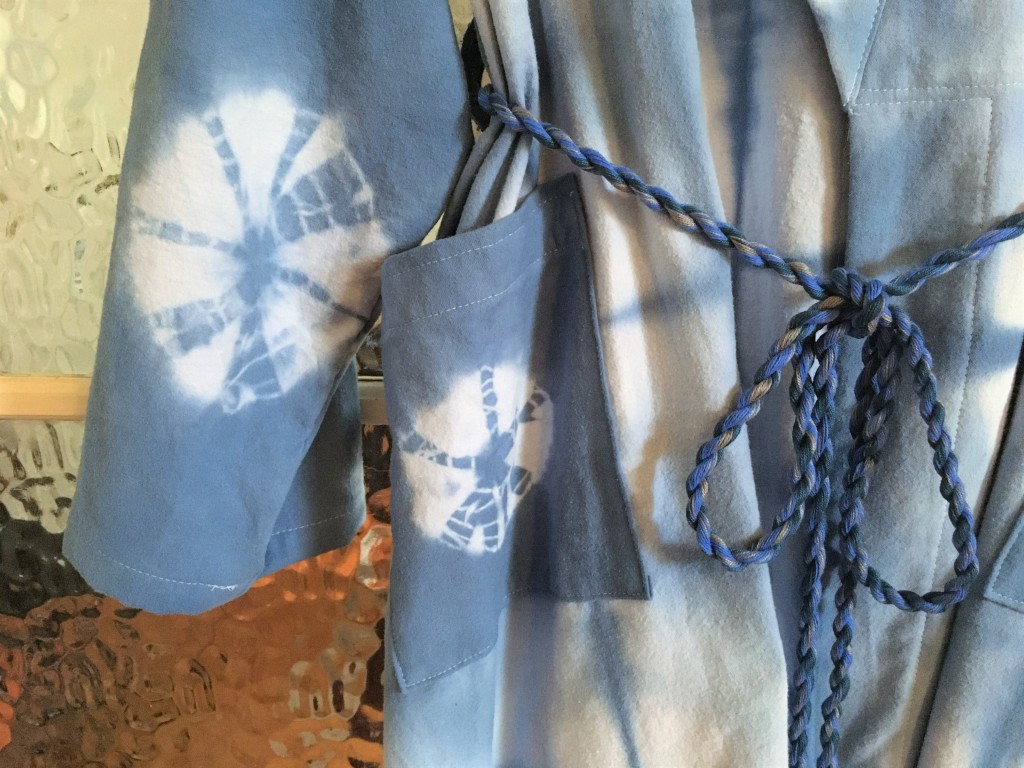
A dandelion clock sleeve:

It has deep facings front and back to increase warmth
Pocket and belt shot. The belt is made of three colours to come the closest I could to the blue of the dye, if you squint and let the colours blend. I had enough fabric to make a self belt but given how flannelette sticks to itself, I thought that was a bad idea.

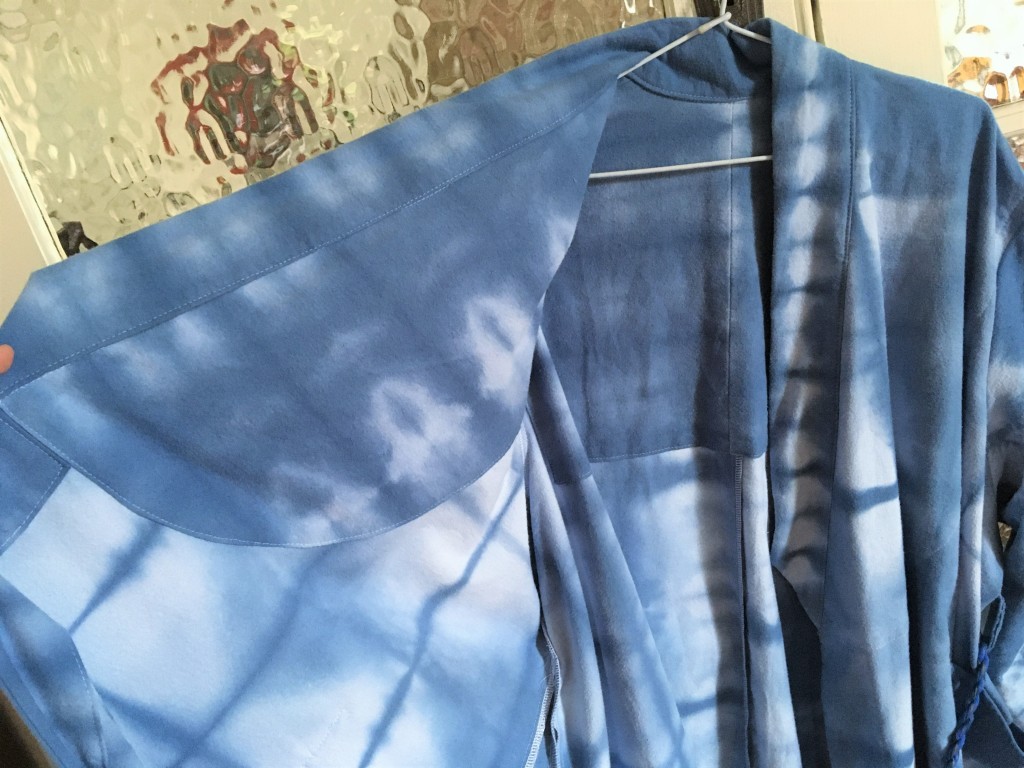
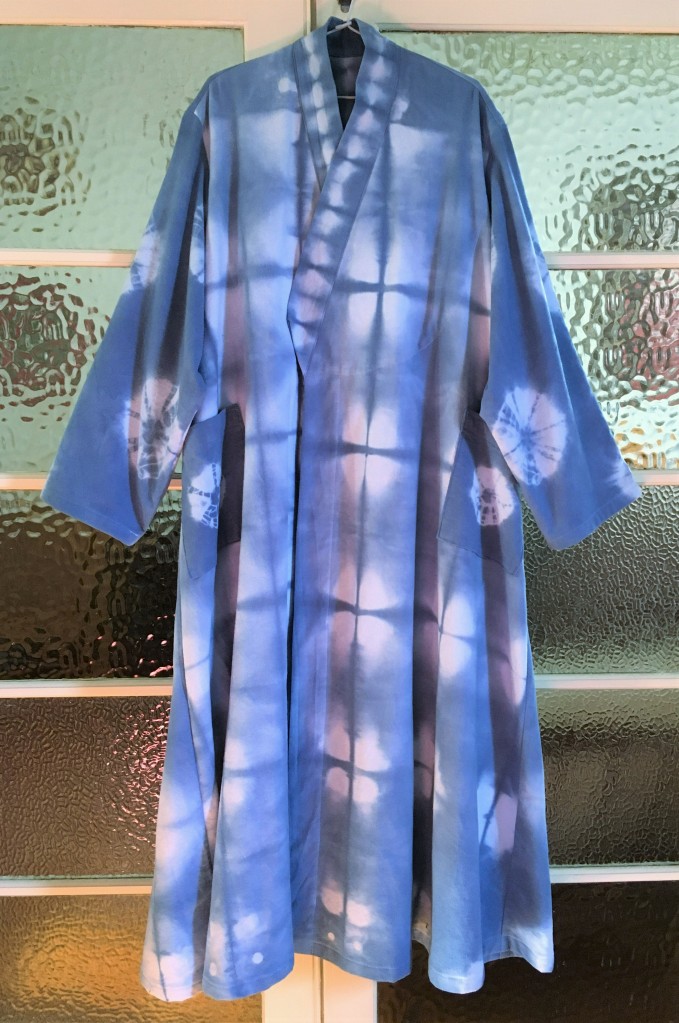
Here is the whole thing from the front. It’s a fusion garment. A-line body, western cut sleeves and armscye, kimonoesque collar for good chest coverage and I confess, ease of construction.

and from the back

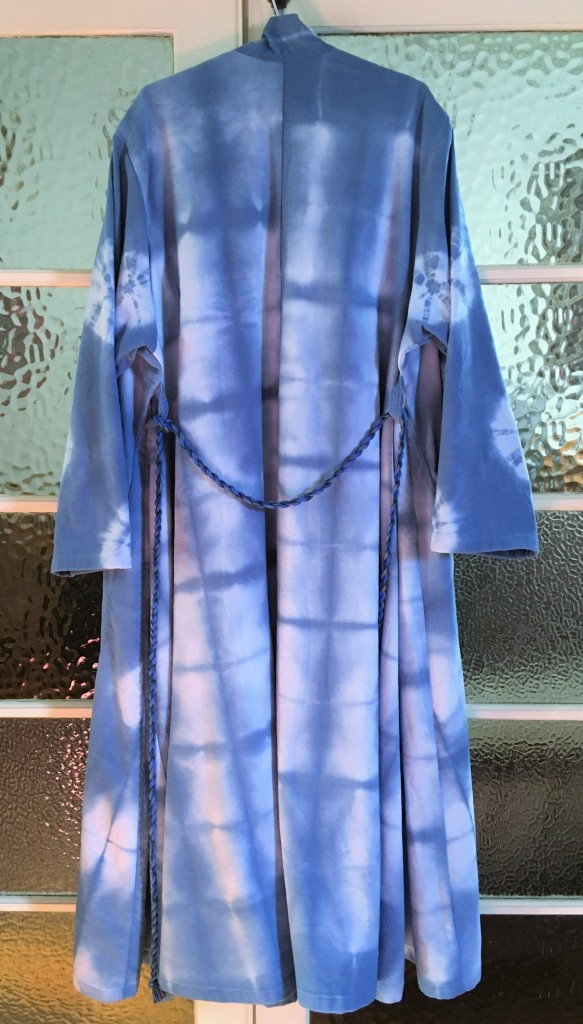
I really like it. It is one of those gift makes that I would be very happy to keep! I didn’t though, I was good and posted it off to her as was intended.

Customised Merch

I don’t normally buy merchandise but I’m a fan of Laura Kampf and her YouTube channel. I’d wanted a “Let Glue Dry” shirt for ages. Not only would buying it support her, it is nicely subtle merch plus I regularly need that reminder for my own woodwork. Sadly when I decided to order, I found that all the clothing was only available in straight cut styles. I’m curvy and pear shaped. Straight cut so doesn’t fit me! However, I’ve several times successfully altered large sized straight cut shirts to fit me better. I need a big size to get the width in the body. The only garment left in XXL was the logo hoodie. Never mind, I like the logo too.

Eventually it arrived. Hurrah! Here it is straight out of the post bag, wrinkled and of course the wrong shape for me.

I tried it on and found these problems that needed remedy, most expected:
-Too long in both body and sleeves
-Too narrow in the hips
-Too wide in the shoulder
-I dislike the central pocket and besides, it’s too low
-I can’t stand the hood. Feels like it’s strangling me and conflicts with my default hairstyle of a single bulky plait.

This is ok. I can deal with all these. So, unpick the pocket, cut it off carefully where it joins the ribbing and slice it in half:

Chop a lump off the bottom:

Cut the sleeve off and take a slice to move the armhole inwards. This makes the armhole too deep but I need the width for bust circumference so I’ll put a piece in.

Unpick the side seams to the waist, try it on to see how much infill is needed:

Then chop the hood off, leaving enough for a collar. The rest of the hood provides fabric for the infill pieces:

Then to sew it all back together. I started with the collar. I wanted to keep the eyelets, and the cord with it’s aglets for interest. The hood was lined, so I had the two layers to form a new cord channel. So I folded the collar edges inwards and sewed them together. Then ran another line of stitching to make the channel.

Then I sewed the pockets back on near the sides, attached the infill pieces, redid the side seam and set in the sleeves. Later on I top stitched all those seams with a twin needle to imitate the original finish but I forgot to get a picture of that. I also top stitched the shoulder seams with woven tape underneath to support them and help the the garment keep it’s shape.

Then it was time to deal with the hem. I didn’t have enough ribbing to do a full width hem of course, but I could cut the old hem in half lengthwise to give a half width hem finish.

All done! It still looks like a real thing but now it fits me. Hopefully the mark from the original pocket position will go when I wash it. This was near a day’s work plus a bunch of thinking and planning. I say it was worth it.

and right next to it’s old self though possibly not quite the same scale

On me to prove it works. Front and back. It’s very comfy, a bit baggy but that is nice I think.

Paisley Particolour Gown

Um yes, I like dressing gowns. Besides, they are very 2020 Iso Couture.

I bought 2 metres of this gorgeous paisley velveteen a few years ago intending to make a skirt. However it isn’t where my style preferences are at for regular clothes at the moment and I had recently given away my mid weight dressing gown. There wasn’t enough for a whole gown but I had noticed the reddish colour in the print was a good match for the russet velveteen I have lots of. Then, in order that neither half be allowed to dominate and to put a pleasing colour near my face I liked the deeper of these two blue corduroy offcuts. There wasn’t enough of that, so I dyed the paler one to solve that problem.

See, they almost match now:

There was just enough of the paisley to get half the body, one sleeve and one pocket. Hurrah. I cut mirror images of all these in the russet too of course. The heavier corduroy was cut for collar facing and cuffs. The pinwhale gave enough for a belt.

After I’d cut everything and started putting the collar together, the pattern seemed to have some problems. Oh no! I had a version control issue and had cut the wrong one. Eep! Let’s see if I can describe the history in an understandable fashion

A Tale of Two Patterns

Once apon a time, I made a nice dressing gown from polar fleece and kept the pattern. Some years later, I wanted to make another but couldn’t find the pattern. So I took a pattern off the original gown, which didn’t work very well for the collar because the gown was both stretchy and well worn. By the next time I wanted to make a similar gown, I’d found the first pattern, but stupidly kept the second and worse one. I made up gown number three (Lady Macbeth https://montjoyeblog.wordpress.com/2020/04/13/lady-macbeth-gown/) with a bit of further improvement in the collar. Then, when I wanted to cut this gown I could only find one pattern. I felt that maybe I had captured the good points of both and only kept one version? Um, nope. The collar shape had looked odd to me while cutting and turned out to be bad when I started to try to put it together. I searched harder and found the first pattern, and then had to recut and piecen the upper sections of fronts, backs and collar facing. Argh. Currently, both versions are out on the cutting table. I really must condense them down to one and keep only that!

After all that excitement, I managed to get the collar put together. I’m getting better at this game.

I used very minimal added stabilising. There is no interfacing, the corduroy is stiffer than the velveteen already and I want this to be machine washable. I have taped the roll line, shoulder seams and back neck seam. I’ve also run a line of hand stitching to control the edge of the collar. The picture below shows the upper sides of the collar on the left and the underside on the right. You can also see the stitching for the roll line tape, plus a bit of stitching holding down the edge of the facing.

The collar was the hard part, the rest was pretty easy. I’m loving the colours though I know they won’t be everyone’s cup of tea. Oh yes, it’s unlined, again for easier washing and of course it has pocketses.

My only regret with this is having ended up with the paisley on the left. I’d rather cross the fronts with the paisley on top, but I always wear a wrap garment with right side over left. Oh well, I’ll cope. That preference hadn’t occurred to me during cutting.

Lady Macbeth Gown

Gothic Pandemic Couture. Mwahaha.

There has never been a better time to work entirely from stash. Thankfully I have a lot of stash. I wanted a new winter dressing gown. After much thought, I finally came up with a design that met the evolving design criteria. All from stash, all natural fibre, warm colours, comfy, nice against the skin, especially at the neck, not too weighty. Then I realised my design had rather gothic overtones… which made me think of Lady Macbeth, who has a hand washing thing….That Was It. Had to be done.

I cut the gown from barely enough heavy Italian wool knit coating… need I say that I bought it cheaply? Yeh, nah. You know me a bit by now.  I had a piece of luxurious crimson silk rayon velvet to use for the collar, and I wanted to get that more of that red into the gown. I only had 1/4 bottle of red dye, so I dip dyed the cuffs and hem.


IMG_4304-1

It looks quite elegant in the finished garment but I could not help thinking “trailing in wells of blood” (which is a folk song quote really) but was what made me think of Lady Macbeth. “Out, damn’d spot! out, I say!…………..who would have thought the old man to
have had so much blood in him?” No murder done here except perhaps to the height of good taste.

IMG_4360-1

The gown is mostly unstructured, but I did tape the roll line (pictured), the shoulder seams and the back neck seam. There is a lot more handsewing than I initially planned. The knit fabric is bulky and doesn’t press well, so I coarsely hand felled all the shoulder and collar seams. I now wish I’d taped the edge of the collar as well, but too late for that now. The cuffs are hand hemmed but I machined the the bottom hem, I won’t be looking so closely at that and neither will anyone else.

IMG_4321-1

The collar turn backs are casually hand quilted so the velvet becomes one with the knit underlayer. Sort of works like pad stitching. There is no interfacing. I did though put a lot of effort into making sure that the roll worked properly. I must say, it feels glorious.

IMG_4376-1

There are of course pockets. Quite stealth though not a perfect pattern match. That, and the creative shaping are due to having no extra fabric. The label went here because previous attempts at putting them onto velvet caused much swearing.

IMG_4373-1

What to use for the belt? I had nothing but tiny scraps left of either fabric and no more dye. After a couple of other plans, I remembered I had previously dyed some grey wool yarn with the exact same dye for a project that didn’t proceed. Hurrah. Perfect.

IMG_4348-1

The belt loop is a detached buttonhole arrangement in stealthy grey tapestry wool.

IMG_4371-1

Here is the finished gown in a relaxed pose. So comfy.

IMG_4405-1

Here I’m trying to act all Lady Macbeth determined.

IMG_4386-1

and this was my best attempt at a handwashing shot with no one else present to take the picture.

IMG_4395-1

I don’t look forward to washing it and shan’t for a while. Every component is prewashed though, including the velvet and the seam tape. Part of the motivation for the dyeing was in case some of the velvet dye migrates to the wool in the wash.

Embroidered (table)Cloth Robe

Still playing catch up on post content. This one dates back to January.

I had need of a new lightweight dressing gown/ house coat ahead of the arrival of a house guest. I had spent quite some time combing through the fabric stash without coming up with an appealing combination of fabrics. The gown needed the equivalent of about 4 metres of standard dress width fabric. Much of the interesting print or otherwise patterned fabric is in 2 or 3m lengths, hence the need of two fabrics at least, both suitable and coordinating, and not earmarked for other projects. Argh. Patterned fabric helps to maximise modesty while still minimising fabric weight and therefore warmth. Then my eye fell apon these two old table cloths. Instant inspiration!

IMG_8764-1

They are not identical but really very close. Each is from one set of grandparents. Obviously this sort of thing was fashionable. Same background colour, both cotton. Pretty much the same colours in the embroidery, one is more delicate, the other is more bold. These I could work with. Woo Hoo. She was off!

The cutting layout was very much driven by the positioning of pattern elements. I wanted to show the fancy work off as much as possible. Here are the gown pieces cut and roughly laid out, prior to assembly.

IMG_8770-1

The pockets and belt tabs are fussy cut pattern elements. The belt is a twist cord made up from crochet cotton in colours matching the embroidery.

IMG_8772-1IMG_8775-1

I added some wide cotton lace to border the whole thing and help form the collar

IMG_8798-1

The sleeves are cut from the corners of the heavier worked cloth

IMG_8801-1

From the back

IMG_8804-1

and a silly, vaguely boudoir shot. I wanted a whole reclining on the couch kind of vibe but this was the best I could manage as a selfie

IMG_9091-1

Once I’d decided to use these cloths, it went so fast. The whole thing was made in not much more than a day. It turned out so well. I’m delighted. It is lovely to wear and feels so rich. Not bad for a couple of old tablecloths.


Eric the Kimono Robe

Eric the half a bee is now a whole bee and even more recently has taken up his destiny on the back of a robe. All this will make more sense when I write the first half of this post about the shibori and dyeing. I’m writing it backwards ’cause I’m all excited about the finished product:

IMG_9499-1

From the front:

IMG_9502-1

When starting to design things for our last indigo dyeing day, I definitely wanted to have another try at stitched resist. I decided to do a bee after learning that one could do a folded shibori that delivered hexagons, reminiscent of course of honeycomb.  I also watched some youtube videos on stitched shibori and learned that it is often done folded in half. Hence half a bee was the thing. I was thoroughly amused.

My hexagons didn’t come out quite the way I wanted. I’m apparently too good at preparing fabric to resist dye. Part of this is that I think I’ve been too ambitious in the amount of fabric per parcel. So I thought I’d emphasise the hexagons on one of the pockets:

IMG_9484-1

I’m utterly delighted in how well Eric himself came out:

IMG_9495-1

There was a lot of slight redesign in the process of making up the robe. One of these was having made the neck cutout too small, so the first time I tried it on it didn’t sit at all well. After some minor panic late at night and some slow thinking, I figured out that I needed to unpick the neck band, increase the neck opening, extend the neckband and reassemble. Which worked just fine to fix the problem. Whew.

IMG_9514-1

The robe has pockets, belt loops, a hanging loop and a deep facing across the shoulders from shoulder blade to below bust. The latter for warmth, structure, longevity and support of the precious bee design.

Here it is being modeled:

Wizard of many colours

.

Mexican inspired cloth has been in the shops the last few years. I had been interested to get some but was sad that all the garment quality bolts I’d found were poly cotton blends. Then I found this, advertised on the store website as 100% cotton. On special even. Woo hoo I though, I’ll have me some of that. Going in believing it was cotton, I didn’t assess it in person carefully enough. It turns out to be pure plastic. Boo hoo! I’ve made it up anyway into the hooded robe I wanted in the first place. We will see how it wears, and whether I can stand it, natural fibre fan that I am.

.   .

.

Chocolate Velvet Jacket

I’ve been wanting a new evening jacket and a big special birthday party gave me a good excuse to make one. I had a piece of chocolate brown silk velvet in stash that I kept coming back to. It’s sombre but luscious. There was only 2 metres. Not enough for my first design thought that involved a handkerchief type hem. A redesigned version was manageable though. I figured that I needed to work with an existing pattern to get it done in time. So this is my much used shirt pattern, cut short at waist level, with a few pleats for shaping and an eight gore peplum with a high low hem.

.

I’m pretty pleased with it. It comes out with a bit of an early 20thC feel. Here are a couple more views:

. .

The velvet behaved itself better than I expected and consented to be sewn by machine as long as the seam was pile to pile. Any joins that were pile to flat fabric were sewn by hand. The lining is ultra slippery rayon satin. Gorgeous cloth to feel, really frustrating to work with. It wouldn’t stay on the ironing board, on my lap, on the sewing table. It just slithered off! Lovely to wear though now it’s trapped inside the jacket.

.

The buttons are shell again but with a difference. Cowrie shell this time, which have a bit of a leopard print look. They also tie in the white dress I was planning to wear on the night. The button loops are done in a lovely vintage silk twist that a friend found a few years back.

.

Here is a pic of it on. Of course there are a few mistakes and things I might do differently. Never mind, it’s wearable and rather lovely anyway.

.